


Adding Processors and Other Upgrades to a Ford F-150
Our Car Stereo Proving Ground Series, Part 3

What do you get at each step of building a car audio system?
Jeff, Crutchfield's Senior Car Merchandiser, devised a plan: to test the sound of an aftermarket system one component at a time in order to prove how much better it sounds than factory. He wanted to test each configuration for sound quality and loudness, then evaluate the soundstage. We started with the factory system of Jeff’s 2004 Ford F-150, then upgraded to an Alpine receiver and a set of Polk speakers. We ran tests after installing each component to note improvements in the sound.
In Part 3, we'll upgrade the speakers, run 12-gauge wire, and install a processor to act as the brains of the system.
Watch our Part 3 video to see Jeff in action.
Part 3: Making it sound perfect
With a quality receiver, amps, subs, and a new set of speakers in place, it was time to do some serious fine-tuning on Jeff's F-150. Our "to-do list" for Part 3 looked like this:
- upgrading the speakers to high-end components
- upgrading from 16-gauge wire to 12-gauge
- bi-amping the component speakers
- adding a processor to run the show and fine-tune
 Jeff cut a custom-sized piece of plastic to fill the oval factory speaker opening. You can download his template if you'd like to add a 6-3/4" round speaker to your F-150. Jeff cut a custom-sized piece of plastic to fill the oval factory speaker opening. You can download his template if you'd like to add a 6-3/4" round speaker to your F-150. |
Separating the woofer and tweeter with components
Coaxial speakers, with the woofer and tweeter together, sounded pretty good in Jeff's truck. But for the best possible sound, he needed a component system. By separating the woofers and tweeters, Focal component speakers raise the tweeter closer to ear level, where the highs ought to be.
To Jeff, the Focal Utopia component speakers are “the best-sounding pair of speakers I’ve heard for the dollar.” He’s heard a few in his day, so that’s high praise. And he knew they were capable of reproducing the subtle details he wanted to hear. Only trouble is, the Focals feature 6-3/4" round woofers, which had to fit in the F-150’s 5"x7" opening. So Jeff made a template and cut a piece of ABS plastic to fit, then screwed the round speakers to it. He cut little notches on the top and bottom of the opening to accommodate the round speaker. It took a little work, but Jeff had the speakers he wanted.
Higher-quality speaker wire: maximizing signal flow from the amplifiers
Up to this point, Jeff had been using the 16-gauge, factory-installed speaker wire. He upgraded to larger 12-gauge wire in order to send more signal to his speakers. To a car manufacturer, speaker wire is one of thousands of decisions made to hold costs down, whereas aftermarket companies simply make the best wire they can. With larger, better-designed, better-insulated wire going from his amps to his subs, Jeff expected a stronger, cleaner signal to eventually reach his ears.
 Bi-amping effectively doubles the power sent to the front speakers by sending two channels of power to the woofers and the other two to the tweeters. Bi-amping effectively doubles the power sent to the front speakers by sending two channels of power to the woofers and the other two to the tweeters. |
Bi-amping the front speakers
Jeff bypassed the component speakers’ crossover system and bi-amped them — sending two channels of power to the tweeters, and two to the midrange drivers. This effectively doubled the power sent to the speakers, and increased the headroom in Jeff’s system.
A component system’s crossovers contain protection circuitry for the mids and tweeters, which makes bi-amping tricky business if they’re not specifically designed with the extra inputs to accommodate it. Here, Jeff took the crossovers out, but there's a processor strictly controlling the range and intensity of frequencies sent to the tweeters (as shown in the diagram). While some crossovers allow for bi-amping, Jeff cautions that if you bi-amp without a processor, you run a greater risk of damaging your tweeters.
 |
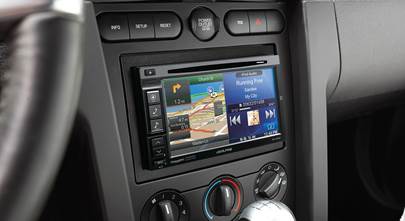
The processor: fine-tuning to perfection
A digital sound processor from Alpine (no longer available) gave Jeff the complete tuning tool he needed to get the great sound he was after. He tuned his system by adjusting the processor’s 31-band EQ for each individual channel, and by applying time correction. He used the remote to address each frequency and meticulously dialed in the levels until the sound curve smoothed out.
But it’s not just about achieving a perfect curve — it’s also about how the system sounds and makes him feel. Jeff can set up his system in different ways, store the settings as presets, and recall them instantly to hear which one suits him best.
Checking the sound curve: without the processor
In the graph below, we’re using the 7-band parametric EQ in the Alpine receiver, plus the Focal crossover network, to tweak the sound. Remember, the RTA is merely a snapshot of what’s going on, so you shouldn’t read too deeply into the individual peaks and valleys here. The overall curve is tracking pretty closely with Jeff’s ideal.
 |
With the processor
A picture is worth a thousand words. As you can see below, the RTA snapshot looks a lot like Jeff’s ideal now. He’s leaving a tiny bit of bass on the table, a compromise because he didn’t want to give up any seating to add extra subs. After all, he wants to save room for passengers so they can hear how great his truck sounds.
 |
The Soundstage
Jeff’s decision to bi-amp the component speakers, combined with the tweaking power and time correction of the Alpine processor, got the soundstage just where he wanted it. Now Jeff can picture the band playing out on the hood, right at ear level. The time correction makes sure the image shifts enough to put him front and center.
The soundstage is the most important thing in the whole system buildup — it’s what Jeff actually hears, how he experiences what he’s worked so hard to create.
“I feel like I’m really listening to music," he said. "All the instruments have their own space.”
 |
What did we learn during this round of testing?
First of all, the Focal Utopia speakers totally rock. They sound incredible, especially the amazing beryllium tweeter. Every snare hit, tambourine, and other high detail comes in crystal-clear.
Bi-amping, while probably overkill for most of us, was a key to Jeff’s plan. It gave him a ton more headroom to work with. Alpine’s digital processor did the rest, letting Jeff “EQ the heck out of it” and giving him pinpoint control over every channel. Bottom line: this system sounds crazy good.
Jeff’s fond of saying that he likes to remove the electronics from the equation — meaning all that’s left is music, as pristine as it was recorded. He definitely accomplished that in his truck.
 |
What’s up next?
In Part 4, we'll address the various vibrations and rattles in Jeff’s truck by installing Dynamat sound damping material. We’ll test incrementally to note any changes in SPL and the sound curve, both while the truck is parked and while driving at different speeds over different surfaces. Normally. you'd install Dynamat while you're doing everything else, but we want to quantify the difference Dynamat can make in a vehicle.
Learn more
Catch up with Part 1 of our test series and read more about our testing methodology.
Part 2 gives you an in-depth look at adding amps, subs, and upgrading the speakers.


Duane E Poorman from Springdale
Posted on 8/25/2018
Thank you for the link to part 4, Dominic DeVito!
Duane E Poorman from Springdale
Posted on 8/24/2018
This is a fantastic series of articles! Did part 4 every get published? I can't find a link to it. Thank you!
Dominic DeVito from Crutchfield
on 8/24/2018
Alexander Hrabe from Crutchfield
Posted on 3/6/2017
Great clarification, Andrew, but he really did bi-amp those speakers. Just like you would do with home speakers, Jeff ran a separate amp channel to each tweeter and each woofer, using all four amp channels for those four door speakers. You have to be careful when doing that because it would be easy to blow most tweeters that way. That's why he also used an outboard processor to keep tight control over which frequencies are sent to the tweeters.
Alexander Hrabe from Crutchfield
Posted on 3/6/2017
Zachary, if you're looking for a budget build-up, you might enjoy this article. Also, to keep the cost down, some people opt out of rear speakers, and only install one subwoofer, or don't add the second amp. A receiver, front speakers, subwoofer, and a 4-channel amp can add up to a great stereo system!
Zachary Wayne Adams from Vero Beach
Posted on 3/3/2017
Why don't yall do this as a budget build? As in a new sub, speakers, amp and stereo for under $1k
Andrew from Santa Rosa
Posted on 2/28/2017
Bi-amping is when you send 2 channels of amplifier power to 1 speaker, generally a floorstanding speaker that is designed with 2 sets of binding posts. I think the author meant bridging 2 channels of power to 1 speaker. The only problem with that is you only had a 4 channel amp to begin with and 4 speakers to power. So all he could have done was run 1 channel of power to each speaker and run them active through a processor.