


Installing an amp and speakers in a 2011 Subaru Outback
The author upgrades the power and clarity in his Subaru


I
think the smile tells you how excited I was about this article. You see, after covering several car audio installations in my four years as a writer, I finally get to write about my own.
I got my hands on some awesome Morel Maximo speakers a few months back, but I didn't want to install them until I found the right amp to drive them. As it turns out, we needed an article about an amplifier installation. I realized this would also be the perfect opportunity to share some installation tips with my readers.

Expanding on a new car stereo
I installed my car stereo, the Sony WX-900BT, a while back. It works great for streaming wireless audio while I'm driving via its Bluetooth® connection. Sony's Music Center app (formerly SongPal) offers control and song info right on the screen of my iPhone®.
When I chose the stereo, I also made sure it featured the preamp outputs I would need later on to send audio signal to an amplifier. But I was still using the factory speakers. I let my colleagues listen to a few songs with this setup. It wasn't terrible, but we agreed I could certainly do better.
Installing new speakers in my Outback
Let's take a look at installing the Morel Maximo speakers in the Subaru:

I made a custom bracket for the tweeters, using Crutchfield's universal backstrap. I secured the tweeter housing to the backstrap and then bent and cut it to the size needed for mounting. I then screwed it into the factory locations in the dash. I used a Pro.Fit Wire Worm to fish the tweeter wire down into the dash cavity where the crossovers would be mounted.

How'd we know where to start? We use Crutchfield's MasterSheet instructions too. Beginning at the front door sail panel, my bud and Crutchfield Graphic Designer, Travis, removed the front door panels in stages to get at the factory speakers.

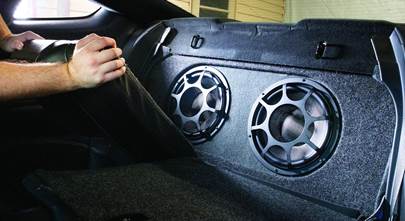
Travis used Bojo panel tools to pop off the panels, and detached the electronic plugs and door latch cables. He then unscrewed the factory speakers. Wow! Look at the size of the magnet on the Morel Maximo woofer compared to the puny stock speaker. Definitely a lot more muscle. Travis attached the new woofer to the bracket and wiring harness that Crutchfield supplies for my Subaru and then screwed it into the factory location.

I worked on the rear door speakers. Some drilling was required to install these speakers. That's often the case in many vehicles. After removing the door panels, I marked the screw holes for the new speakers on the outside of the factory opening. Next, I punched pilot dents in the metal to guide the bit and carefully drilled new holes.
The contour of the door created a gap between the speaker and the metal. So, I decided to mount a pair of XTC foam baffles behind the speakers to seal that gap and also protect the speakers from moisture. I cut out a hole on the bottom of the foam cup, so I wouldn't lose bass response due to restricted air flow.

Ok Travis, calm down! We're not done yet.
[Find the speaker fit information for your vehicle by using our OutfitMyCar tool.]
We move to the amplifier installation
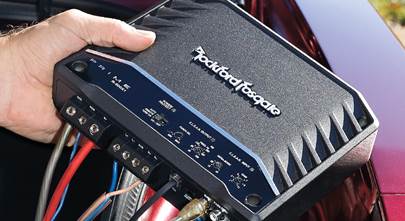
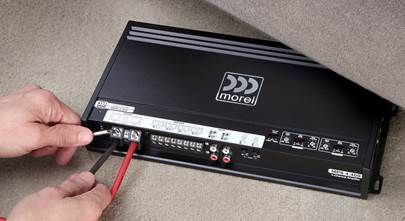
With the speakers in place, it was time to install the Morel MPS 4.400 4-channel amp. Our plan was to connect the amp's speaker outputs to the factory speaker wiring just behind the radio.
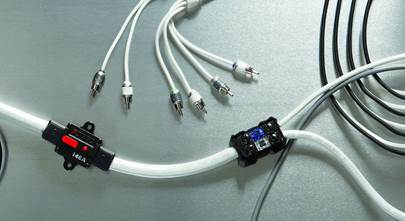
We also mounted the crossovers for the component speakers behind the stereo as well, so we didn't have to deal with running wire through difficult door grommets.
Planning ahead in terms of routing cables and placement of the audio components really helped in the long run.

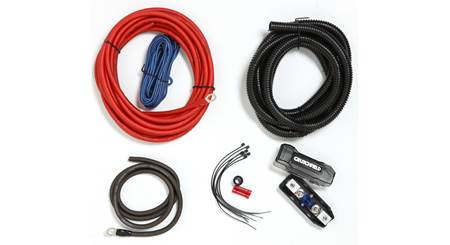
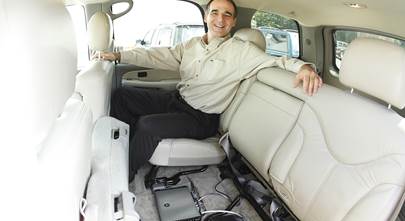
The amp was going under the front passenger's seat to stay out of the way. I ran the power cable from the Crutchfield 8-gauge amp wiring kit from the Subaru's battery through a slit I cut in an easy-to-access rubber grommet in the firewall. A little WD-40™ on the cable jacket allowed me to slide it into the vehicle's interior.
Once I spotted the power cable under the dash, I ran it under the trim on the right side of the vehicle. The bolt on the seat's rail made for a great ground near the amp. I made sure the bolt wasn't coated or painted, so there was a good wire-to-metal contact.

With the power, ground, RCA, and speaker wires in place, Travis began making connections at the amplifier. We used the EFX 9-wire bundle between the amp and radio location. It covered all speaker connections, as well as the remote turn-on lead wire. The amp's connections and controls are all on the same side for a simpler installation and clean look.
[Looking for more information on installing an amp? Check out our amplifier installation guide.]
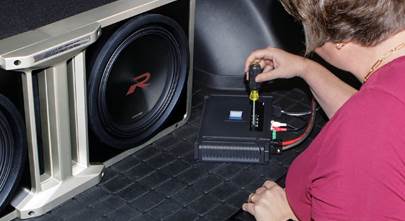
Sound check, reassembly, and audio bliss
With everything in place, we connected the battery for a sound check. I cranked up the same songs the crew had heard hours before. The music drew positive reactions right away. We all agreed there was a massive difference in depth and detail of the sound. I'd relay some other quotes I heard when we started jamming, but they're probably not fit for a family article.
Rest assured, I was happy. We buttoned up all the panels, electrical connections, and door latch cables, and I was ready for some private jamming on the road. Thank you, Crutchfield!

If you need more info about picking the right system for your vehicle, you can call, email, or chat with one of our knowledgeable Advisors. They'll be happy to help you pick the right solution for your car.


Sourabh from Metuchen
Posted on 12/6/2023
My factory HK amp on my 2011 Subaru Outback has water damage and there is only sound coming out of one speaker in the front windshield area. I am trying to figure out if it can be replaced with another aftermarket amp or if I need to purchase a replacement Subaru amp.
Jason Gaudry from Hinesville
Posted on 6/5/2018
I recently purchased a JVC DD head unit, all new door speakers (6 1/2 2-way), dash tweeters(not installed yet) and a powered 8'' sub. The biggest hurdle was retaining the steering wheel controls(still needed work with purchased kit) and utilizing the factory back up camera. I saw notes somewhere when I was shopping for my gear about only low frequencies being sent to the door speakers. I believe I am having this issue. As far as I know, the factory HK amp is still active- which I am assuming is the problem. What is the solution to my problem? Can the factory HK amp be reworked-wired to put out the mid and high range I need in my doors? Is the amp easily bi-passed? I'm at a loss right now and need some good direction. All of this was bought from Crutchfield and I installed everything myself except the the head unit, which was about $350 to install with a new SIRIUS XM tuner. My car is a 2014 Outback with HK and no NAV. Thanks!
Alexander Hrabe from Crutchfield
on 6/7/2018
Alexander Hrabe from Crutchfield
Posted on 9/18/2017
Jessie, thanks for your interest! You can find other installations in our Custom Car Showroom. If you have questions about adding gear to a similar Outback, give one of our Advisors a call.
Jessie Gomez from Muscatine
Posted on 9/14/2017
Would to see more pictures of the build