


1995-1999 Chevrolet and GMC pickups (Standard, Crew, and Extended cabs)
How to upgrade the stereo system in your Chevy or GMC pickup


In brief: This Crutchfield Research Garage article gives you an overview of your truck's stock stereo system and your aftermarket upgrade options. We'll tell you all about:
- The factory stereo system
- Removing the factory radio
- Removing the factory speakers
- Adding more bass
- Other options for your truck
Then, use our vehicle selector to find the gear that will fit your pickup.
Overview of the Chevy and GMC C/K pickups
These are some seriously cool old trucks, and if you're still using yours for work or play, good on ya. GM's C- and K-Series pickups are classic American machines; tougher than shoe leather, easy to work on, and, at this point, practically brimming with character. Installing a new stereo and speakers in your truck will make your hard-working pickup even more enjoyable to own.

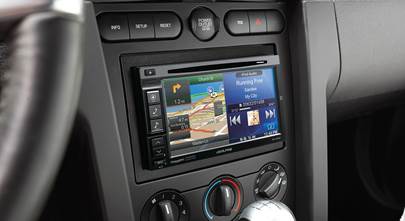
The appearance of the radios can vary in these trucks, but the sizing is consistent throughout (Crutchfield Research Photo)
The factory stereo system
The standard stereos were pretty basic to begin with, and now they're old. Replacing them is pretty basic, too, but you will need to unbolt or cut out the factory radio's rear support bracket to make room for a new double-DIN (4" tall) receiver. A single-DIN (2" tall) involves less work. Both will require dash kits and wiring harnesses, which are included at a deep discount when you buy from us.
If your truck has a separate CD or cassette player below the climate controls, removing the factory radio will render that unit inoperable. If you don't want to look at a redundant, non-functional relic (And why would you?), remove the old deck and replace it with a factory pocket that's available from a dealership or various online sources.

Here's a look at the single-DIN (2" tall) radio kit. A double-DIN (4" tall) is also available. (Crutchfield Research Photo)
Removing the factory radio
Before you start removing the radio, there are a few little housekeeping tasks that need to be dealt with. First, check to see if there's a cassette or CD in the deck, because hey, not everything is online, you know, and you might want to hear those songs again. Next, set the parking brake and disconnect the negative battery cable to prevent any electrical short.
The biggest challenge in this process is the dash trim panel, because it's the biggest piece in the process. Removing it isn't hard, but it's a big piece of plastic and you need to be careful with it.
Starting at the top, carefully pull outward around the edges of the panel to release the retaining clips. Pull it away from dash – just enough to disconnect the headlight switch harness (and any others, if they're there).
If your truck has a column shifter, you'll need to move the gear shift to its lowest position before pulling the top of the dash trim panel out from under instrument cluster cowl. Next, lift the panel off the steering column and remove it. It's a good idea to have an old blanket or something soft like that to store the panel on while you're working.
To remove the radio itself, just press down on the tabs on either side of the radio. Pull it out, disconnect it, and remove it. You won't need DIN tools for this, just a flat-blade screwdriver.
To install your new receiver, secure it to the mounting bracket, following the instructions that come with the bracket, then make the wiring connections following the instructions included with the wiring harness adapter. Slide the entire assembly into the cavity until it snaps into place.
When you're reinstalling the dash panel, the lower edge of the panel must be snapped into place first. Once that's done, you can snap the top part into place,
Tools needed: flat-blade screwdriver
Detailed stereo and speaker removal instructions

Antenna replacement
Your truck's antenna has no doubt led a very hard life. If it's still working, you don't have to replace it when you install a new receiver, but this is as good a time as any to do the job. The process is pretty simple, and it's all explained in your MasterSheet.
Tools needed: small flat-blade screwdriver, needle-nose pliers, string
Read our Car Stereo Buying Guide for shopping tips and advice.
Shop for car stereos that fit your Chevrolet C Series
Steering wheel audio controls
In most cases, it's reasonably easy to retain your truck's steering wheel audio controls when you install a new stereo. When you enter your vehicle information, our database will choose the adapter you need to make your factory steering wheel controls work with a compatible aftermarket receiver.

Upper-level trucks have woofers and tweeters in the doors. The tweeter is at the front of the armrest. (Crutchfield Research Photo)
Removing your truck's factory speakers
Depending on the cab design, these trucks have speakers in the front doors and the rear pillars. Crew Cab trucks also have speakers in the rear doors.
Front door speakers
The front doors (or only doors, if you have a standard cab) contain woofers in the door panels and tweeters in the front of the armrests.

The stock woofers are 6-1/2" models. You'll need to drill new mounting holes for your new speakers. (Crutchfield Research Photo)
Woofers
The 6-1/2" woofers can be replaced by a wide variety of 5-1/4", 6-1/2", 6-3/4", 7", and even 4" x 6" aftermarket models. In some cases, you'll need to drill new mounting screw holes, which isn't hard, but will require some care and attention on your part. Other than that, speakers are easy to deal with, but there are some differences between power window-equipped trucks and their manual cousins.
You'll start by carefully (we mean it, this stuff is old) removing the door release trim by using a panel tool or small flat blade screwdriver to pry between the trim and the inner cup at the various pry points. Pay attention, stay patient, and you'll be fine. Next, you'll pry off the screw cover and remove two 9/32" screws from the armrest cup. From here, just move up the door a bit and pry off the "sail" panel, starting at the top. The retaining clip is very tight and will probably require substantial force to release. Forewarned is forearmed.
If your truck has power windows, you'll need to remove the switch panel. If you have good ol' roll-up windows, you'll have to use a (clean) shop rag in a "shoeshine" motion to release the "C" clip before you can remove the crank. Complete instructions on both options can be found in the Crutchfield MasterSheet that's included free with your stereo or speaker purchase.
Removing the door panels begins with prying out around the bottom and sides of the door panel to release the retaining clips. These clips are also very, very tight, so it'll take some intelligently applied muscle to remove them.
Once you've won that wrestling match, slide the door panel up and off the window channel. Disconnect the courtesy light harness (if equipped) and remove the panel.
Removing the old speakers is a lot easier. Just pry out the spring tab at the top of the speaker, then fold the speaker down to release the lower tabs and disconnect the harness.
To drill new mounting holes, place the new speaker in the cavity and mark the locations for the new holes. Set the speaker aside and drill the holes with a 1/8" bit. This is a pretty light job for the average DIY-er (or even a beginner), but it's important to carefully survey the area you're drilling into before you start. Work carefully and wear eye protection.
Your speakers might come with mounting screws. Or they might not. Check before you start, and make your hardware store run then, if you need to.
Once you've connected and secured the speaker, use some duct tape to cover the holes around the speakers, because duct tape is wonderful. Test the speakers to see if they're working and, if they are, make sure the locks and windows are also functioning properly, then start putting the doors back together.
Tools needed: Panel tool, small flat-blade screwdriver, 9/32" socket, ratchet and extension, drill and 1/8" bit

Here's a closer look at a tweeter. They're easy to reach and remove. (Crutchfield Research Photo)
Tweeters
The factory tweeters, when present, are located at the front of each armrest. You'll get to them by removing the window lock/switch panels. They pry off pretty easily, starting at the rear edge, and you remove the tweeters by rotating them counter-clockwise. A variety of speakers will fit here, but you'll need to mount them using our universal backstraps (or hot glue or silicone, if you prefer).
Tools needed: Panel tool, small flat-blade screwdriver

The rear door speakers in the C/K Cew Cab are very easy to reach and replace. (Crutchfield Research Photo)
Rear door speakers (Crew Cab)
The Crew Cab's rear door speakers can be replaced by a wide variety of 5-1/4", 6-1/2", or 6-3/4" aftermarket models.
Use your panel tool to pry off the speaker grille, starting at the edge closest to the door hinge. Next, pry out the center pins of the fasteners securing the speaker to the door panel. Grasp the center pins and pull out the fasteners. From here, just remove the speaker, disconnect the harness, and start installing the new speaker.
You'll secure the replacement speaker to the door panel using the fasteners you removed earlier. If the fasteners don't provide a satisfactory mount, you'll need to use screws and speed clips.
Tools needed: Panel tool, small flat-blade screwdriver
Rear pillar speakers
The speaker replacement process varies according to which cab you have, and in the case of the standard cab trucks, the model year. In all cases, though, you'll be dealing with 4" x 6" stock speakers that can be replaced by same-size models or, with the help of mounting brackets, 4" speakers. If your truck doesn't have speakers back here at all, there's no wiring, either, so that'll be a challenge to overcome.

The 1995 speakers are very easy to work with. Just remove the grilles and there they are. (Crutchfield Research Photo)
Standard Cab
If you have a 1995 Chevy or GMC standard cab, replacing the rear speakers is pretty simple. Pry out the top of the speaker grille, fold it downward, and remove it. Next, remove the four 9/32" screws securing the speaker, pull it out, disconnect the harness, install your new speakers, and button it all up. That's it, you're done.
The 1996 and up trucks, on the other hand, are a lot more complicated. Some interior design changes added layers of complexity to the process.
Here's the deal: The top window trim panel and rear side trim panels interlock now, and it's really easy to damage both if you try to force them apart. You'll need to work on each individual trim panel to get them ready for removal, and after that's done, all three components must be removed together.
This isn't as awful as it sounds (mostly), but it's a doable DIY project if you have patience and someone to help you out. Complete, step-by-step instructions can be found in your MasterSheet.
Tools needed ('95): Panel tool, 9/32" socket, ratchet and extension
Tools needed ('96-up): Panel tool, 7/32", 9/32", 9/16" socket, ratchet and extension, Phillps screwdriver, Torx T-47 driver

Things get a little more complicated with 1996 - up trucks. You'll need to remove three panels to get to the speakers. (Crutchfield Research Photo)
Extended Cab/Crew Cab
With extended cab and crew cab trucks, there is no easy option. You're dealing with the same three-piece panel situation, plus doors (or door, in the case of some extended cab trucks). Again, complete, step-by-step instructions can be found in your MasterSheet, but budget at least an hour for this project.
Tools needed: Panel tool, 9/32", socket, ratchet and extension, Phillps screwdriver, Torx T-50 driver
Read our Car Speakers Buying Guide for more information.
Shop for speakers that fit your Chevrolet C Series
Bass in your Chevy or GMC pickup
There's some space for bass in your pickup, but exactly how much depends on the cab style.
Standard cab
There's some room for a component subwoofer box in this truck, but not a whole lot of it. The space available measures 33" W x 17-1/2" H x 6"/3" D. The width measurement goes to 62" if you remove the factory jack, but this is still pretty tight. A compact powered sub might work, though, depending on how your truck is equipped.
Extended cab and Crew cab
Can we interest you in a compact powered subwoofer?

Q-Forms are a great way to add even more sound to your truck. (Crutchfield Research Photo)
Other options for your truck
Here are some other ways to update and improve your Chevy or GMC pickup.
Kick panel pods
If you really want to improve the sound in your C/K truck, install a set of Q-Forms Kick Panel Pods. These unloaded, custom-fit speaker enclosures fit into the space where your kick panels are now. They hold a set of component speakers in an ideal position, angling them to maximize sound quality. They're available in a variety of colors to match your truck's interior, so they'll look as good as they sound. Installation takes some work, but it's not beyond the realm of an experienced DIY-er.
Portable nav
If you don't want to install a big-screen double-DIN receiver in your truck's dash, you can still get the nav you need and more with a portable navigation unit. A portable GPS can be transferred from vehicle to vehicle, or just tucked into a storage compartment when not in use. It's one of our favorite upgrades for older pickups like this one.
Security
Installing a security system in your pickup isn't easy (security systems rarely are), but it's definitely a good idea. Our Crutchfield Advisors can help figure out what you need to get the job done, but we usually recommend taking your car and new gear to a professional installer.
Let's get started!
Ready to shop? Use our vehicle selector to find the gear that will fit your car or truck. If you have questions of your own, give us a shout via phone, chat, or email


James
Posted on 6/19/2023
I have recently purchased a Sony head unit from Crutchfield and am planning on purchasing more items for my 1998 GMC c1500. The Sony head unit I purchased has a 20W x 4 RMS. I wanted to make sure that this head unit will sound better than the factory head unit that comes in my truck. What is the output wattage for the factory head unit of a 1998 GMC c1500? (Same stereo that you have in your pictures in the "factory stereo system" section) Thanks! P.S. LOVING Crutchfield, glad I found this website, y'all do things right here!
Crutchfield Writing Team from Crutchfield
on 6/19/2023
larry from guysville
Posted on 2/11/2022
I'm trying to remove the rear pillar and trim to replace my headliner on a 1997 chevy regular cab. Your instructions refer to "Master sheet" for more detailed instructions. where or how do I find Master sheet?
Jon Paul from Crutchfield
on 2/14/2022
Vicki from Orange City, Fl
Posted on 8/2/2021
As a stereo illiterate wife trying to surprise hubby for Christmas, y'all are exactly what I need to stand a chance of getting what he likes. Thanks, and HUGE kudos for actually having pertinent information without any hassles.
Jon Paul from Crutchfield
on 8/3/2021
Jevin from Marshall
Posted on 3/15/2021
So do the kick panel pods work for a 96 Chevy Silverado regular cab truck. Which speakers would I need that aren't going to break the budget and aren't crap
Jon Paul from Crutchfield
on 3/16/2021
David Hlavinka from Mesa AZ
Posted on 1/10/2021
Jon, thank you for this article, though I was hoping you'd go into more detail about what your shop feels are the best products (4" decks), materials and best practices for upgrading these trucks. (Mine is '98 ext. cab, been featured on LMC Trucks) beyond what is covered in the Mastersheets.
Jon Paul from Crutchfield
on 1/11/2021
James from Lisle
Posted on 6/10/2020
Great article! Very helpful info here.
Jon Paul from Crutchfield
on 6/11/2020