


Video: How to install component speakers
Speaker installation tips from Crutchfield tech support

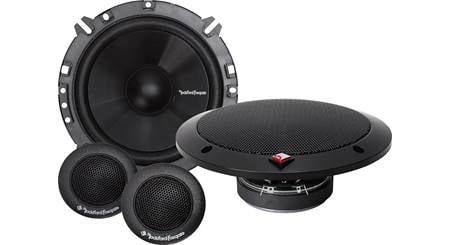
Component speakers, also known as "separates," improve the sound of your music by separating the woofer from the tweeter to help raise the soundstage off the floor in your vehicle. These speaker systems use crossovers to send the right frequencies to the woofer and tweeter, and their installation is more involved than a normal speaker swap.
In this video, one of our Tech Support experts shows you a typical installation so you can see what to expect. And if you get stuck, don't forget, by purchasing your gear from Crutchfield, you get free lifetime tech support, 7 days a week. Experts like Shay will help you get the job done.
For more information about installing component speakers, read our component speaker installation options article.
Read video transcript
Hi, this is Shay with Crutchfield Tech Support. Today I'm going to show you how to install component speakers into a vehicle.
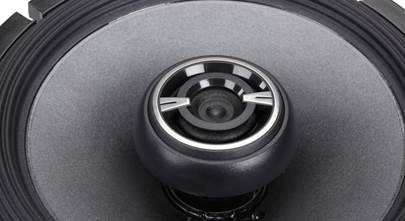
Component speakers are unique in that the tweeter is separate from the woofer, unlike a coaxial speaker where everything is in one. The crossover is separate as well, which I will be showing you how to wire.
The crossover essentially sends the correct frequencies to the correct speaker, and when we mount the tweeter it's custom, as it will be in almost all cases of installing a tweeter.
So the reason why we always say that tweeters are custom is because they're designed to be universal, so not every vehicle has a bracket made for it, and most of the time they don't. There's a lot of different sizes similar to a regular speaker, but they are...the mounting is unique and, we're not going to be able to typically reuse and just pull out the factory tweeter and just stick this one in. We're going to have to build some sort of a mounting mechanism to make it fit into the vehicle.
Installing car speakers
Okay, so step one for this process is removing the door panel. That is a very similar process on all vehicles. There are some differences; it is covered in our Crutchfield MasterSheet. So let's go ahead and get started.
So we're gonna have to pop a couple of screw covers down to access the screws.
Then we're going to be popping off this sail panel here, pop it up like that, and the next part is to...
There's going to be a couple of harnesses that we're going to have to unplug, as well as the cables for your handle assembly and lock, which is unique but similar on all vehicles, and this is the back of our door panel and the door.
Removing the old speaker
The next step in our process here is to remove the door woofer, which in this case is unique in that it has rivets holding it in instead of screws, so I'm going to have to drill those out, but your normal car is going to have screws that you're going to have to remove instead of rivets, so this next step may not pertain to you.
So now that we've got the rivets drilled out, for the most part, we're just going to unplug it, and it's just going to come out like this. And we are now left with our holes which we'll be using, reusing with the new speaker bracket. There will be the remnants of the rivets floating around, which you'll want to try to get out so they don't rattle around in your door.
How to mount the new tweeter
All right, so here's our door panel, and our tweeter is located right here, which comes through right here on the front of the door panel. We're going to need to go ahead and remove that.
All right. And here's our factory tweeter and our aftermarket tweeter, and you can see that they the mounting is completely different. There are several options that come in this kit, neither of which are really going to work.
This is a surface-mount style where the tweeter could go on the front, and essentially this would adhere to some place in your vehicle. This is a flush mount, and then we have our back strap, which is the custom part that we're going to take care of right now where essentially we're going to somehow make a bracket that's going to hold this tweeter in here, and use this back strap to essentially hold it. We're going to cut it and shape it to make it fit in this door panel.
All right, so now we just need to essentially get a general idea of how long we're going to need this bracket to be, so I've got the general idea of the length that we want here. What I want to do is just leave this long hole open so that it gives us a little bit of an adjustability on this to kind of tighten this up.
I generally can tell about where we're gonna where we're gonna need this, so I'm gonna go ahead and cut this the section off that we're gonna use, and now we have a much better idea of what that's going to look like.
So we're going to kind of explore through the different options that we may have for mounting on this. One is the back strap that we were just talking about that we're going to likely be bending into shape on most of the vehicles that we work on. However, there are some other possibilities.
The grille is actually removable on this particular vehicle, so there's a possibility that we could mount the tweeter inside this hole here. Now in this particular case, the mounting is bigger than the hole and the grille, so that will not work in this particular case, but it could in your vehicle. So we're going to go ahead and put this back on.
All right, and then our other option that we could possibly look at would be reusing the factory tweeter mount. So with some tools and maybe a heat gun to loosen some glue if it's needed, the factory tweeter may pop out, and we may have ourselves a built-in bracket already. In this case, the tweeter pops out, and now we're left with a bracket that we could potentially use with the new tweeter, which it looks to be a perfect fit, just about. It's going to require some sort of glue, so this is going to be ultimately the way that we're going to mount this in here, but I do want to show you an example of how we actually make this strap work, since this is the more common scenario that you're going to run into.
Creating a custom bracket
So we're going to need to just make some bends here, and this stuff bends quite easily, so a pair of pliers should do the trick in most cases. Okay, so we have this bracket molded pretty much exactly the way that we need it for this install, and I do need to notch it out a little bit still to account for this right here, and so I'm just going to kind of figure out where that notch needs to be and we're going to go ahead and notch it out.
All right. I think we have a perfect fit there. So now we're just going to take...this is going to primarily pressure fit in here for the most part, but we'll go ahead and use one of the adhesive pads that came in the package, and that just mounts on the back of the tweeter. Now double-sided tape or something to that effect could also work, or if you wanted to use hot glue, that would be another alternative, or some silicone, but since this is going to pressure fit primarily we're just kind of using this to kind of hold it in its spot, not so much to keep it there.
And there is the finished product. Okay, so this was one mounting method that we did, now I'm going to show you another mounting method.
Now had this been your mounting method, you would have just continued on and wired this in, but since we're going to be doing a different method, I'm going to go ahead and pull it and now we're going to find a way to mount this into the factory bracket. So I just want to kind of get a idea of how this fits back on here. Okay.
And then, essentially I'm just going to drop this into the factory bracket, and I'm just going to put some hot glue in here. Now you could use silicone instead of hot glue, it would just take and require more dry time.
All right, you just need to let that dry for a few minutes before we actually proceed with the installation. The glue is now dry on this, so we're going to go ahead and make sure everything fits properly, which it looks like it fits just right. So now our next step would be to wire it.
Connecting the component tweeter
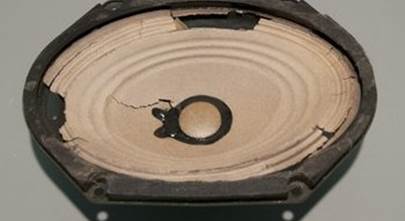
So, now, our wiring is very long, and what we're going to do is we're going to cut the harness and reuse it from the factory tweeter. So I'm going to go ahead and shorten this, but we need to make sure that the inline capacitor remains, as this is what ensures that this (tweeter) doesn't receive any bass, because if it does it will blow very, very quickly, so this is absolutely a necessity to keep in-line with the tweeter. I'm going to go ahead and cut this back and shorten it up.
All right, so we are going to get rid of that.
So this is heat-shrink tubing that we're going to use to seal the wire after I solder it, and will keep out corrosion and things of that nature.
Okay, so putting the heat shrink tubing on first, and then we're going to wire in the capacitor.
Okay, all right, so that concludes how to wire it. Now something else that I will probably do is cover this in Tesa tape to give it more of a factory look. And the wire colors on this, are on this particular vehicle are pretty standard here, but this is not always going to be the case. Essentially we may have to look and find out what color positive and negative are, and they won't always be red and black as it is in this particular vehicle. So in your vehicle we may need to look up wire colors to find out what the actual polarity is as that is important to make sure that the speaker is in correct polarity.
Okay, so now we're ready to go ahead and mount the tweeter back into the door. So it's just going to re-mount exactly like the factory.
All right, just gonna zip-tie the extra length here a little bit. And there we have it.
I want to give a little bit of a tech tip. Depending upon your climate, if you're in a really hot climate you may want to put a little bit of silicone on here along with the hot glue, because the hot glue can melt, or not really melt but soften up, and could fall out over time in a really hot climate, so you can use a combination of silicone as well as hot glue to make your tweeter fit in there securely and last a long time. However, you don't want to use anything like super glue, as it would be a permanent install. You're not going to be able to get that out if you ever need to have a warranty replacement.
Installing a tweeter in the A-pillar
Now I want to talk about an A-pillar install. The folks over at Staunton Wrecking Company were kind enough to donate this for our video today. Essentially we're going to show you kind of generally how we would want to go about installing a tweeter into this a-pillar, and it came out of an '05 Silverado with Bose.
The factory tweeter could be removed, and we could just put in a a tweeter of appropriate size into its spot, or we could potentially reuse this one and just mount it from behind into this just like we saw previously on the on the last one. We would install it very similarly. In this particular case, I'm going to go ahead and file this down a little bit, and we're going to remove the factory assembly altogether.
Let's see how close we are on that.
And that slides right in there very nicely. Then on this particular tweeter style, you could flip it this way, although on this one I think we could have used it on either way and it would have held on just fine, but that would be how we would do that.
I would also highly recommend that you do not paint this, as it will essentially ruin the tweeter because it won't be able to move anymore. You will not be able to reinstall the factory tweeter after filing this, so just kind of keep that in mind. If you go this route as well, you will not be able to put this back in, but that will give you a nice, finished look relatively easily on your a pillar tweeters.
Installing a tweeter in the dash location
Now we have an example of a factory dash location. Depending on your vehicle, you could use metal back strap, reuse a factory bracket, or as you see here, using a hole saw to create a hole in the available bracket for this vehicle.
Installing a tweeter when there are no factory tweeters
Now our last example will be for a vehicle that has no factory installed tweeters or tweeter locations. There are two options here: we can surface or flush mount them. Flush mounting is our recommendation, as it serves a more factory, cleaner look. Flush mounting will require some measuring, cutting for the tweeter, and would generally go into the door as we show here, but it could also go into an a-pillar.
With that said, we can go ahead and go back to the car and reinstall this door panel after we install the speaker.
Installing and connecting the crossovers
Okay, so now that we have the tweeter installed, we now need to get the woofer in here and put the the door back together. Before we do that, we're going to need to talk about some other things along with crossovers. So this is not applicable for our install, because we're using inline crossovers that were part of the tweeter line that we discussed earlier.
But in some cases you're going to have a separate crossover network which might be this size or larger, and we're going to need to find a place to stick this. Essentially we want to put this this crossover network where you're going to get less impact. At this end of the door, it's going to feel a lot less impact. The impact of having it over here could essentially cause the internal components to break off the solder joints on the circuit board, and it's not going to last very long, so we want to keep it on this side of the door panel, and preferably keep everything serviceable so if a mechanic needs to get into your door that they don't have to mess with this to do what they need to do.
So this is a great place for it, and if you look at the back of our door panel here, you kind of have to look and make sure that there's enough room within it to to make sure that this is going to fit. And so we can see that there's enough depth in this area that it will fit just fine in that spot.
So essentially at that point once you were to mount this here there's going to be two lines. This one's going to go to your woofer, one's going to go to your tweeter, and then you have the input, so that would have to be wired up accordingly for your vehicle.
Installing the woofer
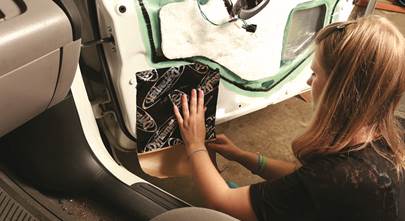
Moving on we can go ahead and start installing the woofer. So because of drilling out the rivets, we have some rather large holes here that would be good to go ahead and cover up so that we get a good seal between the speaker bracket, the speaker, and the door panel. That will help improve bass and whatnot. So bass response is greatly impacted if the sound waves from the back of the speaker are able to interact with the sound waves in the front of the speaker.
So what we're going to do is throw some Dynamat on here, and that will help with that seal and that issue. This stuff is usually very easy to work with, and it's kind of an aluminum, but you can kind of get a general idea of the shape that you need by kind of pushing it into the door. And then what we're going to do is we have that general shape here, and we can just cut it accordingly. The knife will do just fine.
Okay, so now that we have the Dynamat in place, we just need to secure this bracket here, but before we can do that we need to check the fitment of the speaker into the bracket. Now you might notice these little tabs that are sticking out here, and on a lot of speakers they interfere, so when we go to put this in there is some interference that we can see on that, which means that we need to break those tabs off to make this speaker fit. Those are essentially just tabs for smaller speakers, and they just snap off. They were designed this way, so it doesn't take much, just a good pair of pliers.
All right, and now our speaker fits in there just right. Now we can go ahead and move forward with mounting the bracket onto the door here, and this one actually has a notch in it for the speaker wire, so essentially our speaker harness is here. You can kind of see what's going to happen here. We'll just need to position this notch so that that'll be able to go through there, so that is what we're going to do.
And then we're just going to take these screws, and this is on this particular vehicle, this is just plastic, so we don't really need to drill any pilot holes or anything of that nature, they should bite right in and just go right in there. Now some vehicles this will be metal, and you would want to use a self-tapping screw or drill a hole before doing this, but on this one we should be able to just screw it in there.
Okay, all right. So now I'm going to put some of this foam in there which comes in one of our speaker kit install kits, comes with screws and some of this, and what this does is it gives a good seal between the speaker and the bracket, essentially, and it's pretty straightforward to install.
I'm just going to put it around the edge of the speaker there, and there's that. Now we just need to connect up the speaker, which we need to make sure that we support the back of this when we press these on.
All right, and then now...
Another word of caution is to make sure when you're using a screw gun or putting any pressure on this that you try to aim your tip away from the speaker, because if you slip off the screw it'll poke a hole right in the speaker.
And there we go. Should be good to go. So I'm going to go ahead and zip-tie this harness up a little bit.
So what I'm doing here is I'm just going to take a little scrap piece of Dynamat and put it right around where this harness is to try to keep any type of vibrating from possibly occurring with that. I think it'll be just fine, I just want to make sure that we don't have any vibrating there.
Putting it all back together
I already tested it, sound works, so now we're ready to go ahead and put the door panel back on.
We've got the power window switch, we're plugging in the cables for these pieces here I need to go back on for the handle and door locks. All right, so this snaps back in.
I'm plugging the tweeter back in. Tweeter plugging in, and then this lip is just going to sit back into this groove on the top, and then from there it just...
All right, and then we have the two screws left to put back in.
All right, test all the functionalities. All right. Everything is working as intended.
Final evaluation
So we just wrapped up the installation on this component set. As you could see, there was a good deal of customization. Hopefully you got some ideas on what to expect in your vehicle, as it will likely be different than this one. We hope you found it helpful, and have a great day.


John
Posted on 7/1/2023
Great communication skills , to fully understand your objective at what your attempting to do without demeaning people's understanding. good job !
Imre Varga from Sunnyvale
Posted on 8/24/2022
You mentioned the crossover unit but you did not show how to wire it up. This is key in getting the stereo to function correctly ... isn't it ??