


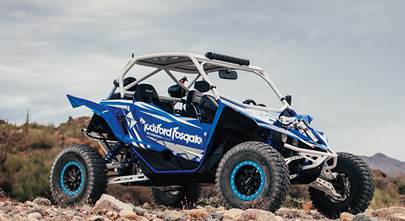
Installing the MTX X3-17-THUNDER8 system in a Can-Am Maverick X3
This 8-speaker package is the ultimate in audio for Can-Am's awesome UTV

In brief: The MTX X3-17-THUNDER8 kit is a truly thunderous 8-speaker kit that's made for the Can-Am Maverick X3. Read on to see what we learned when we installed one.
If you’re looking for the biggest and baddest audio/lighting upgrade available for your 2017-up Can-Am Maverick X3, this is that. The MTX X3-17-THUNDER8 kit is a truly thunderous 8-speaker kit that has everything you need for the best sound around.
This top-of-the-line kit includes:
- the MTX AWMC3 digital media receiver with a custom dash kit
- two 4" MTX X3-17-FS-U dash pod speakers
- two 6-1/2" MTX X3-17-FS-L RGB LED speakers in custom kick panel pods
- two 12" underseat subwoofers
- two MUD65PL RGB LED cage speakers
- a powerful 4-channel amplifier
- a mono amplifier to power the subs
- all the wiring and brackets you'll need for a hassle-free installation
We installed one ourselves, and it’s everything MTX says it is, both in terms of performance and ease of installation. A friend of ours happened to have a Maverick X3, we happened to have a kit in the house, and we also happened to have Crutchfield editor and installation whiz Matt Freeman, who was really looking forward to this project after a long time away from the install bay.
Editor's note: The gear used in this project was graciously provided by MTX. They wanted to give us the chance to get hands-on and hear for ourselves how amazing this kit sounds.
Below, we’ll take a look at the gear itself and add Matt’s observations from the installation process.

Installation overview
You’ll need some basic tools, of course, but the kit comes with everything else needed for the installation. MTX even includes the hole saw you’ll need when you’re installing the kick-panel speakers.
The first step is to remove the Maverick’s seats, dash panels, and fenders. This isn’t that hard (you’re just removing several series of bolts), and once you’re done, you can reach all the spots where you’ll be installing your new gear.

Installing the MTX amps
If you want a powerful system in a UTV, you need a compact, powerful amp that’s built for life on the trail. Or, in this case, two of them. The 4-channel MUD100.4 is a marine-rated Class D amp that pumps out 100 watts RMS per channel, while the subwoofers are powered by the MTX MUD600.1 mono amp, which produces 300 watts of RMS power at 4 ohms.
Matt says: "The amps will be the first components you install. You attach the two amps to the included metal amp board, then, with the help of a couple of included clamps, mount the board on the firewall, just behind the steering column. It’s a tight fit, so I’d recommend doing the initial gain and crossover settings on your workbench before you install these subs."

Installing the kick-panel pods
Each molded and sealed kick panel pod houses a coaxial 6-1/2" RGB LED speaker with a polypropylene woofer and Mylar dome tweeter. The durable finish provides a smooth, subtle factory look, and these speakers won't get in the way if you decide to install an aftermarket cage.
Matt says: "This is the only step that requires major modification to the Maverick. You use the hole saw to cut holes in the kick panel according to a template, which MTX includes. This allows for the wiring to pass through the kick panels, and for the pods to attach to clamps that you place on one of the vertical frame rods."

Installing the dash speakers
Each dash pod houses an outdoor-ready coaxial 4" speaker with a neodymium motor structure that produces clear, powerful sound. The pods mount directly into the upper dash locations, so installation is pretty painless.
Matt says: "The pods attach to the underside of each dash panel using screws. You will need to drill a few pre-marked holes in the dash panels to allow the screws to go through, but that’s not too stressful. The dash panels come with speaker grilles, and the speaker pods are angled to aim the sound right at the driver and passenger. And they really do fit perfectly."

Installing the tower speakers
This top-of-the-line package includes a pair of MTX MUD65PL cage speakers. These compact RGB LED speakers feature 6-1/2" woofers and soft dome tweeters that really crank out the sound. The adjustable clamps rotate for perfect positioning, and you can customize your light show with the included MUDLEDC remote and control harness. You can select multiple colors and multiple flashing modes, so you’ll always get the look you want.
Matt says: "The cage speakers clamp onto the vertical bars of the rear roll cage, and aim into the cabin. MTX includes several different clamps so you can choose the ones that fit the bar diameter of your particular cage."

Installing the underseat subwoofers
This system includes not one, but two underseat subwoofers, one for the driver’s seat and one for the passenger’s seat. Each slimline enclosure houses a 12” shallow-mount, down-firing sub that can handle up to 300 watts of power. The enclosures mount directly under the front seats, and they won't impact your seat adjustability. There's an integrated waterproof harness, too, so you can connect the subs to the MTX MUD600-1 mono amp with minimal hassle.
Matt says: "These downward-firing subs mount to the seat brackets of the Maverick, and they fit perfectly underneath each seat. They’re totally stealth, but they really do bring the bass."

Installing the receiver
The MTX AWMC3 multimedia controller is the heart of this system. This rugged, all-weather controller, lets you play tunes from a variety of sources, and see what's playing on the 3" color TFT display. There's an AM/FM/WB tuner, built-in Bluetooth® connectivity for music streaming, plus an AUX input and a charging USB input. The AWMC3 will also work with your SiriusXM tuner (sold separately, subscription required).
Matt says: "The controller mounts on top of the dash in a housing that comes with the kit. To run the wiring into the dash, you can cut a hole in the top, or, as I did, remove the factory 12-volt power port (which would be covered by the receiver anyway), and push the wiring through the resulting hole. The receiver secures to the dash with four screws. I ran the USB cable out behind the receiver housing, so the owner can connect a long USB cable, then thread it down to the center console."

Working with the wiring
Because the X3-17-THUNDER8 system is designed specifically for the Maverick X3, everything fits where it’s supposed to and connects the way it ought to. We try to stay away from the "e-word" around here, mostly because we do this all the time and you probably don’t, but Matt’s not afraid to go there with this system. Because it’s, um, y’know, easy.
Matt says: "The wiring is all Molex and bullet connectors, so there’s no need to solder or splice anything. The power and ground wires plug into the power and ground wires of the amp, then connect directly to the battery. The speaker wires all have clearly labeled Molex plugs, so it’s easy to know which connects to which. A Molex plug from the receiver plugs into the 4-channel amp’s speaker-level inputs, and the speaker outputs plug into a cable that feeds all six speakers.
The receiver connects to the sub amp with line-level RCA outputs, and the amp feeds the subs with a cable that plugs in at both ends. The LEDs and receiver get power and ground at a distribution block in the center console. All in all, the whole process is super easy."

Our overall impressions
MTX really did their homework on the MTX X3-17-THUNDER8 kit — and the other Maverick X3 kits in their powerful, custom-designed line-up. This is the biggest and baddest version, of course, but there are custom-fit kits to fit any budget, so enter your vehicle information to see them all. What we learned during this project is that the installation process is something that's well within the capability of the average DIY-er. We also learned that, once installed, this thing really, really rocks.
Matt says: "All in all, the installation was very smooth. MTX provides decent written instructions, but the key is their step-by-step installation video found on their YouTube channel.
In terms of performance, this system really sounds terrific. When you’re sitting in it, everything is nice and clear. The bass hits pretty hard, the high-frequency detail is good, and it puts out plenty of volume without being obnoxious. You’re going to annoy fewer people while still enjoying your tunes.
Better still, the owner is over the moon about it. He was giddy like a kid at Christmas when he picked it up, and he’s already run it around his property a bunch. He thinks it sounds fantastic, and he loves the way it looks."
Expert advice for UTV audio enthusiasts
We carry custom-designed audio systems for a variety of popular UTVs and side-by-sides. Use our vehicle selector to see Crutchfield's entire selection of sound systems and other equipment. If you don't have a Maverick X3, we still have a wide selection of audio and lighting gear that'll work for all UTVs. If you have any questions, contact our advisors by phone or chat.
And if you like the advice and tips you just read, remember that your Crutchfield purchase includes free tech support for the life of the gear. If you hit a snag or have a question during (and/or after) your installation, give us a call or chat. Our Virginia-based experts are here seven days a week to help you get the most of out of your new audio gear.


Comments (0)