2008-2016 Ford F-450
How to upgrade the stereo system in your F-450 or F-550


In brief: This Crutchfield Research Garage article gives you an overview of your truck's stock stereo system and your aftermarket upgrade options. We'll tell you all about:
- The factory stereo system
- Removing the factory radio
- Removing the factory speakers
- Adding more bass
- Other options for your F-450 or F-550
Then, use our vehicle selector to find the gear that will fit your truck.
Overview of the Ford F-450
A lot of pickup owners will never put their truck through anything more difficult than helping friends move or hauling mulch twice a year. And that's okay, because pickups are cool, they're fun, and it's no wonder people like them so much.
Trucks like these are a different deal. No one buys a Ford Super Duty because they "might" have to tow 30,000 pounds of something or other across the country. People buy these trucks because they have livestock, boats, race cars, and other important things that need to be transported quickly, safely, and comfortably. No one thinks they need an F-450, they know they need an F-450. As a boat captain we know once said of his vessel, "This ain't no toy."
He was right, but that didn't mean the boat didn't have a nifty sound system. The same goes for your F-450. A big truck on a long trip needs a serious stereo.
Note: The information in this article also applies to 2011-2016 F-550 models.

Several factory radios were available for these Super Duty trucks. This is the navigation receiver. (Crutchfield Research Photo)
The factory stereo system
While parts of these trucks can seem almost over-designed, the factory radios are basically the same off-the-shelf Ford pieces you'd find on an F-150. These trucks offered trim levels ranging from stripped-down work truck to leather-lined luxury hauler, so the audio options started with a standard AM/FM radio and topped out with a factory navigation receiver and, with the Audiophile option, extra speakers.
The stock stuff is adequate at best, and, let's face it, powerful trucks demand powerful sound systems. With a wide variety of aftermarket receivers and speakers to choose from, you'll have no trouble finding a combination that sounds great in your truck.

The stock receivers aren't hard to reach or replace (Crutchfield Research Photo)
Removing the factory radio
Thanks to Ford's "modular design" philosophy, removing and replacing the radio in these trucks is relatively simple. A truly vast array of single-DIN (2" tall) and double-DIN (4" tall) receivers will fit in the space, so you have lot of options to choose from. You'll need a dash kit to help the new stereo blend into the dash, and Crutchfield offers those (and wiring harness adapters, too) at a significant discount with your purchase. Our illustrated, step-by-step disassembly instructions are included free.
All the details can be found in that document, but we'll take a quick look at the basics. You'll start by prying around the edges of the cigarette lighter trim panel to release the retaining clips. Be careful while you’re doing this to avoid damaging the clips. Once that's done, pull out the trim panel and disconnect the wiring harnesses. Remove (but don't toss) the four screws securing the factory radio, then pull it out, disconnect everything, and set it aside.
Detailed stereo and speaker removal instructions

Remove the DIN sleeve from the new stereo and slide it into the stereo mounting bracket, then secure it by bending the metal tabs. Slide the stereo into the sleeve and connect the receiver wiring adapter to the stereo's wires by following the instructions included with the adapter.
Next plug the stereo wiring adapter into the truck's factory harness, plug the antenna lead into the rear of the receiver, then slide the entire assembly into the dash and use the screws you removed earlier to secure everything to the dash. All you need to do now is test everything out to make sure it's working, then put the dash back together and start enjoying your new stereo.
Tools needed: Panel tool, small flat blade screwdriver, 7mm driver
Read our Car Stereo Buying Guide for shopping tips and advice.
Shop for car stereos that fit your Ford F 450
Steering wheel audio controls
In most cases, it's reasonably easy to retain your Ford's steering wheel audio controls when you install a new stereo. When you enter your vehicle information, our database will choose the adapter you need to make your factory steering wheel controls work with a compatible aftermarket receiver.

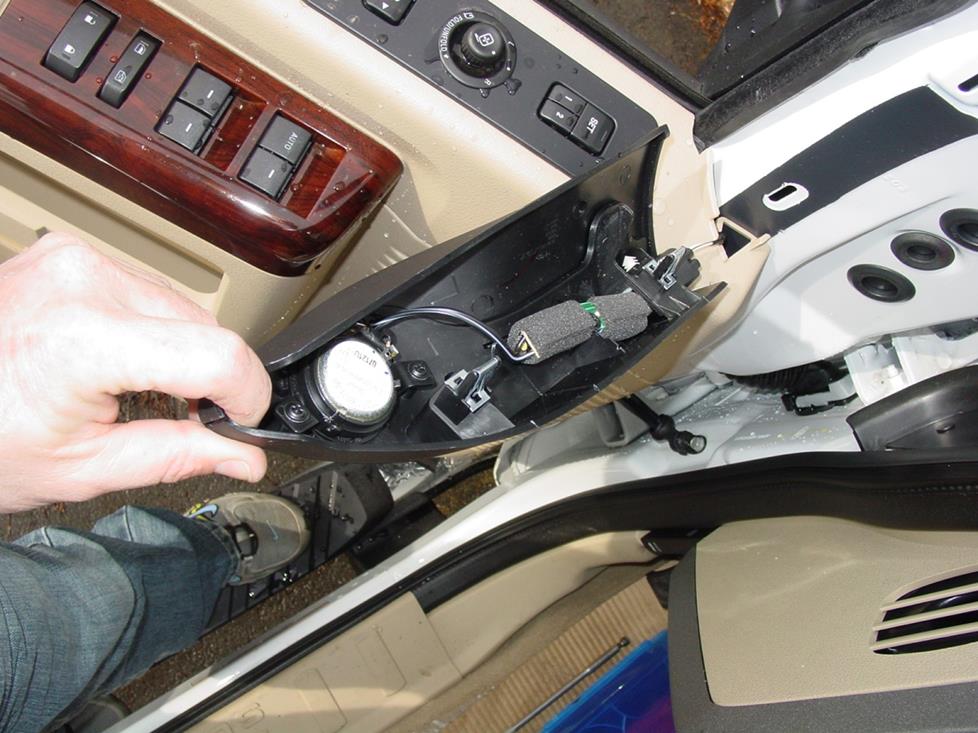
The front doors house factory 6"x8" speakers, plus tweeters in some models (Crutchfield Research Photo)
Removing the factory speakers
Depending on the factory package, your truck will have speakers in the front doors, rear doors, and rear side panels, and possibly a subwoofer behind the rear seat.
The tweeters, if present, will be found in the front door sail panels (Crutchfield Research Photo)
Removing the front door tweeters
The Audiophile tweeters are located in the front door sail panels. The factory tweeter has a physical size of 1.721" and is wired in parallel with the door woofer. This speaker receives a full range signal and employs an in-line crossover at the tweeter location.
You'll need to pry off the sail panel/tweeter housing and disconnect the wiring harness to remove the assembly. Next, remove three Phillips screws, pry out the clip securing the tweeter/harness assembly to the sail panel, and remove the assembly.
No mounting bracket is available for this location, so you'll need to create one using our universal backstraps. You'll also need some Posi-Products speaker connectors to attach your new tweeters to the factory wiring.
Tools needed: Panel tool, Phillips screwdriver
Removing the center dash speaker
Your truck's center dash speaker (if present) is a 3-1/2" 8-ohm model that's reasonably easy to remove and replace. There's no wiring harness available, though, so you'll need to splice, solder, or use Posi-Products speaker connectors to connect the new speaker.
Tools needed: Panel tool, Torx T20 driver
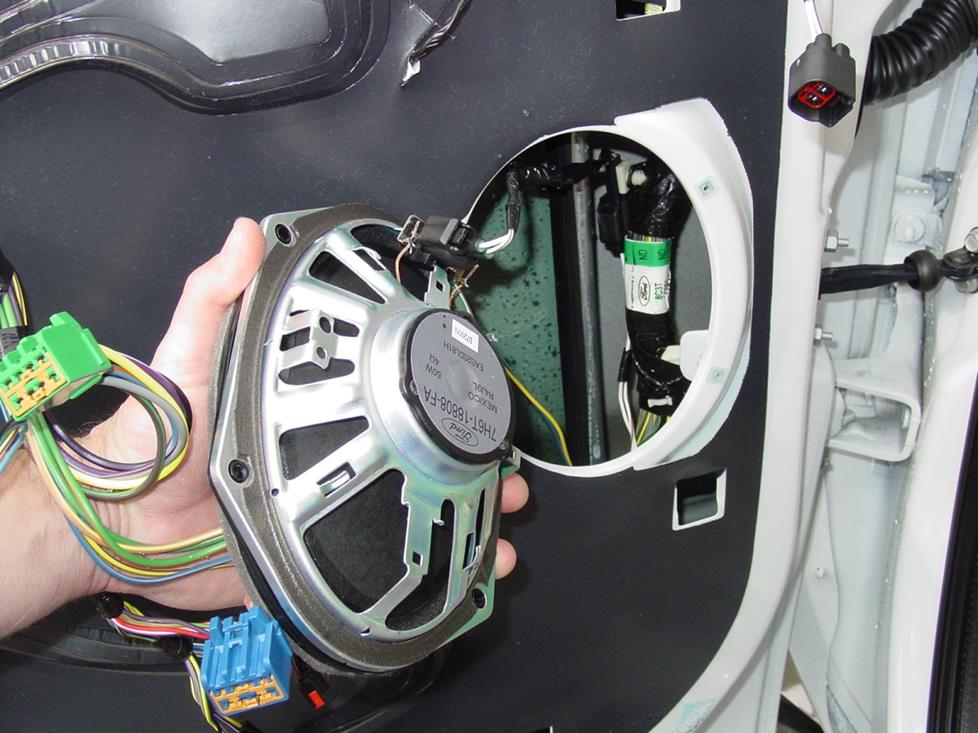
The front door speakers are reasonably easy to reach and replace (Crutchfield Research Photo)
Removing the front door speakers
The F-450's factory 6"x8" door speakers are reasonably easy to reach and replace with same-size models or smaller 5-1/4" speakers. If you go with the smaller models, you'll need speaker mounting brackets, which are included at a deep discount with your Crutchfield speaker purchase.
You'll start the replacement process by prying off the sail panel (present whether the truck has tweeters or not). What you do next depends on whether your truck has manual or power windows, but it's not complicated either way. Both versions are covered in the illustrated Crutchfield MasterSheet that's included free with your Crutchfield stereo or speaker purchase.
You'll then need to remove the door panel. Pry off the reflector lens from the lower corner of the door panel, then remove the screw beneath. Lift the door panel, disconnect the electrical harness (if equipped), and remove the door panel. Remove four screws securing the factory speaker to the door, then pull it out, disconnect it, and set it aside.
Installing a new speaker is simply a matter of connecting the wiring adapter to the new speakers, plugging it into the truck's speaker harness, then using the screws you removed earlier to secure the speaker. Once you've tested the speakers to make sure they're producing sound, start putting the door back together.
Tools needed: Panel tool, 7mm driver
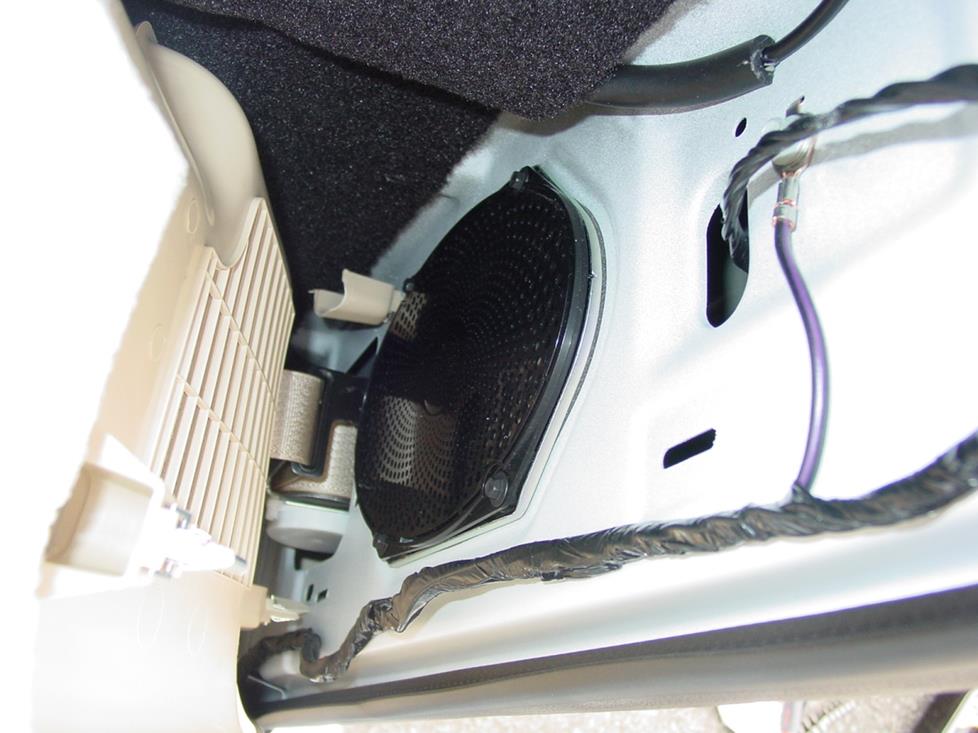
A downward look at an F-450 rear side speaker (Crutchfield Research Photo)
Removing the rear side panel speakers
Your truck's rear speakers are conveniently located in the side panels behind the rear seat. These 6"x8" models can, like their cousins in the doors, be replaced by same-size models or smaller 5-1/4" speakers. You'll need speaker mounting brackets for the smaller ones, of course. To replace them, you'll need to pry away some panels and get the seat belts out of the way, but it's not terribly difficult.
Starting at the edge closest to the seat, pry up and remove the door scuff plate. Next, pry open the seat belt anchor cover, remove a T-50 Torx bolt, and lower the seat belt to the floor.
Starting at the top, pry out the edges of the rear side panel. You'll be releasing the retaining clips that run all the way to the bottom of the panel. Remove the side panel and set it aside. You can leave the belt in the panel, which makes life a bit easier.
The speaker is held in place by four 7mm screws. Remove those, disconnect the harnesses, then set the speaker aside. As with the front doors, connect the new speaker's wiring adapter to the truck's speaker harness, test everything out and, if it works, start putting things back together. For safety's sake, please make sure the seat belt anchors are secured properly before you hit the road.
Tools needed: Panel tool, 7mm driver, T-50 Torx driver
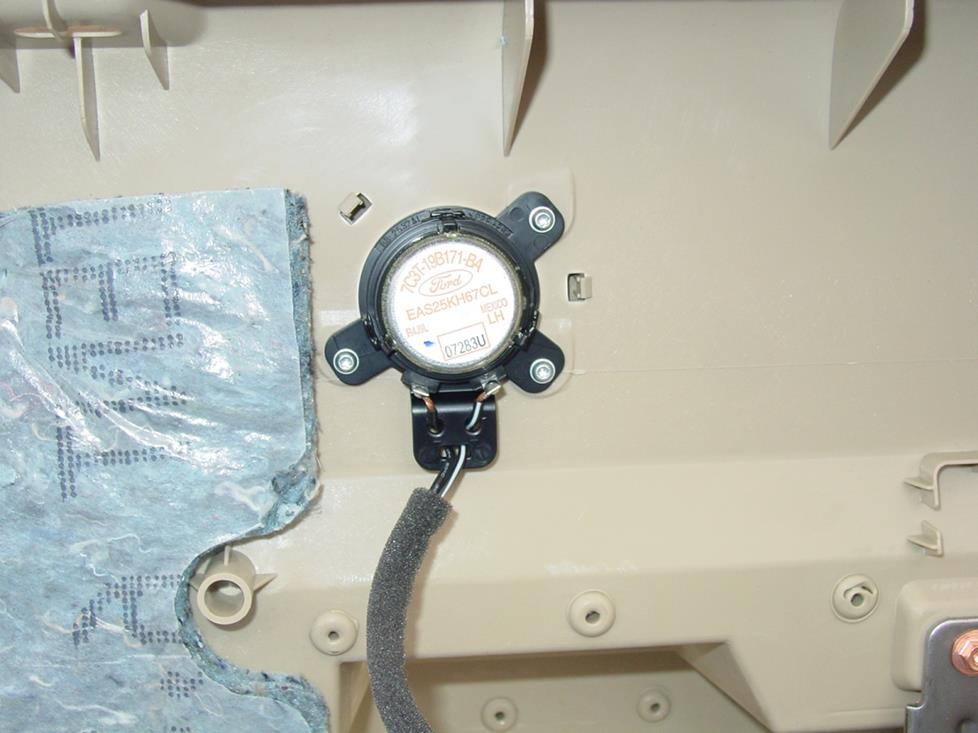
A close look at a rear door tweeter (Crutchfield Research Photo)
Removing the rear door tweeters
The rear tweeters measure 1.716" apiece, and they're wired in parallel with the rear side panel woofers. You'll need to remove the door panels to reach these speakers. No mounting bracket is available for this location, so you'll need to create one using our universal backstraps or some other method. You'll also need some more Posi-Products speaker connectors to attach your new tweeters to the factory wiring.
Tools needed: Panel tool, 7mm driver, Torx T-9 driver
Read our Car Speakers Buying Guide for more information.
Shop for speakers that fit your Ford F 450
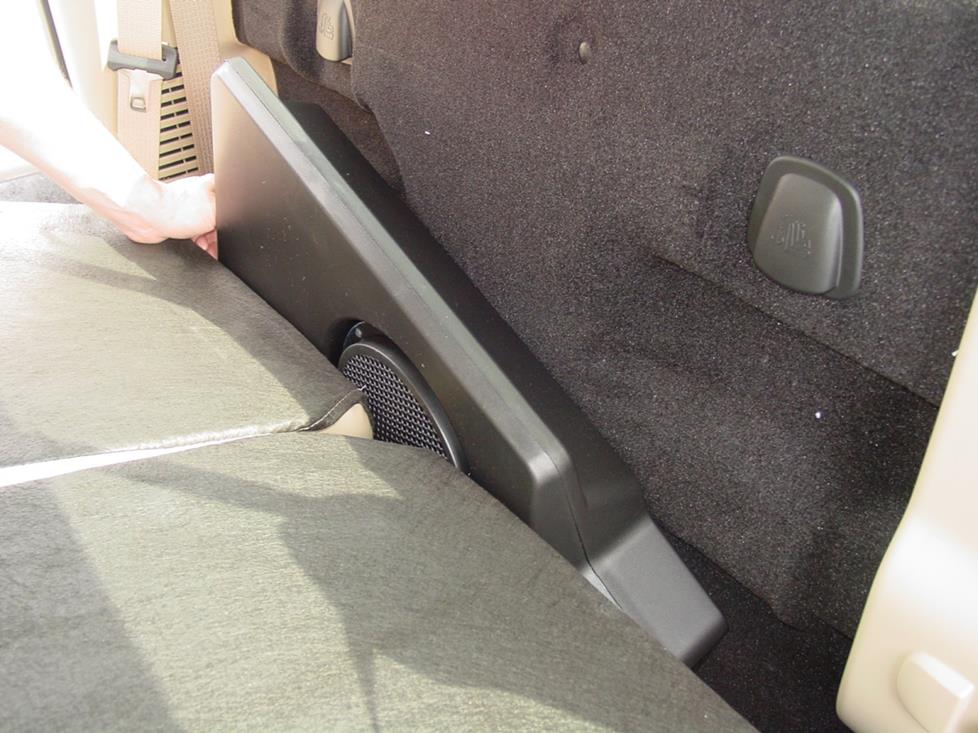
The stock sub is behind the rear seat (Crutchfield Research Photo)
Bass in your F-450
The Audiophile system's 8" dual-voice coil subwoofer is located in a polymer enclosure behind the rear seat. It's powered by an amplifier that is attached to the back of the enclosure. The factory system sends only bass frequencies to this sub, so a replacement aftermarket speaker will also only play bass.
Removing it is reasonably simple, though it's a bit tight back there and you'll want to work carefully. Start by removing the T-55 Torx bolt securing the driver's side of the enclosure to floor, then remove the four 10mm bolts that secure the passenger's side. Disconnect the harness, then lift up on the passenger's side, pull it towards that side of the truck and work the sub enclosure out from behind the seat.
If you're going to replace the sub and keep the stock enclosure, you'll get the old sub out by removing the eight T-20 Torx screws that hold it in place. When you're shopping for a new one, you'll want to look at shallow-mount subs for obvious reasons.
Like we said, it's tight back there, but if you want to go even bigger on bass, there are some vehicle-specific sub enclosures that will fit back here, whether your truck had a factory sub or not. You can choose from unloaded, loaded, and amplified versions, and some are available in colors to match your interior. There's also room back there for a compact Class D amplifier that will deliver some serious power.
Tools needed: Torx T-20 & T-55 drivers, 10mm socket, ratchet and extension
Learn more about building a bass system in our Car Subwoofer Buying Guide.
Shop for vehicle-specific subwoofers for your Ford F 450
Other options for your F-450
Here are some other ideas for your Ford Super Duty pickup.
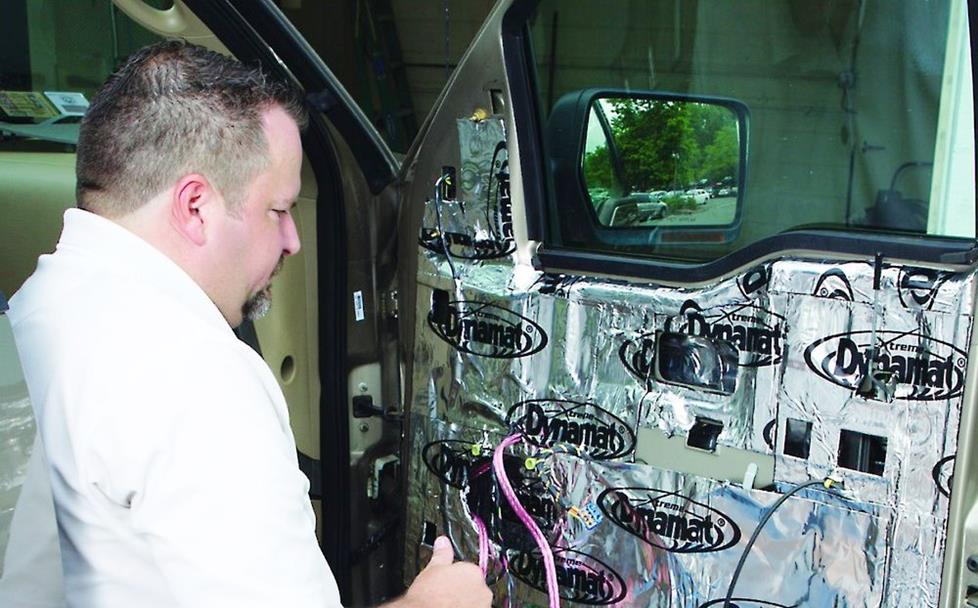
Installing Dynamat in your Ford truck can really improve sound quality (Crutchfield Research Photo)
Restyle your dash with Alpine
Alpine has developed a line of Restyle packages that are designed to accommodate a multimedia receiver in a variety of vehicles, including the F-450. Enter your vehicle information to see the available Restyle package for your truck.
Add some sound damping
Your Ford Super Duty is to pickups what a cattle ranch is to a rooftop garden in the city. It’s big, it's buff, and it goes through the air like a fullback churning towards a first down. To prevent wind noise and road roar from undoing the great work your new stereo is doing, make sure you install Dynamat when you're replacing your speakers. This soundproofing material is a great way to dampen the sounds you don't like and get more enjoyment out of the ones you do.
For more information on installing Dynamat in a pickup, check out an informative series of articles on our 2004 F-150 project truck. The details are different in some ways, but it's a great way to see what's possible in your truck.
Add a rear-view camera
The F-450 is almost 22 feet long, 8 feet wide, and just shy of 7 feet tall, so yeah, a rear-view camera might be kinda helpful when you're backing up in a crowded parking lot. Or an open field, for that matter. We offer cameras from Kenwood, Alpine, Pioneer, and more. Some are designed to work with same-brand receivers only, but others come with a composite video connector and will work with almost any video receiver.
Help your interior look better longer
If you drive an F-450, chances are you're going to track some mud and muck into your truck every now and again. When that happens, it's a good idea to have a set of WeatherTech Floor Mats protecting the carpeting. These incredibly durable mats trap moisture, contain dirt, and keep your factory carpets looking good.
Remote start and security systems
Adding remote start capability to your vehicle lets you warm it up in the winter or cool it down in the summer. The iDatastart system is incredibly convenient and makes it easier than ever to install a remote start system, so we highly recommend it. The module requires a vehicle-specific T-harness (sold separately) to connect with your vehicle's computer, security, and ignition systems, so we ask that you call to order so that we can make sure you get the right harness for your truck.
You can also talk to your Crutchfield Advisor about a security system. They’re not as easy to install (we usually suggest letting a professional do the job), but we can help you choose a system that’ll work in your vehicle.
Let's get started!
Ready to shop? Use our vehicle selector to find the gear that will fit your car or truck. If you have questions, give us a shout via phone, chat, or email


Comments (0)