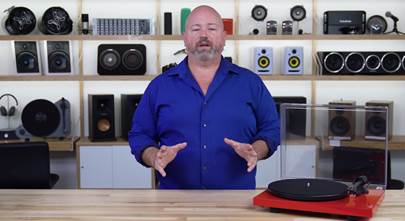
Video: How to set up a belt-drive turntable
Follow our guide and get the best sound from your vinyl

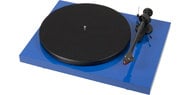
Proper setup of your turntable helps you get the best performance and sound quality. By carefully setting up your new component, you'll ensure that it is operating under ideal conditions. In this video, we show you how to set up a manual belt-drive turntable, using the Pro-Ject Debut Carbon as an example.
Read video transcript
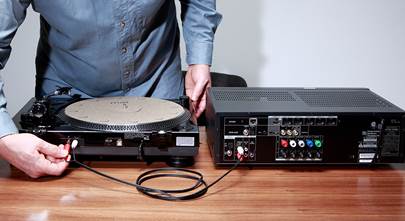
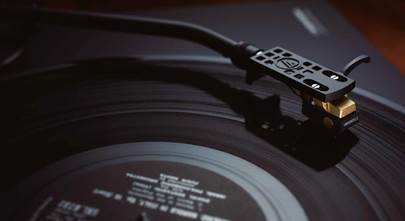
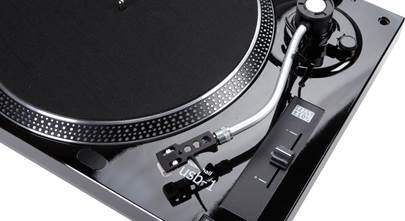
Hi, I'm Philip and today I'm going to show you how to set up a turntable. So I have the Pro-Ject Debut Carbon with me, but the process is pretty much the same for any belt-drive turntable. The very first thing I want to do is make sure that the turntable and the surface I'mworking on is level. I just have a free iPhone app here with a bubble level on it. Drop it on there...I can see that it is level. So I put that out of the way, and then I'm going to install my drive belt. Really important that you wash your hands before doing this. The oil, sweat, greases on our hands can deteriorate these belts. Then we can put the belt around the hub and around the smaller diameter portion of the pulley. That's for thirty-three and a third rpm records. The larger pulley, it's for 45. Go back to there, and we just want to make sure it's nice and flat and even on there. And then what we're gonna do is something that's not actually in the owner's manual. There's two screws here, either called floating motor screws or transport screws, that kind of secure the motor to the base. They can increase the amount of noise or humming here, so we recommend just removing them. Sometimes they're fine, they don't cause too much of a problem, just depending on how tight they're in there, but it really doesn't hurt to remove them and then your motor is completely isolated from the turntable plinth, or the base. So with those out of the way, you can see the motor is kind of suspended freely. And then we can move on to installing our platter. The platter has a hole there for the spindle in the center. I'm gonna go ahead and line that up, drop it down, make sure it's seated all the way. We don't want any uneven gaps or anything. It looks good. We'll install the felt slip mat here, if your turntable comes with an acrylic or Delrin platter, you may not have a mat, you may just put the record directly onto the platter. If it's metal, you're gonna want that felt mat on there. Next we can move on to the cartridge and setting the tracking force for the cartridge. Many turntables, including this Pro-ject, come with a pre-mounted, pre-installed cartridge. That's awesome, it saves us quite a bit of time. If your turntable doesn't, or if it does and you end up replacing the cartridge with a new one, you will have to align the cartridge. An alignment protractor like this is really useful. You just put that over the center spindle, and then you have two points to align the cartridge. The cartridge mounts in the head shell with two screws, and what that means is that cartridge can swivel and it can move forward and back. What you want to do is line up the cartridge with the first point, get it nice and square and perpendicular with that. When you get it set to the first point, you then check it to the second point. If it's at an angle, if it was square with the first point but it's at an angle with the second point, that means you need to either move the cartridge forward or back in the head shell. It takes quite a bit of trial and error, and you just kind of have to take your time and play with it, but if you take your time and make really small incremental adjustments, just line it up with the two points and you'll be set. With that out of the way we can set the tracking force. This Ortofon 2M Red has a recommended tracking force of about 17.5. Every different cartridge has a different recommended tracking force. So we're gonna go and set that now. The counterweight that is included with the Pro-Ject has this nice numbered dial on there, go ahead and install that onto the back of the tonearm with the numbers facing forward so you can see them. Tracking force is how much force the stylus, or that needle right there pushes down into the grooves of the record to read the information. Too heavy or too light, both damage the record and they're not going to sound good, so it's important to get that set correctly. What we're gonna do is take the tonearm out of the holder, lower the tonearm, and we want to get that tonearm balanced. We want it perfectly level so it's not flying up or sinking down. Just move that counterweight back and forth and you'll see it go up, you'll see it go down, we want it somewhere in the middle. Small adjustments make a big difference, so just take your time and when you think you're getting pretty close, like that looks good, take a look from the side, make sure it's nice and level with the platter. I'm pretty happy with that balance, so I'm gonna put the tonearm back in the holder, raise the arm up, and I don't want to move this weight now. Now that it's balanced, I want to hold the weight still and spin just the number dial so the zero lines up with the mark at the top, so we're kind of zeroing out the tonearm, then you can set the tracking force to exactly the recommended number, which like I said is 17.5. And our tracking force is set. If your turntable does not come with that kind of counterweight with a number dial on it, you will need to use a tracking force gauge. This is just an inexpensive digital tracking force gauge. You would turn it on, set it on the platter, put your cartridge over it, line it up and lower it, and it will give you a digital readout of the tracking force of your cartridge. Again, if your turntable does not have a numbered counterweight like that, you will need a tracking force gauge to set it to the recommended tracking force. All right, with all that out of the way we can set our anti-skate. With the Pro-Ject it is a simple little string with a loop on the end and a weight on the other, and a few different notches that are different anti-skate weight settings for the Ortofon 2M Red. It's the middle notch that is the recommended setting, so we're gonna go ahead and loop that string onto that middle notch, hang the weight over, and our anti-skate weight is set. Next I'm going to connect our signal cables. So the Pro-Ject includes a set of RCA cables with the ground connection on both ends. Really important that you get a good ground connection at the turntable, and at your phono preamplifier or your receiver, or phono input at your amp. Also I recommend starting with the ground connection, because once you plug in the RCAs it's kind of hard to access the little ground screw, so get this screw right there, clamp it down, make sure it's a good metal-on-metal connection. Nice and secure. And with that in place we can plug in the RCAs. White is left, red is right. And then we're ready for a power connection. There we go. And our very last step is our dust cover, in this case there are two hinges on the back with posts and those line up at the holes in the dust cover. Different turntables have different designs, but most of them work on a hinge system just like that, and once you got lined up and all the way in there you want to make sure everything clears so you're not pinching anything. And that looks pretty good. The dust cover is for keeping dust off the record when you're not using it. When you're playing a record, for the best sound quality you want to have that dust cover all the way open, or you can even remove it completely and set it off to the side and then just put it on again when you're done with it. That is the basics of how to set up a turntable. If you have any questions, feel free to give us a call, chat with us online or send us an email. Thanks for watching.


Ron from San Diego
Posted on 10/31/2022
Leaving the dust cover open when playing a record. How does that improve sound ?
Clyde Barrow from Dallas TX
Posted on 2/5/2018
You might want to level the turntable before you set the tracking force, it will give you a better number. Also anti skate is to counteract the centrepital force which wants to pull the tonearm toward the center of the record. Anti skate helps center the stylus in the record groove. A good rule of thumb is to start out with the same setting as your tracking force, then adjust by listening.
Marie from Toronto
Posted on 3/19/2017
Do I need to plug it into my amp or the wall? It was plugged into my amp originally, but I have now moved my turntable so that it is more accessible, but the plug that fed into the amp is now way too short to reach the amp........
Gregory Hall from New York
Posted on 12/12/2016
I believe the reason that people have so much of a problem hooking up their music system is that they really do not understand the difference between an input and an output , and what they do ; Nor do they understand that depending on the unit being connected , the directions in which the signals are traveling to and from the receiver , pre-amp or integrated amplifier. Once they understand that devices such as Turntables and CD players are output or (Play devices only) and can only be connected to an input on the (Receiver or Amplifier) labeled Phono , CD, and sometimes Digital , will they no longer have a problem in connecting external components to their system.
Dan Haydon from napa
Posted on 4/16/2016
I have a Pioneer vsx9700s. I would like to hook up my Turntable A Pioneer PL-777AZ. Is this possible?
Letitia Winquist from Granbury , Texas
Posted on 2/27/2016
I have a Yamaha 1994-95 natural sound stereo turntable p31 full automatic the play / ustop button on front is at an odd angle and I think that is what's keeping it from playing. I have original manuals but do not have the manual on the turntable may be not needed back then?
John from Blue Ridge, TX
Posted on 10/23/2015
More detailed demonstration of EVERY feature would be very helpful rather than just mentioning them in passing. I got the feeling there was a time constraint on the length for this video. Newbies like myself like to see everything in detailed demonstration.
James. Green from Baltimore
Posted on 10/18/2015
Good selection and most of all very informative