2007-2017 Ford Expedition
How to upgrade the stereo system in your Expedition

In brief: This Crutchfield Research Garage article gives you an overview of your Expedition's stock stereo system and your aftermarket upgrade options. We'll tell you all about:
- The factory stereo system
- Removing the factory radio
- Removing the factory speakers
- Adding more bass
- Other options for your Expedition
Then, use our vehicle selector to find the gear that will fit your Expedition.
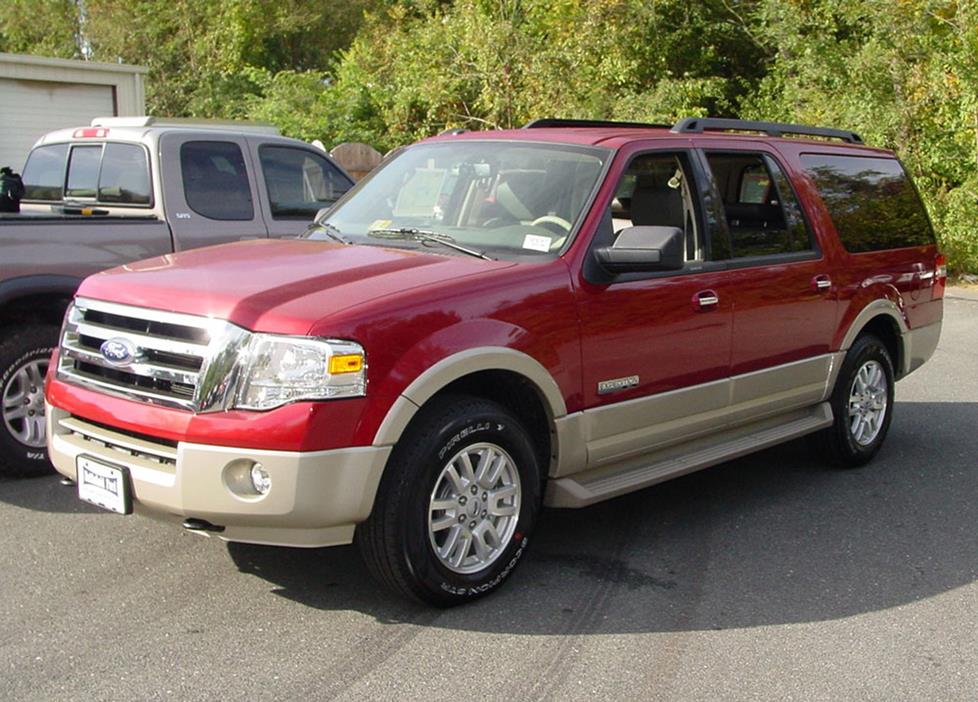
Overview of the Ford Expedition
Ford's full-size Expedition hasn't achieved the long-lasting cultural significance of the Chevrolet Suburban, but for people who need a massive SUV and wouldn't be caught dead in a Chevy, it's just about perfect. The third-generation Expedition, which debuted in 2007 and stuck around until just lately, simply took all the luxury and utility of the previous models and made it bigger and better.
As you might expect from a vehicle that takes up a visible percentage of a city block, the Expedition offers tons of space for audio gear and plenty of space to work with. For those who need even more SUV, there's the extended-wheelbase Expedition EL, which we presume means either "Extra Long," "Extended Length," or "Excursion-Like," because it's all of those things.
Receiver and speaker replacement is the same in both models, though, so if you want even bigger and better sound in your Expedition, you have lots of great options.
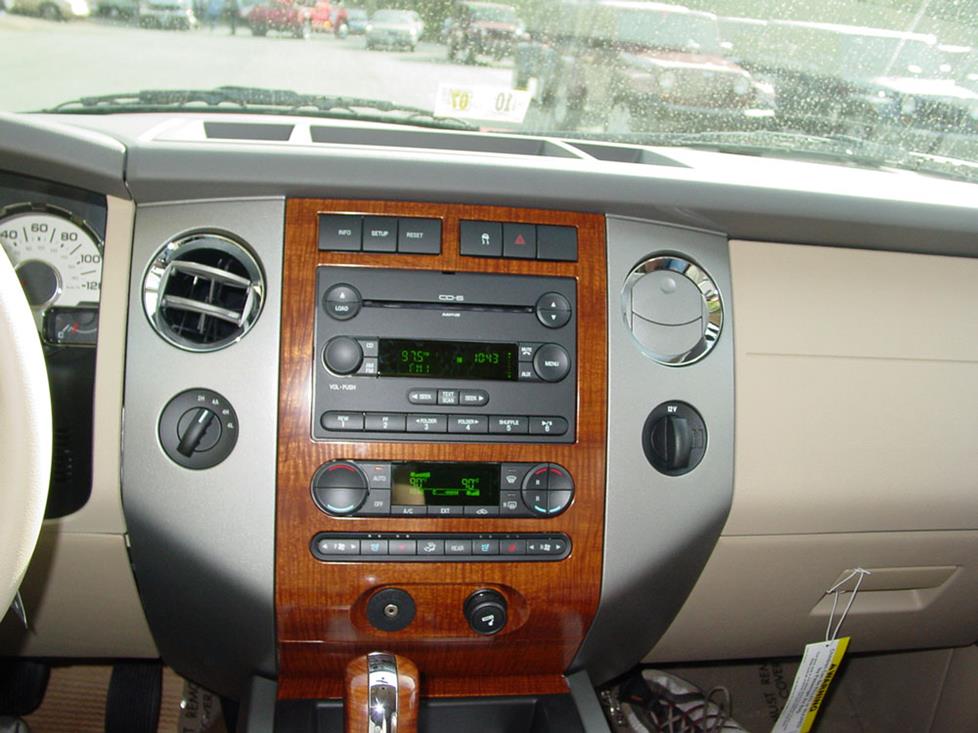
Replacing the base radio will improve both performance and functionality (Crutchfield Research Photo)
The factory stereo system
2007-2014 models
Full-size SUV owners expect a lot when it comes to audio and entertainment features, and the 2007-2014 Expedition did not disappoint. The stock gear really wasn’t bad, but it's starting to age and when it comes to connectivity in particular, aftermarket gear can make a big difference.
Depending on what you're starting with (there were several permutations and combinations), there will be some interesting bits to stereo replacement. Whether you're talking to a Crutchfield advisor or using our vehicle selector tool, we'll make sure you get the info you need for the gear you're buying.
Replacing the receiver can mean losing features like XM satellite radio, navigation, SYNC, or even fader control on vehicles equipped with digital amplifiers. If this sounds confusing, don't worry. You can replace and even upgrade some of those features, and we'll give you a deep discount on the wiring harness adapter and dash kit you'll need for your installation.
A variety of single-DIN (2" tall) or double-DIN (4" tall) receivers will fit in your Expedition's dash, and the project is well within the capability of most DIY-ers. Just be warned that a receiver with a fold-down face is not recommended for the Expedition.
Detailed stereo and speaker removal instructions

2015-2017 models
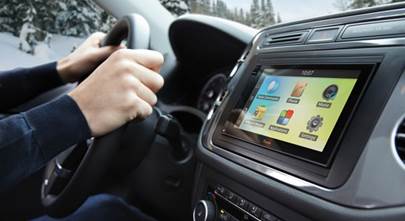
Things changed a bit in terms of the dash layout and dimensions in Expeditions from these years. While stereo options changed too, the good news is that we still have solutions depending on the version you have. And if you want to retain the most factory features and keep a clean factory look, a Direct Replacement package is the one to choose.
A Direct Replacement solution replaces your factory screen with a better-performing upgrade that either mounts an 8” replacement screen in the same spot or replaces it with a 10.1” floating screen. You also get greater functionality, better sound, and improved expandability.
The speaker locations and techniques for Expeditions in this year range should be the same, though.
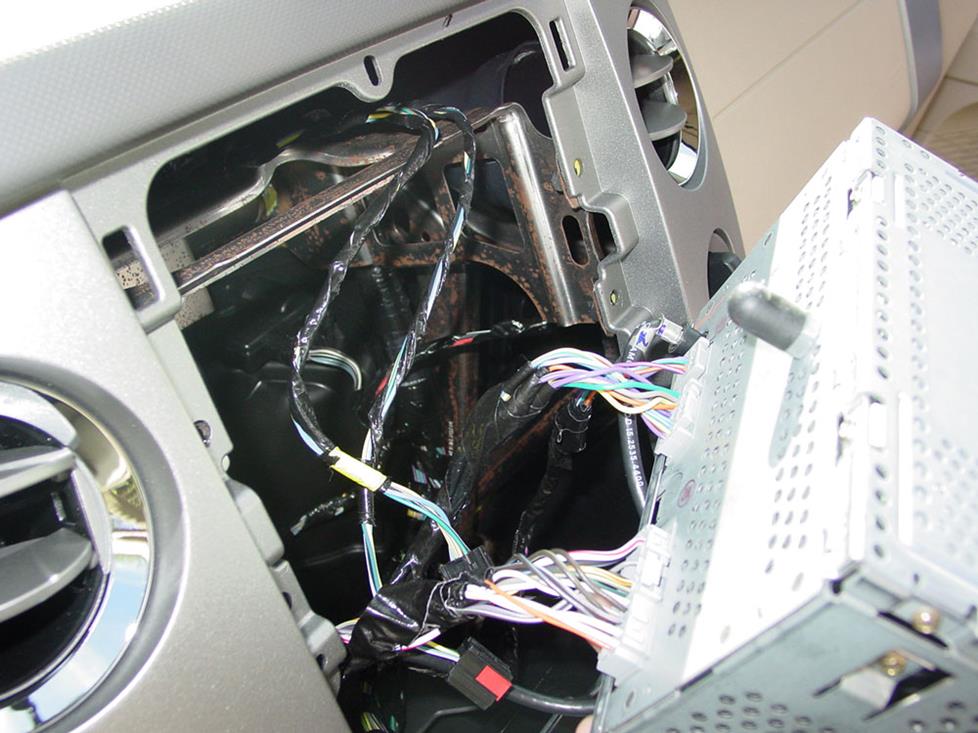
Removing your truck's radio is relatively easy, compared to many we've seen (Crutchfield Research Photo)
Removing the factory radio
The first thing to do with this or any other vehicle is set the parking brake and disconnect the negative battery cable to prevent any electrical short. Safety matters, so make sure you get off to a good start.
Once that's done, pry out the edges of the receiver/climate control trim panel to release the retaining clips. Pry out the lower console trim panel to release those clips, then pull out the entire trim panel. Disconnect the wiring harnesses and remove the assembly. Remove the four 7mm screws securing the factory radio, then pull it out and remove it.
Installing the new stereo essentially involves doing all of that stuff backwards, following the Crutchfield MasterSheet that's included free with your stereo or speaker purchase. The dash kit and wiring harness adapter will include instructions of their own.
Be sure to test the receiver to make sure it's working before you start buttoning things up again. If it isn't, and you’re not sure why, just give us a call. Every Crutchfield car audio purchase includes free tech support for the life of the gear.
Tools needed: Panel tool, 7mm driver
Read our Car Stereo Buying Guide for shopping tips and advice.
Shop for car stereos that fit your Ford Expedition
Steering wheel audio controls
In most cases, it's reasonably easy to retain your Expedition's steering wheel audio controls when you install a new stereo. When you enter your vehicle information, our database will choose the adapter you need to make your factory steering wheel controls work with a compatible aftermarket receiver.
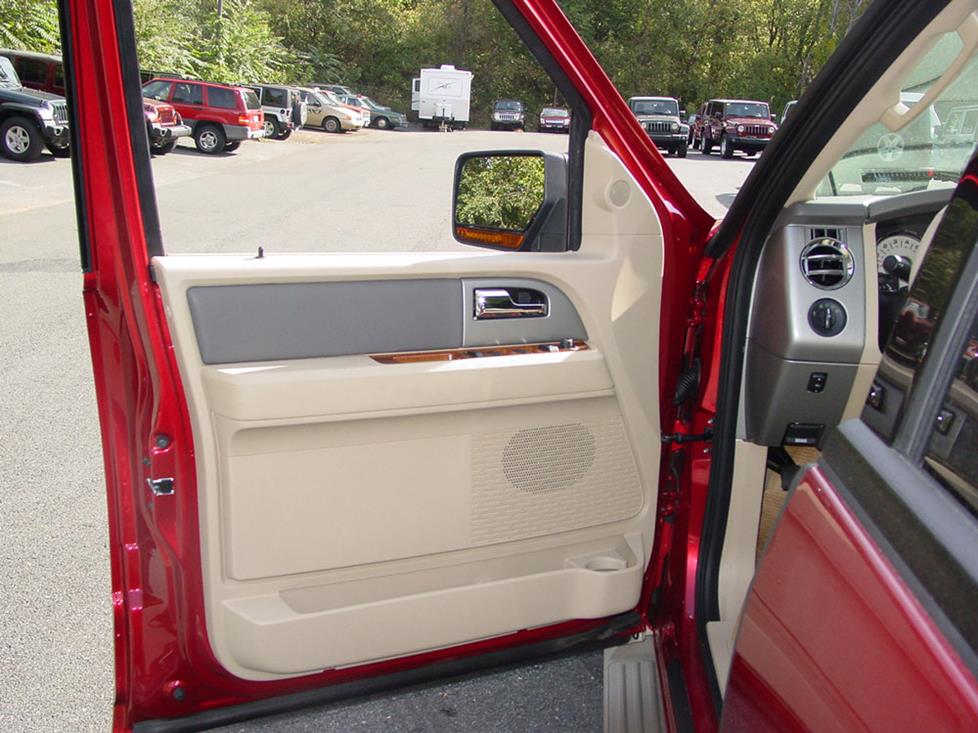
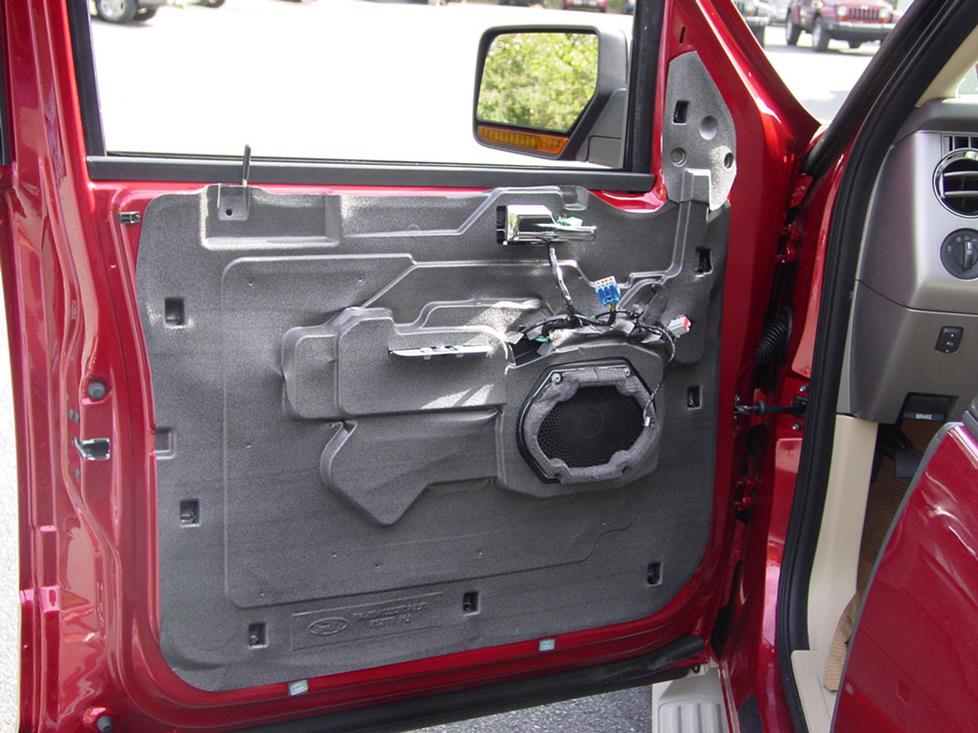
These big front doors deserve some serious speakers (Crutchfield Research Photo)
Removing the factory speakers
The Expedition has a set of component speakers in the front doors, full-range speakers in the rear doors, and, in some cases, a subwoofer in the cargo area.
Removing the front door speakers
The front door speaker array consists of woofers and tweeters in each door. They're not hard to deal with once you remove the door panels, and there are plenty of great aftermarket replacements out there. A set of component speakers will be a great upgrade for your Expedition.
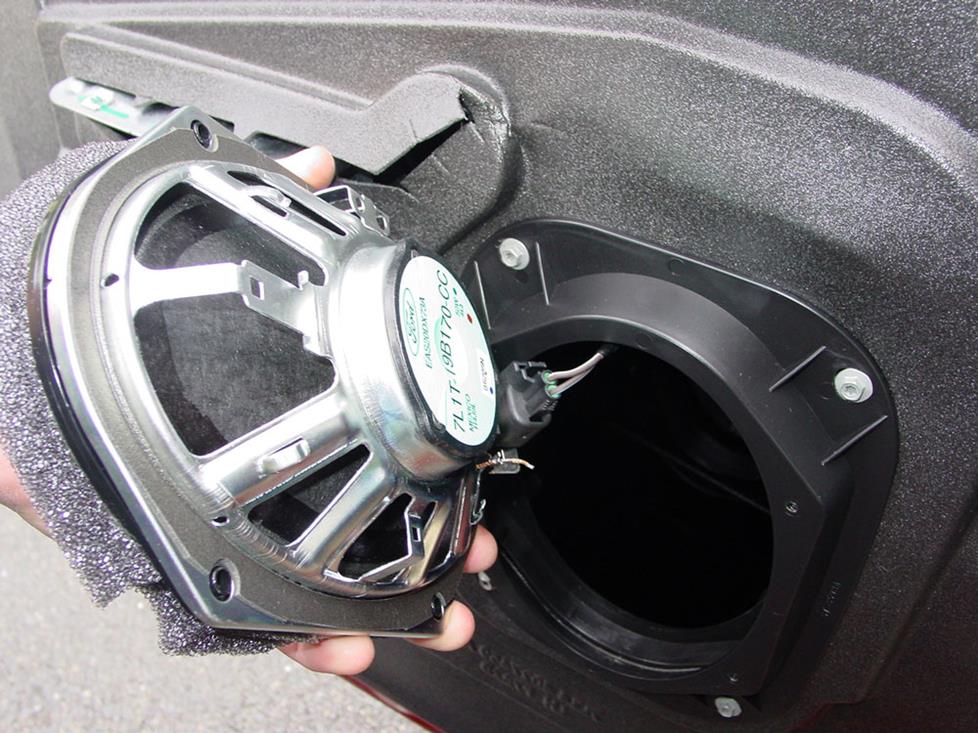
The stock woofers attach to the doors, while the tweeters are attached to the door panels (Crutchfield Research Photo)
The door panel removal process begins with prying off the screw cover behind the door release and removing one 7mm screw. Pry off the door release trim to release the retaining clips and remove the trim, then pry open the screw cover inside the door pull cup and remove two exposed 7mm screws.
Pry open the screw cover on the rear edge of the door panel and remove one Phillips screw, then remove two 7mm screws from the bottom edge of the door panel. Moving back up the door, pry out the sail panel. Hold the sail panel out and lift the door panel to release the hooks from the door. With all that taken care of, you can disconnect the wiring harness and remove the panel.
If that seems like a lot of prying, that's because it is. A set of Bojo panels tools will make this job a lot easier and they're a lot nicer to those plastic panels than a big old screwdriver.
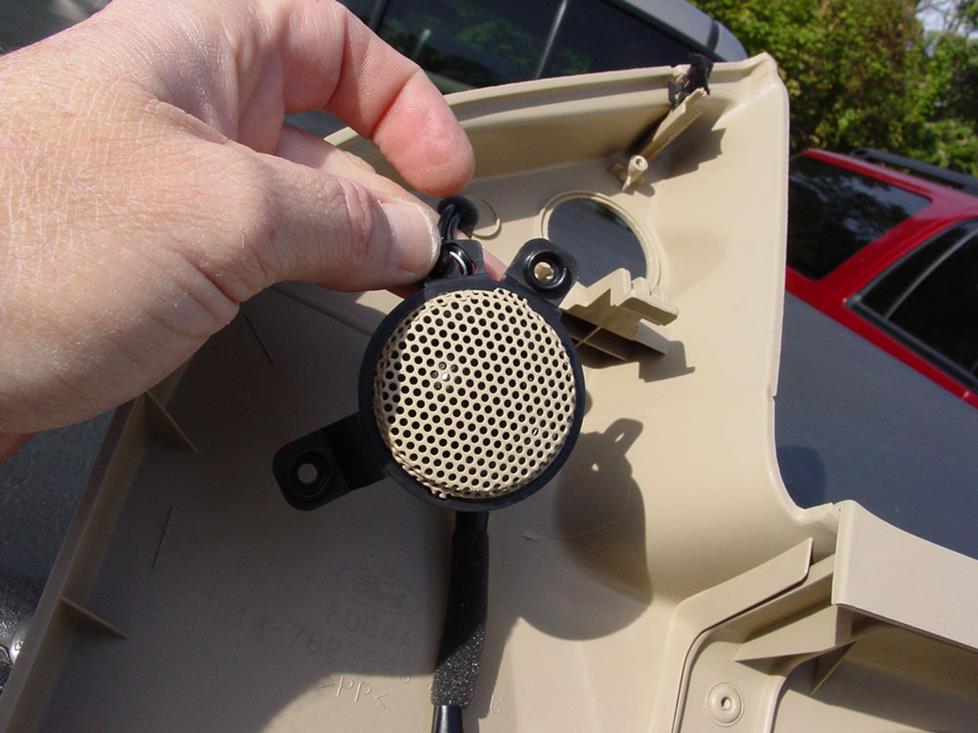
Replacing the tweeters isn't hard, but you'll need a little bit of extra gear to do the job (Crutchfield Research Photo)
Tweeters
The 1.570" tweeters can be replaced by pretty much any component speaker system tweeter, but you'll need to use our universal backstraps (or hot glue or silicone) to secure the new tweeters in place. There's no wiring harness adapter for this location, so you'll need Posi-Products speaker connectors to connect the tweeters to the factory wiring.
The grille is removed with the tweeter and creates a 1.595" hole in the door panel. An aftermarket tweeter can be flush-mounted to the panel, as long as it clears the cutout.
Woofers
The woofers can be replaced by 6"x8" or 5-1/4" aftermarket speakers. With the door panel out of the way, all you need to do is remove the four Torx T20 screws securing the old speaker and get it out of there. Use the speaker wiring adapter to connect the new speaker to your truck's speaker harness. Use the old screws to secure the new speaker to the door, and you're done.
You'll need mounting brackets to mount smaller woofers, and they're included with your Crutchfield speaker purchase at a deep discount.
Be sure to test the speakers to make sure they're working properly before you put everything back together. Also, check to make sure the wiring doesn't interfere with the windows or the locks.
Tools needed: Panel tool, 7mm driver, 1/4" hex driver, Phillips screwdriver
The full-range speakers in the rear doors are very easy to work with (Crutchfield Research Photo)
Removing the rear door speakers
The situation in the rear doors is very similar to what's going on up front, save for the fact that you're only dealing with a pair of full-range speakers. These can also be replaced by 6"x8" or 5-1/4" aftermarket speakers, and the work is basically the same as what you did on the front doors. Complete, step-by-step disassembly instructions can be found in your Crutchfield MasterSheet.
Don't forget to test the speakers and check the doors and locks before you finish up.
Tools needed: Panel tool, 7mm driver, Phillips screwdriver, 1/4" hex driver
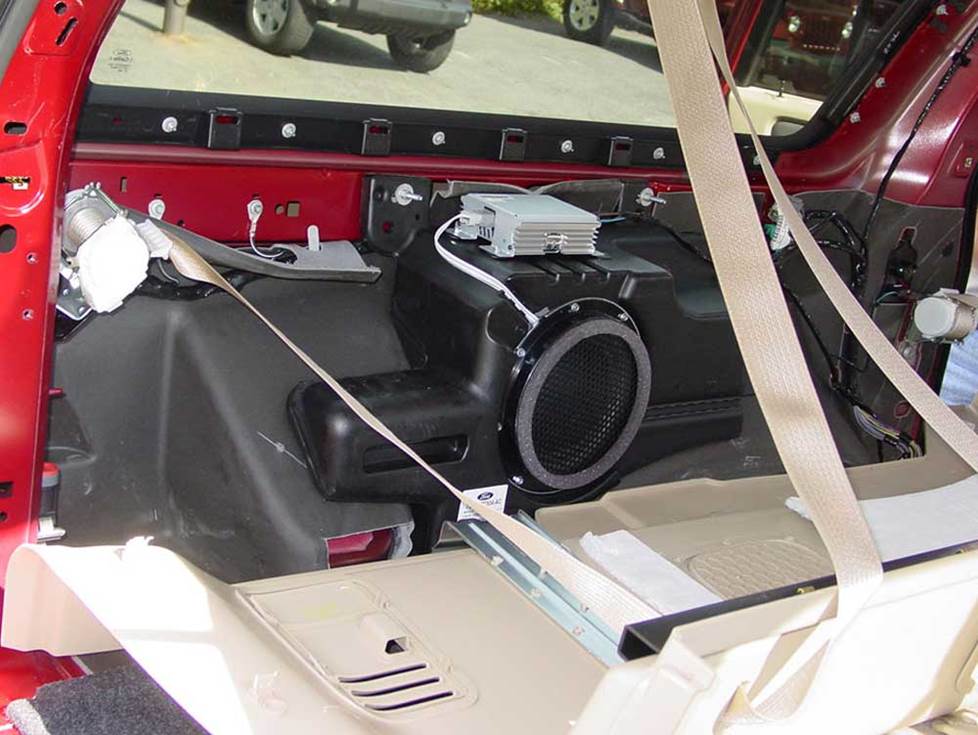
Got a free afternoon? You'll need it for this job. (Crutchfield Research Photo)
Removing the rear subwoofer
The Expedition is pretty easy to work on for the most part, but when it comes to replacing the optional rear subwoofer in the right rear side panel, the job is a little tougher. It's not that the individual tasks are all that difficult, it's that there are a whole bunch of them. If you're a DIY-er with basic skills, you can do this, but you might want to block off an afternoon. It's not a thing you can hurry through, so be patient, work carefully, and maybe ask a friend to help. You'll find complete instructions in your Crutchfield MasterSheet, which will also be a big help.
There are a few other things to know before you start.
For one, the stock speaker only receives bass frequencies, so if you try to put a full-range speaker back here, it'll only produce bass frequencies. You're probably not going to do that, but if you're trying to squeeze some extra use out of a leftover speaker, that's what's going to happen. Also, replacing the low-impedance stock sub with a higher-impedance aftermarket speaker will result in lower volume levels. Shop accordingly.
Whatever you put back there (and there are some very cool and very powerful 8" subs that will fit), you'll need to use Posi-Products speaker connectors, because there's no wiring adapter available at the moment.
You'll need to drill new mounting screw holes for that sub, and while this isn't necessarily the hardest thing you'll ever do, you are drilling a hole in your truck, so know what's around the area you're drilling into, work carefully, and always wear eye protection. Your new sub might not include mounting screws, so check the box and hit the hardware store if you need to.
Before you button everything up, make sure the seats and seat belts are secured to manufacturer’s specifications. Safety first, and all that.
Tools needed: 6mm & 7mm drivers, 10mm socket, ratchet and extension, Torx T-50 driver, panel tool
Read our Car Speakers Buying Guide for more information.
Shop for speakers that fit your Ford Expedition

Exactly how big a subwoofer were you thinking about? (Crutchfield Research Photo)
Bass in your Expedition
As you can probably guess, the Expedition offers acres of room for a subwoofer box. If you want to go big, you can, since you have a 51" W x 15" H x 24"/30" D space (measurements taken below side ledges) to work with. Want to put three 12" subs back there? Okay, that could work. Of course, if you still need the Expedition's vast cargo area for vast amounts of cargo, you can go with a smaller box or even a powered subwoofer.
Take a look at our full line of subwoofer boxes for inspiration.
Learn more about building a bass system in our Car Subwoofer Buying Guide.
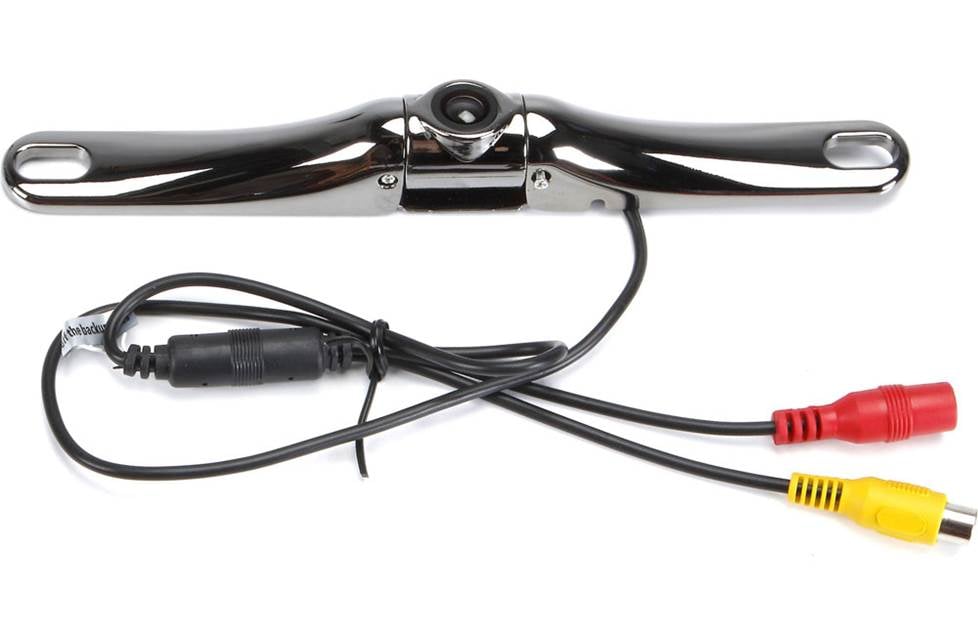
A rear-view camera is an ideal back-up solution for your SUV
Other options for your Expedition
Here are some other cool ideas for improving your Expedition.
Rear-view cameras for better visibility
The Expedition is an enormous vehicle, and maneuvering in a crowded parking lot can be a big challenge. If you want a better view of what's behind you, we offer rear-view cameras from Kenwood, Alpine, Sony, Pioneer, and more. Some are designed to work with same-brand receivers only, but others come with a composite video connector and will work with almost any video receiver.
Add an amplifier to fill your truck with music
if you want real power, you need an aftermarket amplifier. You'll find plenty of great spots to mount amplifiers in the Expedition (under the seats or behind interior panels, for example), but consider the size of the amp and remember that it will need air to operate efficiently. Learn more about adding amps to your system in our Car Amplifier Buying Guide.
Car security systems
Installing a security system in your Expedition isn't easy (security systems rarely are), but it's definitely a good idea. Our Crutchfield Advisors can help figure out what you need to get the job done, but we usually recommend taking your car and new gear to a professional installer.
Let's get started!
Ready to shop? Use our vehicle selector to find the gear that will fit your car or truck. If you have questions, give us a shout via phone or chat.


Scott from Memphis
Posted on 4/19/2023
I did not see instructions on how to install an amp in a expedition.
Jon Paul from Crutchfield
on 4/20/2023
randolph livernois from Newport News
Posted on 3/27/2022
does not address at al about replacing the oem amolifier, which is what google lead me to on this page.
Jon Paul from Crutchfield
on 3/28/2022
Carlos Garza from WAUTOMA
Posted on 12/11/2021
Can you send me pics or area in which to see an upgraded system with HVAC led touch screen
Jon Paul from Crutchfield
on 12/13/2021
matt from minneapolis
Posted on 5/16/2021
is it possible to reuse the stock sub and amp from the expedition in another vehicle? if so how do you wire that to aftermarket single din stereo?
Jon Paul from Crutchfield
on 5/17/2021
Randolph from Newport News
Posted on 12/8/2020
All right, everyone agrees (with the exceptions at Ford engineering) that the MyTouch Sync was a lead balloon. However, before removing parts and digging into the dash, are there any harnesses or updates to idata link that allow using the oem back camera? I can't see, no pun intended, having to wire in a brand new camera all the way to the dash and having an aftermarket looking camera on the back. Say what you will about the oem nav radio but the rear camera works very well. As far as replacing the oem amp, is there a harness for that as well? Thanks for any input.
Jon Paul from Crutchfield
on 12/10/2020
Brandon from Austin
Posted on 3/30/2020
Is there a way to first test the radio to see if it works before fully hooking it up
Jon Paul from Crutchfield
on 3/31/2020
Jon Paulette from Crutchfield
Posted on 9/29/2017
Timothy, It depends your truck's model year and factory stereo situation. When you enter your vehicle's info into our Outfit My Car tool, you'll see which stereos fit your car, plus the right wiring harness. If you have any questions, our advisors are available via phone or chat.
Timothy Rector from Fort morgan
Posted on 9/28/2017
Will I lose the rear seat controls if I change head units and the ability to split the sound between the front and rear ?