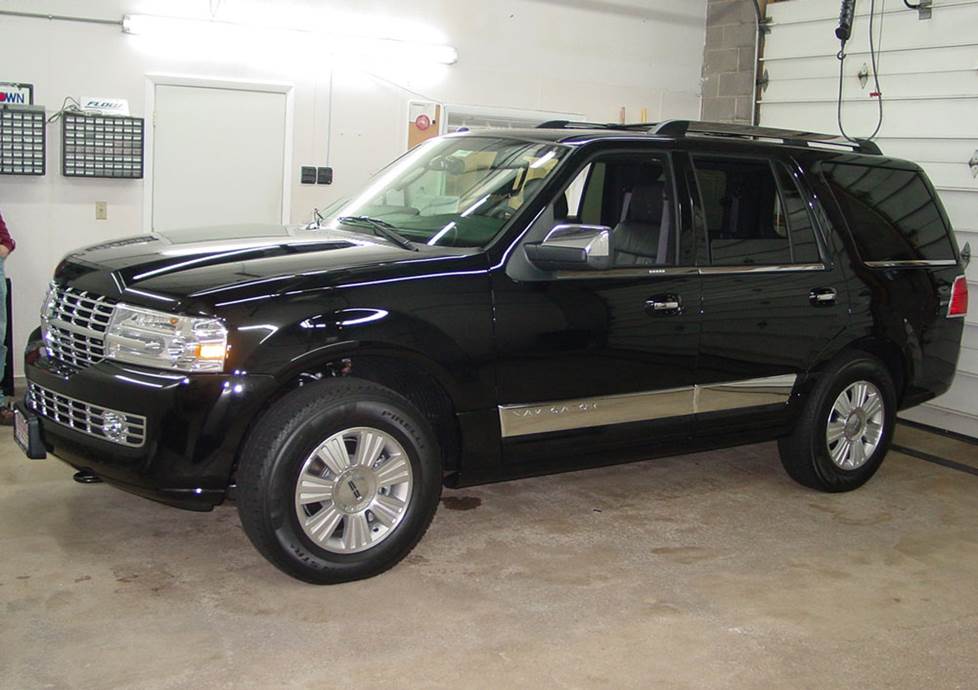
2007-2017 Lincoln Navigator
How to upgrade the stereo system in your Navigator

In brief: This Crutchfield Research Garage article gives you an overview of your Navigator's stock stereo system and your aftermarket upgrade options. We'll tell you all about:
- The factory stereo system
- Removing the factory radio
- Removing the factory speakers
- Adding more bass
- Other options for your Navigator or Navigator L
Then, use our vehicle selector to find the gear that will fit your Lincoln.
Overview of the Lincoln Navigator and Navigator L
The Lincoln Navigator is kind of like your dream vacation home on wheels – or at least the kitchen, anyway. There's chrome, there's leather, there's wood, there's technology, and there's tons of space for friends, family, and a bunch of stuff. It's a big, comfortable vehicle with all the luxury you'd expect in a Lincoln, plus the everyday utility of the more pedestrian Ford upon which it's based.
Yes, you can cruise the highway in leather-lined comfort, but you can also rumble around town and pick up everything you need for the weekend, including (we imagine) a grill and a patio set. The Navigator is a luxury SUV, yes, but it's still an SUV, so there's plenty of room to haul the things people assume Lincoln owners hire other people to haul. For those who need even more SUV, there's the extended wheelbase Navigator L (For "Longer," we presume...). The stereo and speaker replacement processes are the same for both models.
If you're looking for a stereo system that sounds like a million bucks, the factory systems probably aren't going to get it, especially the older editions. Upgrading the receiver and speakers will give you the rich sound you want while you're navigating through your daily drive.

Of course the Navigator has a navigation receiver.... (Crutchfield Research Photo)
The factory stereo system
The Navigator's standard system wasn't awful, but the really hot set-up was the 14-speaker, 600-watt THX II-Certified system, which added three center dash speakers and two more in the rear pillars.
A lot of people really like the THX II system, but the older versions are a bit out-of-date and you can get similar (or better) performance from aftermarket gear. You can also improve your in-car connectivity and replace that old navigation receiver with something new and updatable.
If you replace the receiver, you'll lose SYNC and the factory nav (if equipped), plus the stock satellite radio connectivity. The good news is that there are plenty of aftermarket nav receivers that are SiriusXM Ready, so you can get that stuff back (and add more) in a hurry. SYNC, not so much, but that functionality can be replicated in other ways.
This article hits the high points of replacing the audio gear in 2007-2014 Navigators. A mid-cycle refresh changed things in the dash, so at this time, we do not recommend replacing the receiver in 2015-2017 trucks. The speaker replacement process is the same for all third-gen Navigators, though, and there are some other ways to improve the sound and functionality without replacing the radio. To learn more, just give us a call and speak with one of our expert advisors.
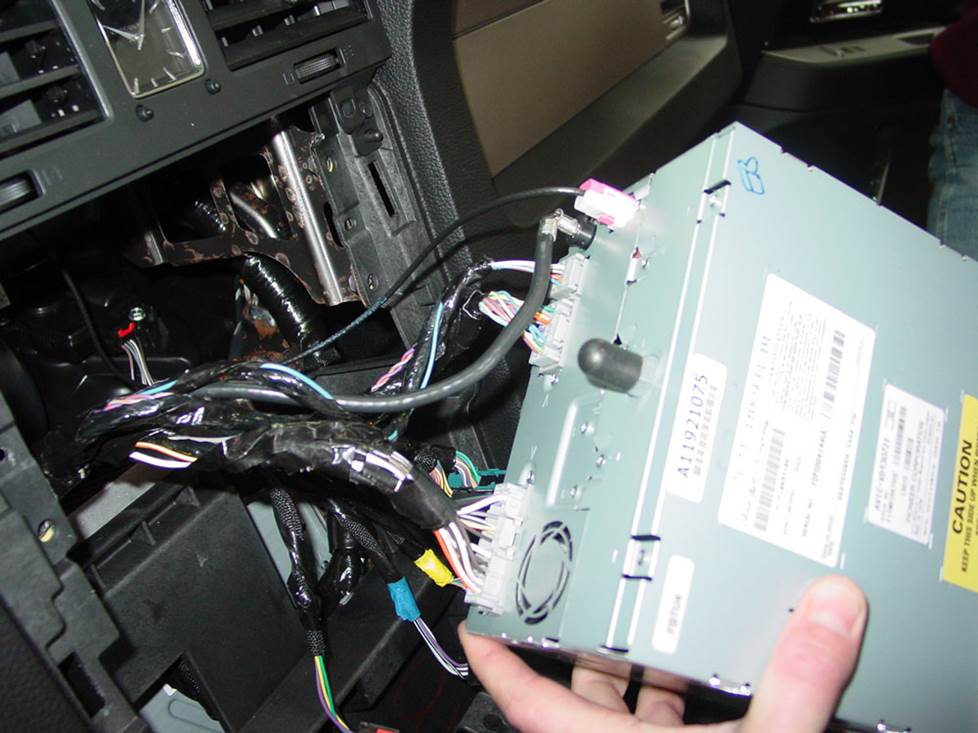
Despite the integrated look, the receivers are actually pretty easy to remove and replace (Crutchfield Research Photo)
Removing the factory radio
Removing and replacing the radio in '07-'14 Navigators is a pretty basic process, and it's the same for the standard and navigation models. The dash and center console are pretty well integrated in this truck, so you'll have to remove some lower panels to get the receiver. It's not hard, but work carefully and take good care of the various panels. We recommend Bojo panels tools because they're effective and easy on the panels.
The first thing to do (with this or any other vehicle) is set the parking brake and disconnect the negative battery cable to prevent any electrical short. Safety matters, so make sure you get off to a good start.
Pry off the gear shift trim ring to release the retaining clips and remove the ring, then pry up on the rear edge of the cupholder trim to release it. Removing the cupholder trim will expose a pair of 7mm screws below the radio/HVAC trim. Remove those, then pry out on the sides of radio/HVAC trim panel to release the retaining clips.
Detailed stereo and speaker removal instructions

Using the shift lock release, slide the gear shift into its lowest gear. Disconnect the harnesses on the radio/HVAC trim panel and remove that, then remove four 7mm screws securing the radio to the dash. Disconnect the harness, remove the radio, and get the new receiver ready to go.
When you buy your stereo at Crutchfield, you'll get a very nice discount on the dash kit and wiring harness needed for this installation. After plugging that wiring harness into the dash, connect the RCA plug from the harness to the subwoofer output on your new stereo. Make sure you don't connect it to a full range output.
Tools needed: Panel tool, 7mm driver, small flat blade screwdriver
Read our Car Stereo Buying Guide for shopping tips and advice.
Shop for car stereos that fit your Lincoln Navigator
Steering wheel audio controls
In most cases, it's reasonably easy to retain your Lincoln's steering wheel audio controls when you install a new stereo. When you enter your vehicle information, our database will choose the adapter you need to make your factory steering wheel controls work with a compatible aftermarket receiver.
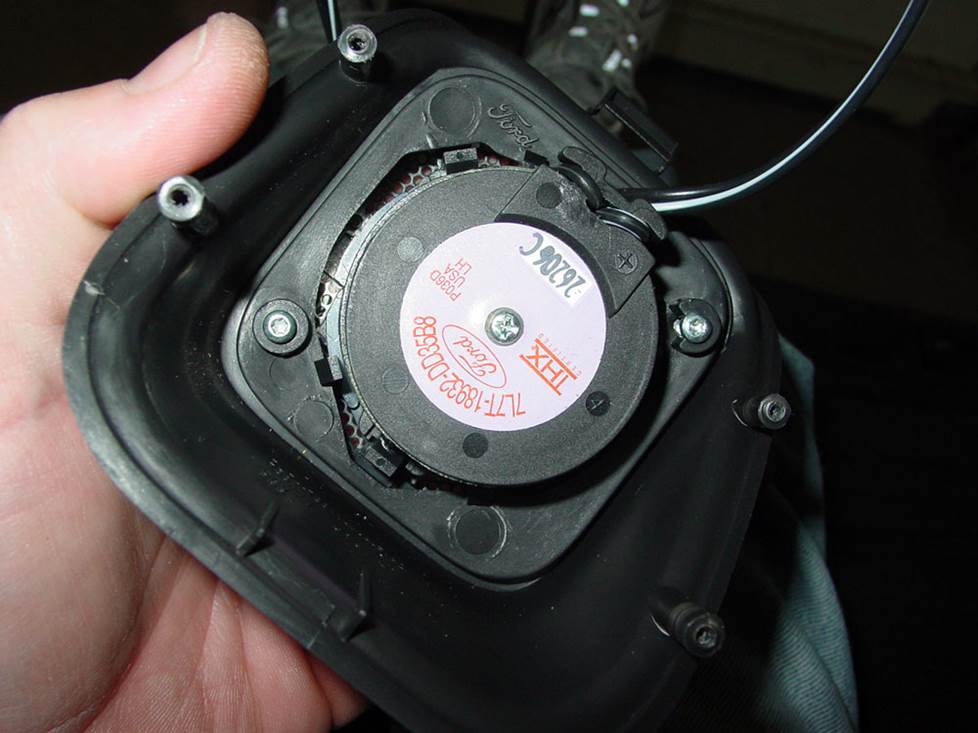
A close-up look at one of the rear pillar tweeters (Crutchfield Research Photo)
Removing the factory speakers in your Lincoln Navigator
The Navigator's door speakers are very easy to deal with, but the center dash speakers and the rear subwoofer are a different story. The sub is do-able, but you'll want to leave the dash speakers where they are.

The THX center dash speakers are basically impossible to replace, so you'll want to leave them where they are (Crutchfield Research Photo)
Center dash speakers
Lots of car stereos include center dash speakers. The Navigator's THX system has three — two midranges sealed inside an enclosure with one tweeter mounted to the bottom. They're oddly sized, hard to get to and almost impossible to replace, so we suggest leaving them where they are. The sound really isn't that bad, so you probably won't mind avoiding the rather lengthy removal process.
Tools needed (not really): Panel tool, small flat blade screwdriver, right-angle 7mm driver
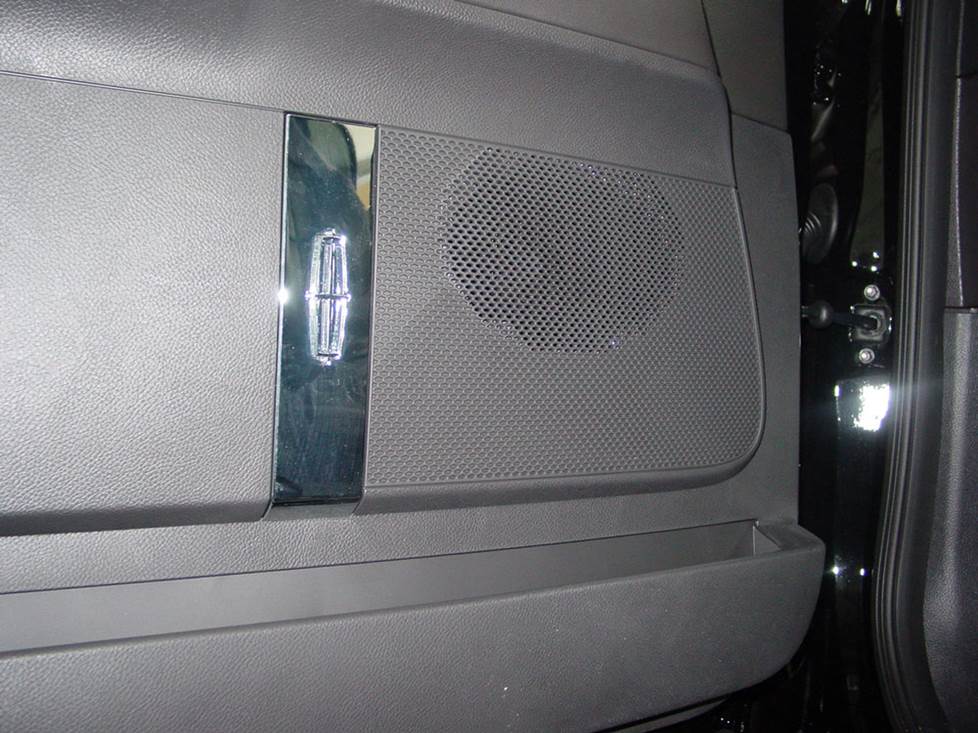
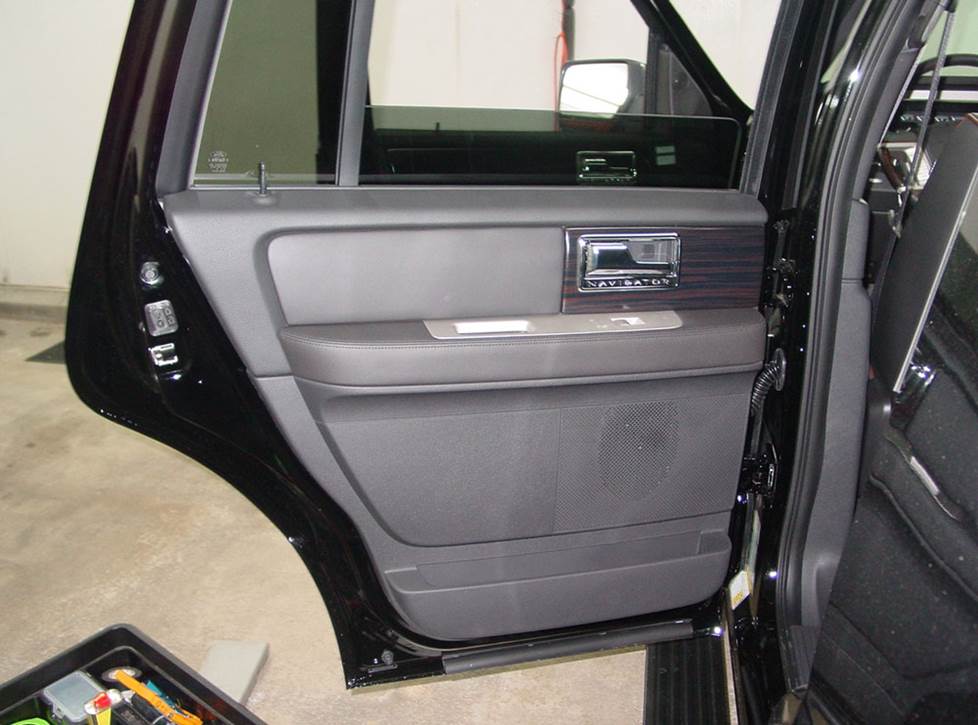
The front doors house a set of component speakers (Crutchfield Research Photo)
Front door speakers
The front door speaker array consists of woofers and tweeters in each door. They're not hard to deal with once you remove the door panels, and there are plenty of great aftermarket replacements out there. A set of component speakers will be a great upgrade for your Navigator.
The door panel removal process begins with prying off the screw cover behind the door release and removing one 7mm screw. Pry off the door release trim, then pry open the screw cover inside the door pull cup and remove two exposed 7mm screws.
Find the screw cover on the rear edge of the door panel, then pry it open and remove one Phillips screw. Remove two 7mm screws from the bottom edge of the door panel. Moving back up the door, pry out the sail panel to release one retaining clip. Hold the sail panel out and lift the door panel to release the hooks from the door. With all that taken care of, you can disconnect the wiring harness and remove the panel.
If that seems like more prying than you'd get from a nosy neighbor, that's because it really is a lot of prying. A set of Bojo panel tools will make this job a lot easier and they're a lot nicer to those plastic panels than a big old screwdriver.

The door tweeters are attached to the door panels (Crutchfield Research Photo)
Tweeters: The 1.570" tweeters can be replaced by pretty much any component speaker system tweeter and you'll need to use our universal backstraps (or hot glue or silicone) to secure the new tweeters in place. There's no wiring harness adapter for this location, so you'll need Posi-Products speaker connectors to connect the tweeters to the factory wiring.
The grille is removed with the tweeter and creates a 1.595" hole in the door panel. An aftermarket tweeter can be flush-mounted to the panel, as long as it clears the cutout.
Woofers: The woofers can be replaced by 6"x8" or 5-1/4" aftermarket speakers, and with the door panel out of the way, all you need to do is remove the four 1/4" screws securing the old speaker and get it out of there. Connect the speaker wiring adapter of the replacement speaker to your truck's speaker harness, use the old screws to secure the new speaker, and you're done.
Well, close, anyway. Be sure to test the speakers to make sure they're working properly before you put everything back together. Also, check to make sure the wiring doesn't interfere with the windows or the locks.
You'll need mounting brackets to mount smaller woofers, and they'll be included with your Crutchfield speaker purchase.
Tools needed: Panel tool, 7mm driver, 1/4" hex driver, Phillips screwdriver, small flat-blade screwdriver
The full-range rear door speakers are also easy to remove and replace (Crutchfield Research Photo)
Rear door speakers
The situation in the rear doors is very similar to what's going on up front, save for the fact that you're only dealing with a pair of full-range speakers. These speakers can also be replaced by 6"x8" or 5-1/4" aftermarket speakers, and the to-do list is basically the same stuff you did on the front doors. Step-by-step instructions can be found in your Crutchfield MasterSheet, of course.
Tools needed: Panel tool, 7mm driver, Phillips screwdriver, 1/4" hex driver, Torx T20 driver, small flat-blade screwdriver

Replacing the rear pillar tweeters requires some careful work, but it's do-able for the DIY-er (Crutchfield Research Photo)
Rear pillar tweeters
The THX 2.194" rear pillar tweeters are wired together and attached to the grilles with screws and heat-fused clips. Be careful when you're removing them, because you don't want to damage either the tweeter or the grille. You probably won't be able to re-install the stock tweeters after you replace them. That's probably not a huge concern, but we thought we'd mention it.
The tweeters are pretty easy to get to, anyway. Pry open the third row seat belt cover and remove one Torx T50 bolt. Allow the seat belt to hang while you pull down on the hatch door's upper trim panel and release the retaining clips. Remove that panel, then open the third row windows using the switch on the sunroof control panel.
Pull the pillar trim panel away from the pillar to release those retaining clips, then disconnect the harness and remove the panel. Remove the four Torx T10 screws securing the tweeter/grille assembly to the pillar trim panel and remove the assembly. The tweeter is attached to the grille with two Torx T10 screws and three heat-fused clips, so remove the screws and use care with the clips.
A wiring harness is not available for these tweeters, so we recommend Posi-Products speaker connectors here, too. They're a ton easier than splicing and you'll get a nice, secure connection to the factory wiring.
A variety of aftermarket tweeters can fit here, but you'll need to use universal backstraps (or hot glue, or silicone) to secure them.
Tools needed: Torx T50 socket, ratchet and extension, Torx T10 driver, panel tool
Read our Car Speakers Buying Guide for more information.
Shop for speakers that fit your Lincoln Navigator
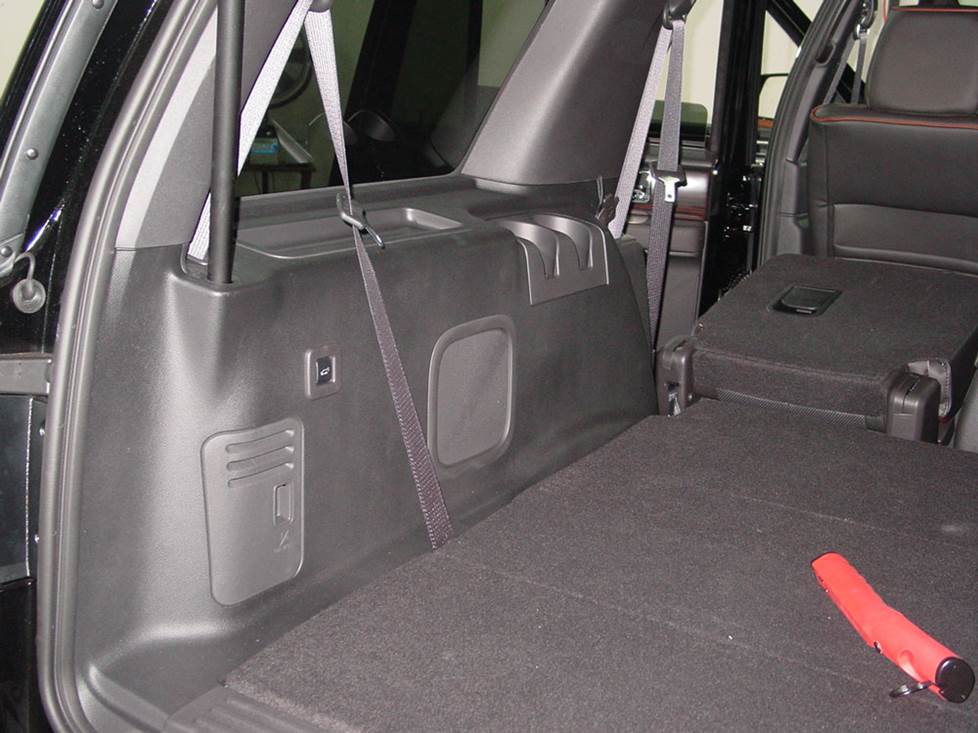
Replacing the rear subwoofer is kind of hard, but adding subwoofers is easy in a space this vast (Crutchfield Research Photo)
Bass in your Navigator
Replacing the optional rear subwoofer in the left rear side panel is not the easiest of tasks. It's not that the individual tasks are all that difficult, it's that there are a whole bunch of them. If you're a DIY-er with solid basic skills, you can do this, but you might want to block off an afternoon. It's not a thing you can hurry through, so be patient, work carefully, and maybe ask a friend to give you a hand. If you run into trouble, remember that your Crutchfield purchase includes free tech support for the life of the gear.
The stock speaker only receives bass frequencies, so if you try to put a full-range speaker back here, it'll only produce bass. Also, replacing the low-impedance stock sub with a higher-impedance aftermarket speaker will result in lower volume levels, so look for a 2-ohm replacement.
Whatever you put back there (and there are some very nice 8" subs that will fit), you'll need to use Posi-Products speaker connectors, because there's no wiring adapter available. Your new sub might not include mounting screws, so check the box and hit the hardware store if you need to.
You'll need to drill new mounting screw holes for that hardware, and while this isn't necessarily the hardest thing you'll ever do, you are drilling a hole in your truck. Make sure you know what's around the area you're drilling into, work carefully, and always wear eye protection.
Before you button everything up, make sure the seats and seat belts are secured to manufacturer’s specifications.
Tools needed: 6mm & 7mm drivers, 10mm socket, ratchet and extension, Torx T50 driver, panel tool
Even more bass
The Navigator offers acres of room for a subwoofer box or two or three. If you want to go big, you can, since you have a 51" W x 15" H x 24"/30" D space (measurements taken below side ledges) to work with. Of course, if you still need the Navigator's vast cargo area for stuff and things, you can go with a smaller box or even a powered subwoofer.
Learn more about building a bass system in our Car Subwoofer Buying Guide.

Installing Dynamat will help prevent wind and road noise from disturbing your musical entertainment
Other options for your Navigator
Here are some other cool ideas for improving your Navigator.
See more with add-on cameras
As you may have noticed, the Navigator is a pretty massive piece of machinery that's not exactly easy to maneuver in tight spaces. If you want a better view of what's behind you, we offer rear-view cameras from Kenwood, Alpine, Sony, Pioneer, and more. Some are designed to work with same-brand receivers only, but others come with a composite video connector and will work with almost any video receiver. We also have forward-view cams, too, so you can get a good look at everything around you.
Add an amplifier for bigger sound
If you really want to fill your SUV with sound, you need an aftermarket amplifier or two. You'll find plenty of great spots to mount amps in the Navigator (under the seats or behind interior panels, for example), but consider the size of the amp and remember that it will need air to operate efficiently. Learn more about adding amps to your system in our Car Amplifier Buying Guide.
Quiet things down with sound deadening
The Navigator is a luxurious vehicle, but it's still an SUV and it can get rather loud on the road. To combat wind noise and road roar, you can install Dynamat in the doors and (if you install a big sub) rear hatch area. This sound-deadening material will keep the noise out and allow you to really enjoy your music.
Protect your carpets with floor mats
No matter how much you pamper your Navigator, you're eventually going to get involved in some sort of truck-like activity that gets you and/or it dirty. When that happens, it's a good idea to have a set of WeatherTech Floor Mats on the floors. These incredibly durable mats trap moisture, contain dirt, and keep your factory carpets looking good.
Security systems and remote start
Installing a security system in your Navigator won't be easy (security systems rarely are), but it's definitely a good idea if you tow long distances and stop overnight. Our Crutchfield Advisors can help figure out what you need to get the job done, but we usually recommend taking your vehicle to a professional installer.
Adding remote start capability to your Navigator lets you warm it up in the winter or cool it down in the summer. Installation is usually easier with these systems, but we still ask that you call to order so that we can make sure you get the right harness for your ride.
Let's get started!
Ready to shop? Use our vehicle selector to find the gear that will fit your car or truck. If you have questions, give us a shout via phone, chat, or email


Comments (0)