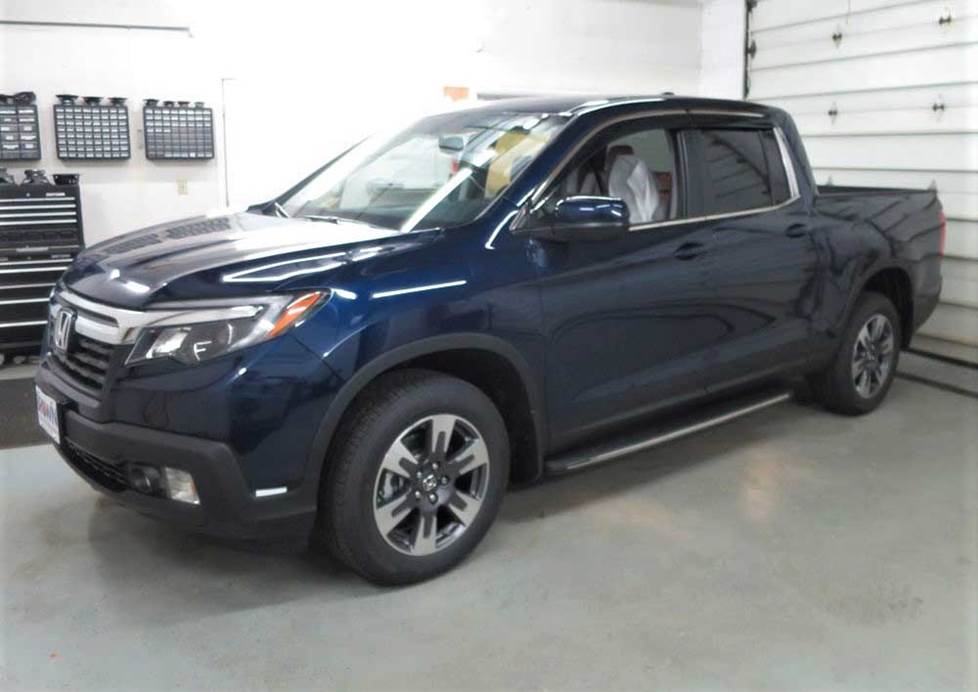
2017-up Honda Ridgeline
How to upgrade the stereo system in your Ridgeline

In brief: This Crutchfield Research Garage article gives you an overview of your Ridgeline's stock stereo system and your aftermarket upgrade options. We'll tell you all about:
- The factory stereo system
- Removing the factory radio
- Removing the factory speakers
- Adding more bass
- Other options for your Ridgeline
Then, use our vehicle selector to find the gear that will fit your truck.
Overview of the Honda Ridgeline
The original Ridgeline took the basic pickup concept, boiled it down to the things most pickup owners actually do with their trucks, then added all sorts of cool new ideas. And it was good. Very good, in fact.
With the newest Ridgeline, Honda started with the basic Ridgeline concept, then got to work improving that. The styling is less, um, "out there" (for the record, we liked the old one), but it’s still very distinctive. The handling is more refined, the interior is still spacious, and the bed is not only longer, but also has (in upper level models) transducer speakers and a power inverter that can power a TV at your next tailgate. And, of course, there are enough storage cubbies to make you think you don’t own enough stuff yet, including a trunk in the bed.
You can’t upgrade those transducers, alas, and there are a few other challenges for the car audio DIY-er. That said, there are lots of ways to improve the sound in your Ridgeline and this article will show you what you can do and how you’ll do it.
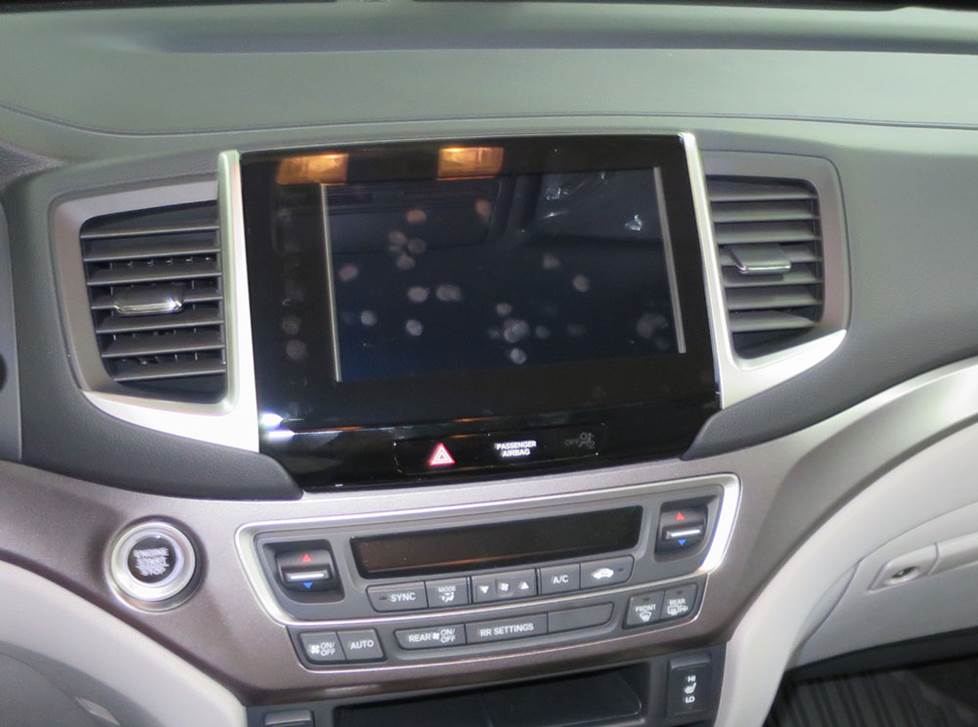
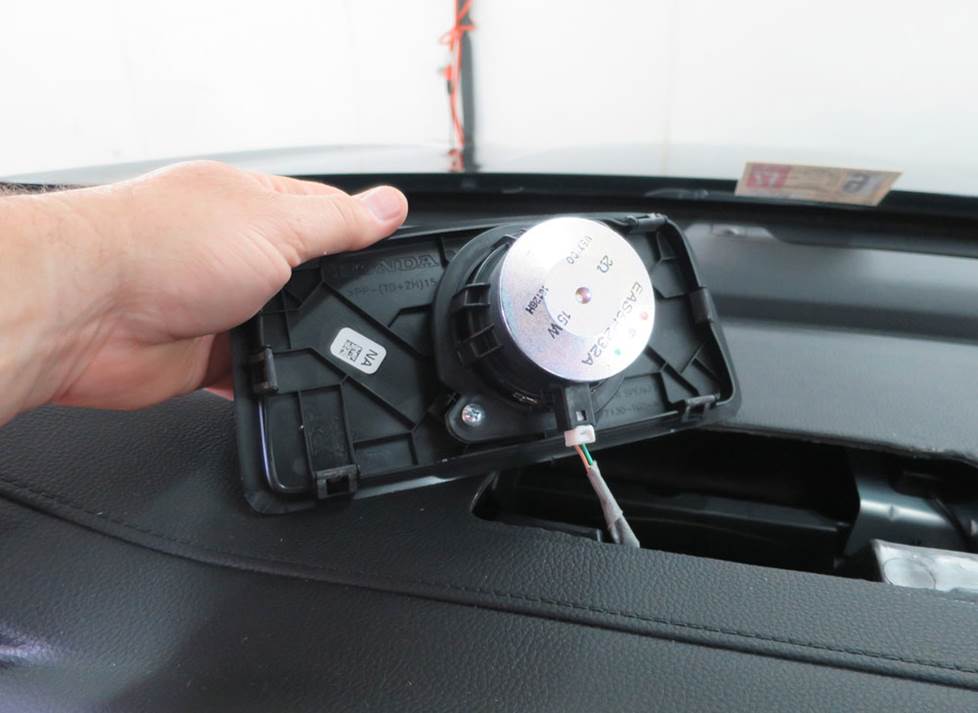
The Ridgeline's base radio (shown, and apologies for the smudges) is reasonably easy to deal with, but the 8" premium model is a bit more difficult (Crutchfield Research Photo)
The factory stereo system
In 2017-2020 mpdels, the base audio system is a 5" LCD with AM/FM/HD/SiriusXM with seven speakers. The upgrade features an 8" AM/FM/SiriusXM/HD LCD touchscreen with HondaLink functionality, navigation, and a bonus USB port. This receiver also works with both Apple CarPlay and Android Auto, and it plays through eight speakers. Upper-end trim levels also include six wonderfully innovative transducer speakers in the Ridgeline’s bed.
Replacing the base 5" radio in 2017-2020 models is a straightforward process, for the most part. You’ll need a wiring harness adapter and dash kit to install a new stereo in your Ridgeline, and you'll save money on them when shopping with Crutchfield.
Replacing this radio means losing some obvious things, like the factory CD player, the factory AUX and USB inputs, the factory satellite radio capability, and in some rare cases, the lane change camera. Most of these things can be regained with the right aftermarket stereo.
When you replace the stock radio, you'll also need to install an aftermarket amplifier with a power output between 50-100 watts RMS. You'll need an amp with a low-pass crossover if you want to keep the stock rear-wall subwoofer.
And in other news, your Ridgeline is equipped with an active noise cancellation system. When you add an aftermarket amplifier, processor, or subwoofer, you'll need to disable that system.
Many of the same things are true when it comes to upgrading the 8" radio in 2017-2020 models, with the massively notable exception that there’s no wiring harness available for this upgrade. While this does not make radio replacement impossible, the sheer amount of hard-wiring involved will make the job it a lot harder. If you’re an experienced hand at car audio DIY, have at it and work carefully. If you aren’t, you might want to farm this job out to a local car audio installer.
If you are bypassing the factory amp (above the passenger-side kick panel) in one of these Ridgelines, we recommend replacing the low-impedance factory speakers with standard 4-ohm aftermarket speakers to prevent overheating and other damage to your new radio. Or you can just add an aftermarket amp, a process that will include even more hard-wiring.
Note: Radio replacement is not recommended for 2021-up Ridgelines. New speakers and other upgrades are possible, though.Talk to a Crutchfield Advisor to learn more.
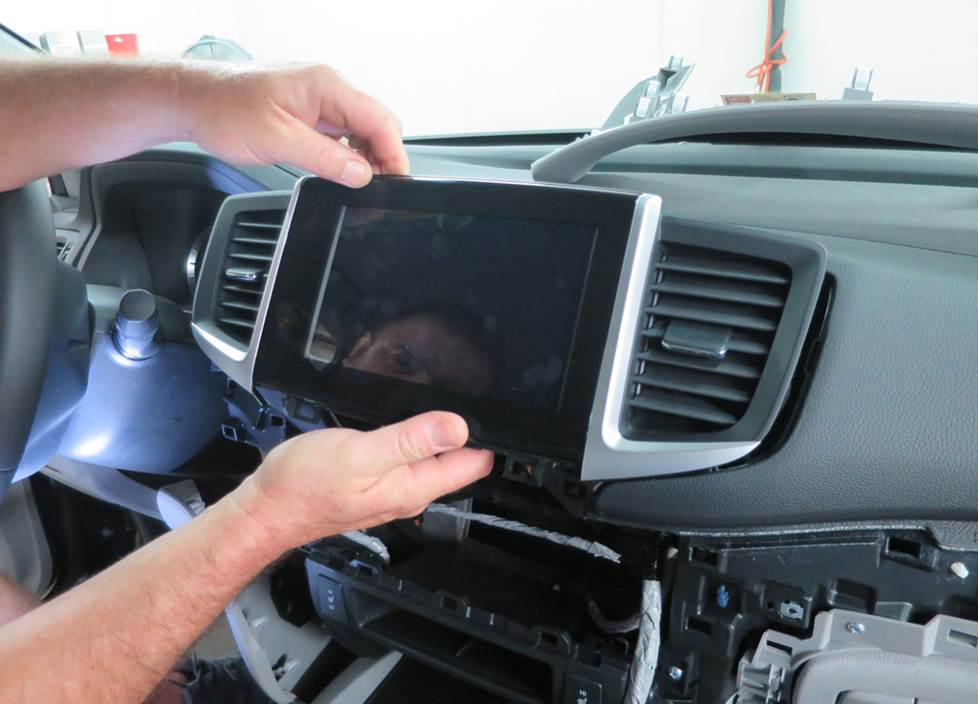
You'll save money on the dash kit needed to install a new radio when you buy it and your new stereo from Crutchfield (Crutchfield Research Photo)
Removing your Ridgeline's factory radio
Before you start, check to make sure there’s nothing in the stock radio that you’ll miss later. Then set the parking brake and disconnect the negative battery cable to prevent any electrical short. Once all that’s done, you’re ready to work.
Use a panel tool to pry off the driver’s side dash end cap to release the retaining clips, then remove the cap. Pry out the driver-side knee panel to release those clips and just let the panel hang while you keep working.
Pry out the passenger’s side dash end cap to release the clips, then remove it. Next, starting at the right side, pry off the passenger’s side dash trim strip to release fifteen clips, then remove that panel. Pry off the hazard/airbag light switch panel to release its clips and let it hang by the wiring harness.
Remove the three Phillips screws exposed by the removal of the driver’s side knee panel and the passenger’s side dash trim strip.
Pry off the climate control panel to release fourteen clips, disconnect the wiring harnesses and remove the panel. From here, loosen the two 8mm screws securing the bottom of the factory radio bracket, then pry out the factory radio assembly to release nine clips. Pull out the entire assembly, disconnect it, and set it aside.
To install the new radio, follow the instructions included with your dash kit and the wiring harness adapter.
Once the new stereo is connected and installed, reconnect all wiring harnesses — especially the airbag — then reconnect the battery. Test the radio to make sure it’s working properly and, if it is, start putting the dash back together by reversing the disassembly steps.
Tools needed: Panel tool, Phillips screwdriver, 8mm socket, ratchet and extension
Read our Car Stereo Buying Guide for shopping tips and advice.
Shop for car stereos that fit your Honda Ridgeline
Steering wheel audio controls
It's relatively easy to retain your Ridgeline's steering wheel audio controls when you install a new stereo. When you enter your vehicle information, our database will choose the adapter you need to make your factory steering wheel controls work with your new receiver.
Upgrading the speakers is a great way to improve your sound, even if you keep the stock radio (Crutchfield Research Photo)
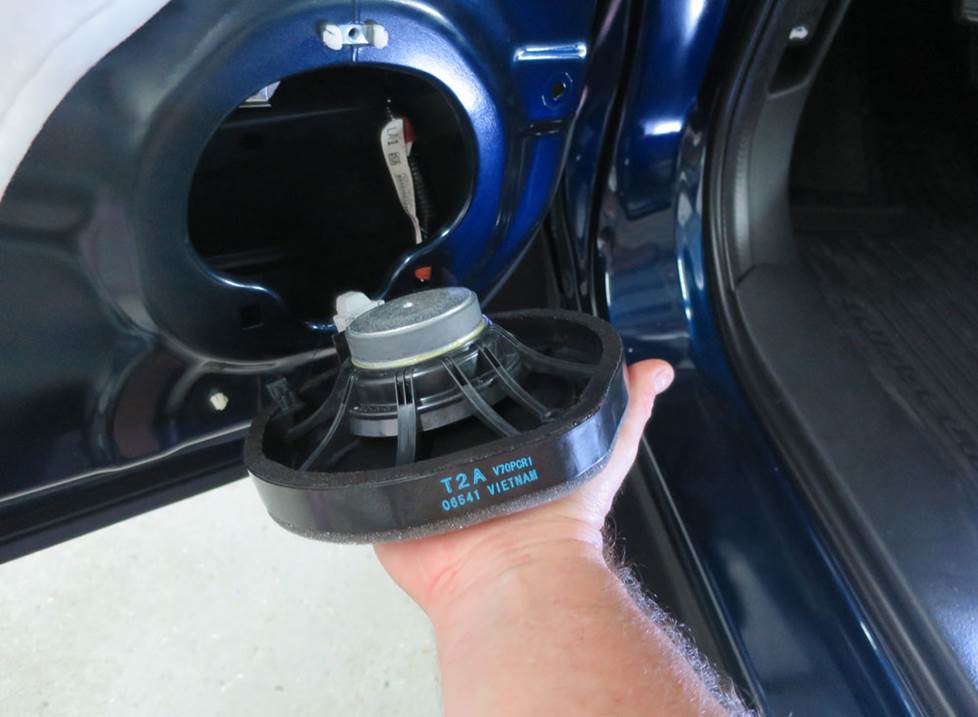
Removing your Ridgeline's factory speakers
The Ridgeline's cabin speakers are reasonably easy to deal with, so even if you don't want to replace the stock radio, this is an excellent area for an upgrade. The bed transducers can't be replaced, but hey, it's just cool to have them there anyway, right?
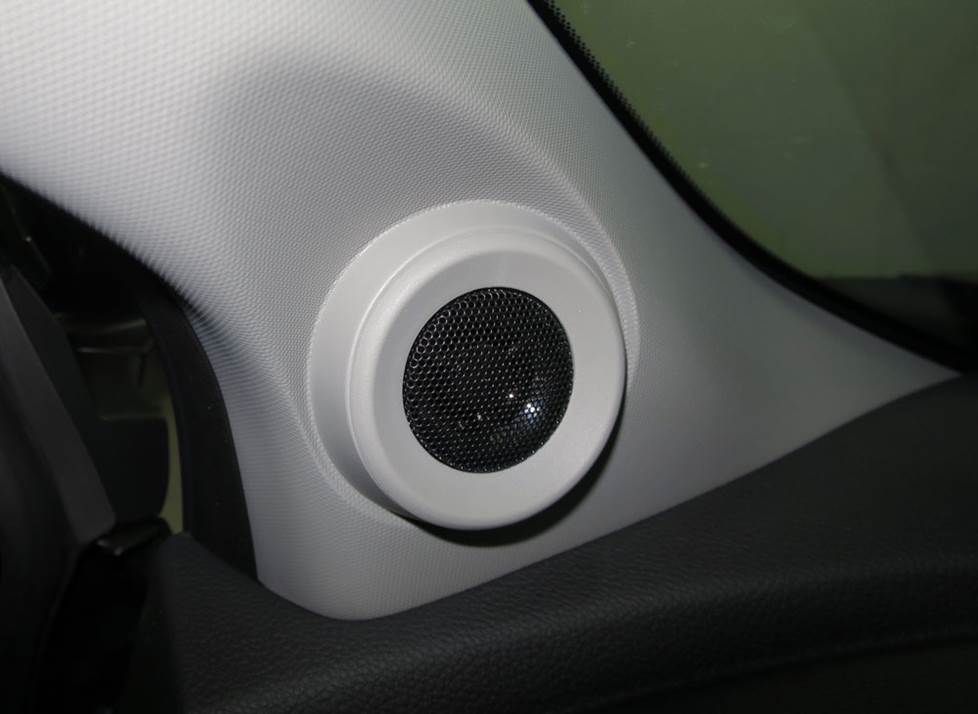
The Premium system's center dash speake comes out with minimal hassle (Crutchfield Research Photo)
Removing the center dash speaker
If your Ridgeline is equipped with the 3-1/2" center dash speaker, it’s reasonably easy to reach and remove.
Pry up the center dash grille to release six clips, then remove the speaker/grille assembly. Remove the two Phillips screws securing the speaker, the remove it.
No speaker wiring adapter is available for this location at the moment, so you’ll need to splice, solder, or use Posi-Products speaker connectors to install an aftermarket speaker.
Note: Replacing the low-impedance factory speaker with a 4-ohm aftermarket speaker will result in lower volume levels. Shop accordingly.
Tools needed: Panel tool, Phillips screwdriver
You'll find tweeters in the Ridgeline's A-pillars (Crutchfield Research Photo)
Removing the front pillar speakers
The Ridgeline's 1.685" pillar tweeters are attached to the back of the grilles. While they’re pretty easy to get to, installing the replacements will involve a couple of extra steps.
Pry open the screw cover on the pillar trim panel and remove one exposed 8mm screw. Next, start at the top and pry off the pillar trim panel to release one clip. Disconnect the wiring harness and remove the trim panel, then (gently...) pry the tweeter off the pillar trim panel to release the retaining clips and remove the tweeter.
There’s no speaker wiring adapter for these tweeters, so you’ll have to splice, solder, or use Posi-Products speaker connectors to connect to the truck’s wiring. There aren’t any mounting brackets, either, so you’ll need to make your own, use a set of our universal backstraps, or hot glue, or silicone to secure them. Once they’re in, be sure to test them before you start putting things back together.
Tools needed: Panel tool, small flat blade screwdriver, 8mm socket, ratchet and extension, Phillips screwdriver
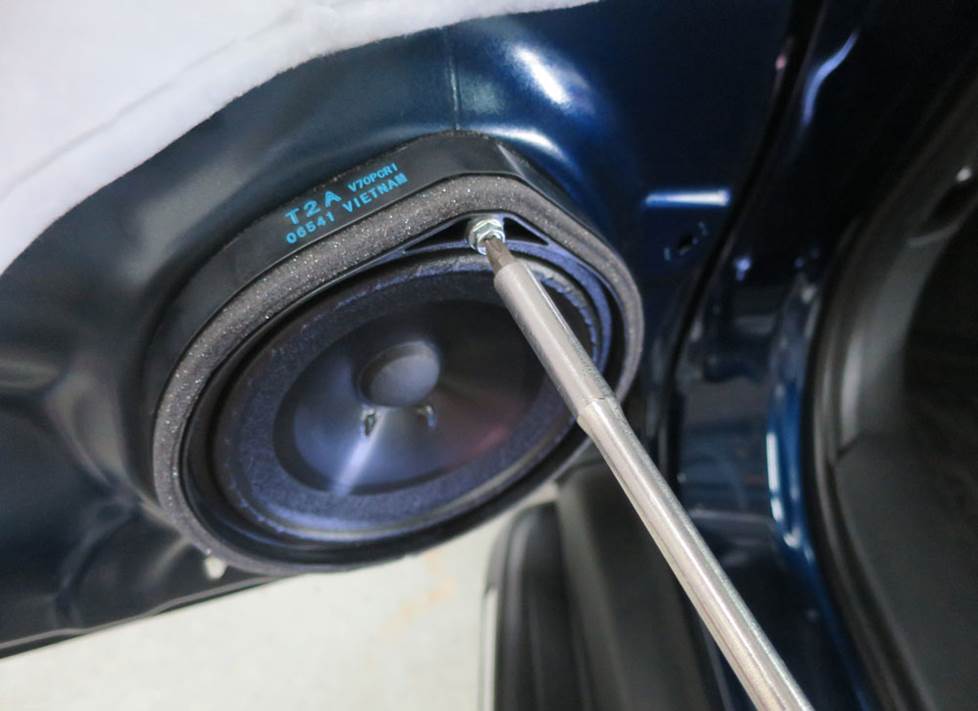
There are plenty of great-sounding aftermarket options for the front and rear door speakers (Crutchfield Research Photo)
Removing the front door speakers
The 6-3/4" front door speakers can be replaced by same-size or 6-1/2" aftermarket speakers. You’ll need mounting brackets to install your new speakers, and we’ll include them with your Crutchfield speaker purchase. You'll need to cut off the back of the factory plastic speaker grilles to install the new ones, and in the case of 6-3/4" models, you’ll also need to remove the inner tabs on the aftermarket speaker brackets.
To remove the stock speakers, start at the top edge and use your panel tool to pry out the screw cover behind the door release, then remove two Phillips screws. You’ll also need to remove the Phillips screw under the armrest.
Moving down the door, pry out the sides and bottom of the door panel to release ten clips, then disconnect the door lock/release assembly and wiring harnesses before removing the door panel. Set the panel aside in a safe, dry place, then remove the Phillips screw securing the top of the speaker and remove the speaker.
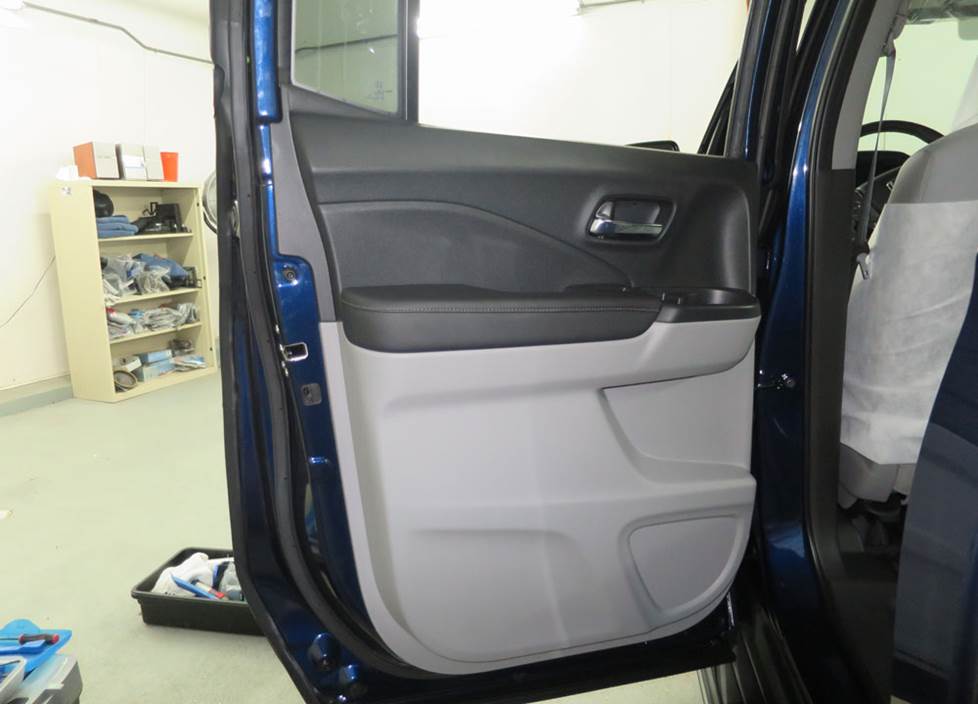
Once the new speakers are connected, test them to make sure they’re working. If all’s well, you can put the doors back together. Don’t forget to make sure the wires aren't messing with window operation and also test the door lock and releases.
Tools needed: Panel tool, Phillips screwdriver, small flat blade screwdriver, utility knife
The rear door speaker replacement process is very much like what you'll do on the front doors (Crutchfield Research Photo)
Removing the rear door speakers
The situation in the rear doors is pretty much identical to what we just went over for the front doors. Same factory speakers, same aftermarket size options, same basic disassembly methods, same brackets, etc. If you can do that, you can do this.
Our vehicle-specific disassembly instructions, which are included free with your stereo or speaker purchase, have all the step-by-step details on replacing your Ridgeline’s factory audio gear.
Tools needed: Panel tool, small flat blade screwdriver, Phillips screwdriver, utility knife
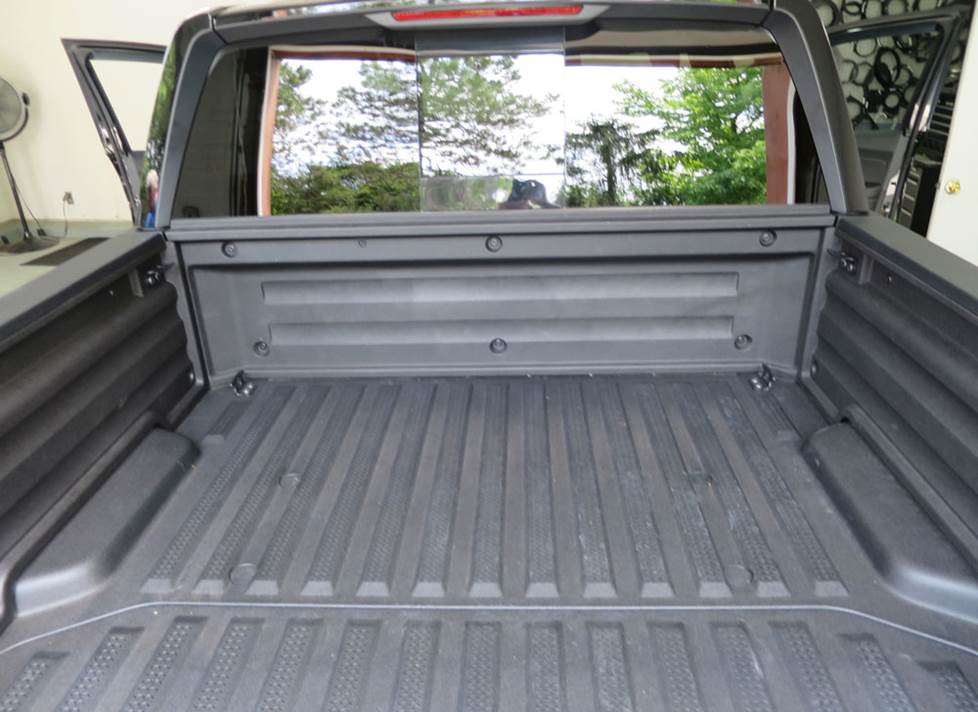
A pickup truck with transducer speakers in the bed. What will they think of next? (Crutchfield Research Photo)
Replacing the truck bed transducers (or not)
The Ridgeline’s upper trim levels include some very nifty transducer speakers in the truck’s bed. These six speakers, which are obviously handy as heck for tailgating or any other outdoor activity, are mounted behind the bedliner walls (two behind the front wall and two behind each side wall). Each transducer has an 8-ohm impedance and should only be replaced by similar transducers.
Since we’ve already noted that replacing the 8" factory receiver is a bit of a hassle, you might be looking for an excuse to not do that. And here it is: The factory radio switches between the in-cab speakers and the truck bed audio system, so if you remove the factory radio, you’ll lose the use of these transducers. So yeah, keeping the stock 8" receiver might turn out to be a smart move?
Since we’re not sure how many of you are going to attempt to remove and replace these speakers, we’re not going to go into a great deal of detail here and that info also won’t appear in your Crutchfield MasterSheet. We do know how to reach and remove them, though, and if you’re interested, we can help.
Your Crutchfield purchase includes free tech support for the life of your gear, so if you want to get into this, you can give our Virginia-based tech support team a call. These experts are available seven days a week and they’ll give you the info you need to get the job done
Tools needed, maybe: Panel tool, small flat blade screwdriver, Phillips screwdriver, Torx T-30 and T-55 drivers, 8mm socket, ratchet and extension
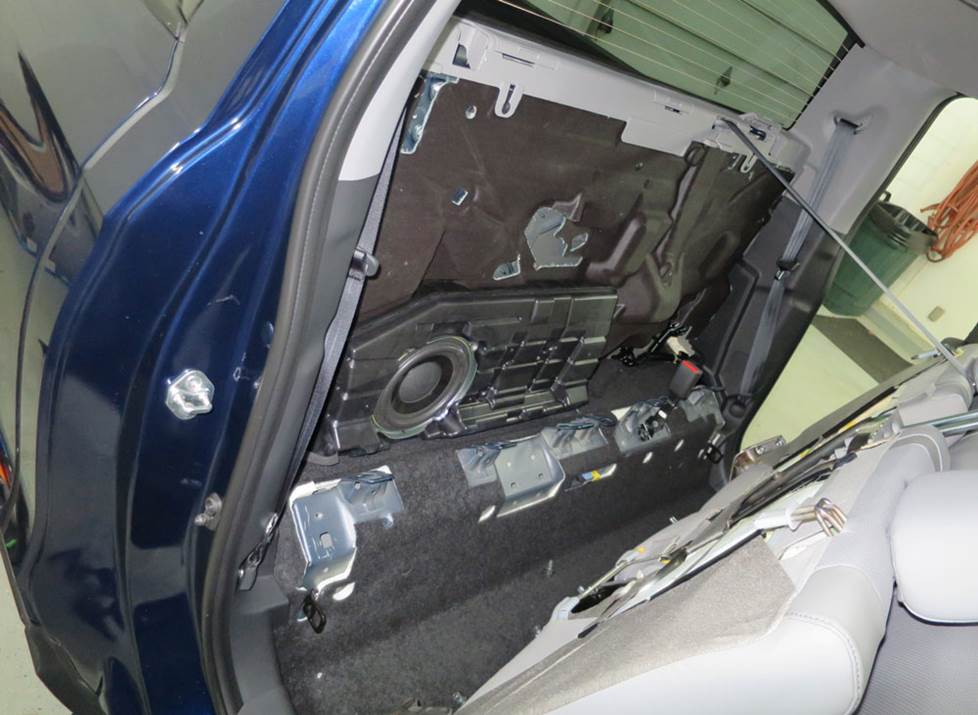
Getting to the rear wall sub takes a bit of work, but it's nothing a reasonably skilled DIY-er can't handle (Crutchfield Research Photo)
Removing the rear wall subwoofer
The Ridgeline’s 8" single voice coil factory subwoofer is mounted to a polymer enclosure that is attached to the back wall of the cab. This sub has a 2-ohm impedance, so replacing it with a 4-ohm aftermarket speaker will result in lower volume levels.
You’ll need to remove the rear seat assembly to get to this speaker, and while that’s a bit of work, it’s nothing the average DIY-er can’t handle. You might want to get some help heaving the seat out of there, though. Complete removal instructions can be found in your Crutchfield MasterSheet.
You’ll need to look for a shallow-mount subwoofer to fit in this very specific spot. Some subs will have multiple bolt patterns that will allow you to install them without drilling or modification. In other cases, you will need to drill mounting holes. That’s not terribly difficult, but you’re drilling a hole into one of the more expensive things you own, so be careful. Make sure you know what’s around and behind the area you’re drilling into, be patient, and wear eye protection.
Once the new sub is installed and you’ve tested it out, make sure the re-installed seat is secure and the seat belts are working properly.
Tools needed: Panel tool, 8mm, 10mm (deep socket) & 14mm socket, ratchet and extension, Phillips screwdriver, drill with 1/8" bit
Read our Car Speakers Buying Guide for more information.
Shop for speakers that fit your Honda Ridgeline
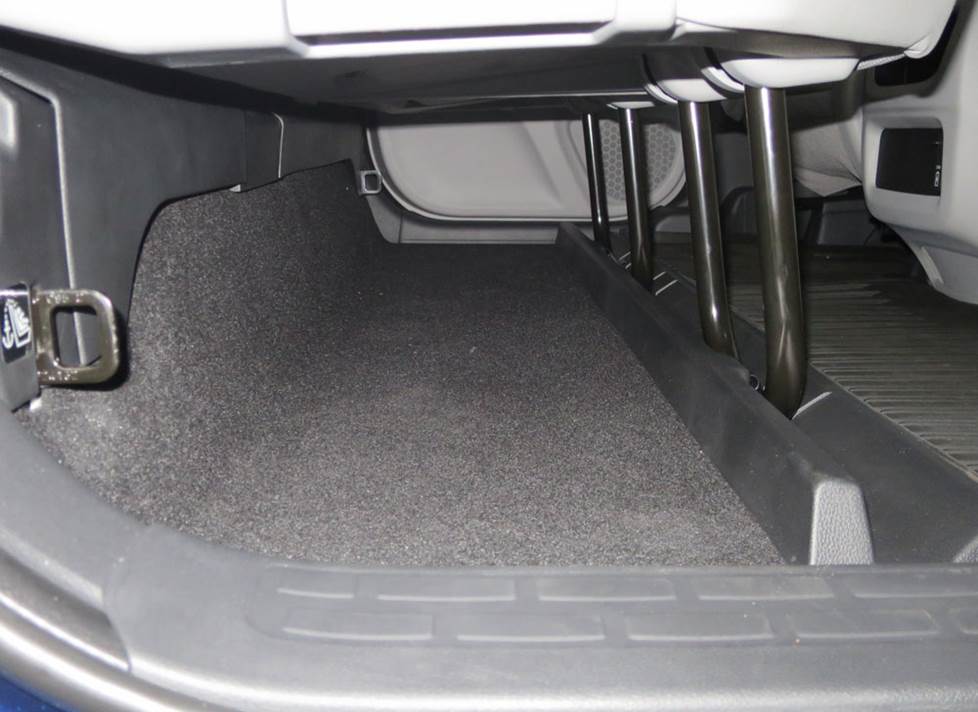
There's some room for a sub enclosure under the Ridgeline's rear seat (Crutchfield Research Photo)
More bass in your Ridgeline
If you want to boost your Ridgeline’s bass even more, there’s room under that rear seat for a subwoofer enclosure. The actual dimensions are 9" H x 54" W x 11" D, so you have some possibilities here. On the other hand, if you want to use that space for other things, you can go with a more compact powered subwoofer.
Learn more about building a bass system in our Car Subwoofer Buying Guide.
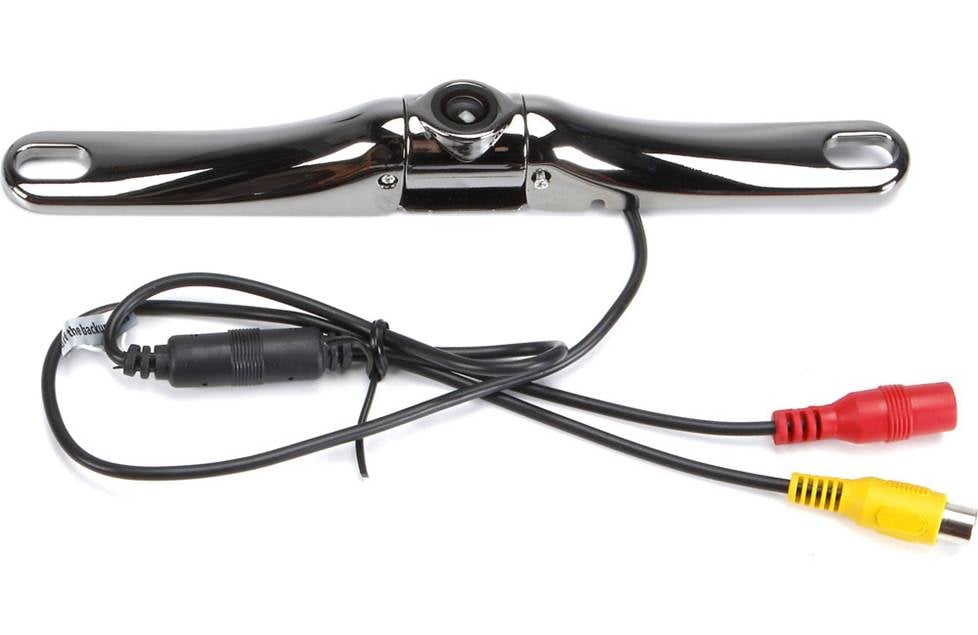
The Accele RVCLPMBS rear view camera mounts on your Ridgeline's license plate
Other options for your Ridgeline
The aftermarket offers an amazing variety of other ways to improve your Ridgeline. Here are some of the ways Crutchfield can help.
Add a rear-view camera
The Ridgeline isn't a huge vehicle, but it's not exactly a Honda Fit, either. A rear-view camera can be a big help when you're backing up in a crowded parking lot. We offer cameras from Kenwood, Alpine, Pioneer, and more. Some are designed to work with same-brand receivers only, but others come with a composite video connector and will work with almost any video receiver.
Install some sound deadening
Like most trucks and SUV's, the Ridgeline can get a wee bit loud at highway speeds. To combat wind noise and road roar, you can install Dynamat in the doors and (if you install a sub) rear seat area. This sound-deadening material will keep the noise out and allow you to really enjoy your music.
Protect your truck with a security system
Installing a security system in your Ridgeline isn't easy (security systems rarely are), but it's definitely a good idea. Our Crutchfield Advisors can help figure out what you need to get the job done, but we usually recommend taking your truck and new gear to a professional installer.
Let's get started!
Ready to shop? Use our vehicle selector to find the gear that will fit your car or truck. If you have questions, give us a shout via phone, chat, or email


Kurt from Caledonia
Posted on 12/30/2022
When you remove the factory speakers the driver's side door has red and green wires, the passenger has pink and grey. Which colors go to the positive terminals? Is the signal crossed over or is it the full spectrum? Likewise with the tweeters and center channel.
Jon Paul from Crutchfield
on 1/3/2023