Bill H's 1963 Studebaker Avanti
A great-sounding, hidden installation in a classic car


Bill's gorgeous 1963 Studebaker Avanti
Items installed:
- Sony CDX-M60UI
- Kenwood Performance series component speakers
- Retrosound dual voice coil speakers
- Sound Ordnance M-1350 amp
- Profile California amp
- Bazooka Bass Tube®
Bill's installation story

In a nutshell, Bill put together a "hidden" system so he wouldn't have to alter the vintage, stock look of his Avanti, yet would still get fantastic sound.
He mounted his receiver in the glove box, with a wired remote in his center console, two woofers underneath the center console (on top of the transmission hump), two tweeters in custom enclosures underneath the dash, two full range speakers in the center factory dash location and the center factory rear-deck location, and a Bazooka Bass Tube® in the trunk. Here's an excerpt of Bill's article to get you started. Or you can read the entire Avanti Magazine article here.
Stealth High-End Stereo Installation in a 1963 Avanti R2
(Words and photos by Bill Henderson)
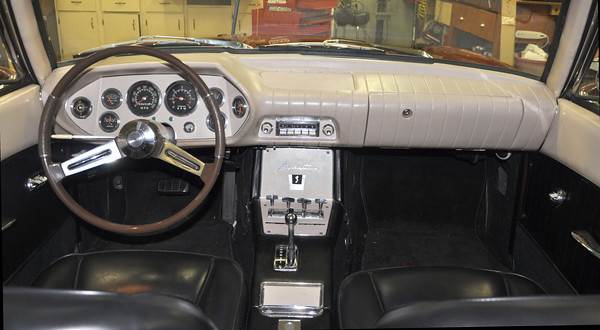
Before or after? You can't tell, and that's exactly the point. This is an "after" shot. Head unit hidden in the glove box; speakers out of sight under the dash; controls under the lid of the center console; and amplifiers in the trunk.
Updating old cars with new technology has been going on since people were driving Model T Fords. When I bought my 1963 Avanti R2, I first addressed the "must do" jobs like replacing the brakes, recoring the radiator and the like. Then my itching turned immediately to updating the audio: not just a little, but upgrading it to state of the art.
I began my quest with one hard and fast rule that made life considerably more difficult. I set out to install an impressive system that would be completely undetectable by observers or occupants, even on close inspection. I am pleased to say that I have accomplished this feat to my satisfaction. Simply put, the audio system in this car sounds almost as good as the high-end system in my new Infiniti sedan, but without any butchery of my Avanti's beautiful 1963 Space-Age era interior.
Step One: Setting Goals
Every successful project starts with a clear set of goals and objectives. Mine were as follows:
- I wanted sound that was well above average in quality, with ample power and versatility to play CDs, attach my iPod®, and maybe add satellite radio later.
- I wanted the original Studebaker AM radio to remain in the dash for the sake of original appearance, and for it to light up when the interior gauges glowed red.
- I wanted absolutely nothing to show, so that passengers would have no clue as the modern upgrades.
- I needed to be able to control the sound from the driver's seat without taking my eyes off the road.
- This was not to be a "cost is no object" installation. The result needed to cost under $1000, in the same neighborhood of the cost of a high end sound system as a factory option in a new luxury car.
- And finally, I wanted to cut as few holes as possible too — preferably no holes at all, if such a thing was possible.
Step Two: Selection of the head unit
Since I wanted to leave the 1963 vintage radio in the dash, I obviously could not install the new radio in that spot. I took careful measurements of the Avanti's glove box, being careful to allow room for the wires that need to exit from behind. I found that the available space was perfect for a standard DIN sized head unit, the most common size on the market.
Now, these units are meant to be operated using the buttons on the front of the radio, so I realized I would need one that had a very full featured remote control available for it as an option.
Researching further, I learned most head units so equipped come with an accessory infrared remote. That means that the remote must be able to "see" the head unit for it to work, useless if the stereo was in the trunk or behind the glove box door. While RF (Radio Frequency) remotes were available for some units, meaning that they can operate the stereo even if it is out of sight, I found that these controls offered only a few functions. So unless I was happy only using the remote to change CD tracks and raise and lower the volume, I would need to have physical access to the head unit while driving to do most anything else.
With some additional searching, I discovered that stereos made for use on boats — marine units — came with the option of attaching a full-featured, wired remote control unit. Typically on boats the radio is mounted under cover or below deck to keep it out of the elements, and having a full-featured remote is a common optional accessory.
I reasoned that this might be a good choice for the Avanti, with the head unit in the glove box and the remote possibly stored in the console. I chose the Sony CDX-M60UI, because it fit in the Avanti's glove box, had a full-featured wired remote available as an option, offered a CD player, iPod attachability, and allowed remote amplifiers and a subwoofer to be connected for better sound.
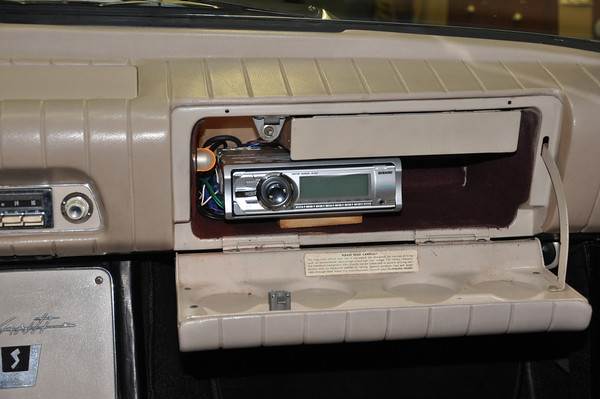
The Avanti's glove box makes the ideal home for the Sony marine CD receiver.
Step Three: Speaker Choice and Placement
For those so inclined, there is plenty of room to cut giant holes in the rear deck panel for 6x9 speakers. The doors can be carved to accept 5" speakers in their front bottom edges, or even larger openings can be hacked in the rear of the front doors instead. But since I wanted no additional holes and nothing visible that varied from stock, I dismissed these options.
Avanti doors are too precious to hack holes in, as well as risking introducing problems with rattles, structural integrity and interference with the window lowering mechanism. But still I wanted full and strong bass, as well as brilliant highs with a sense of spaciousness in the stereo image. Difficult, but not impossible, I found.
My installation employs a total of seven speakers placed throughout the car. I have used the stock factory openings in the dash and rear deck for dual voice coil "center" speakers, and separate component speakers (woofers and tweeters) as my main front speakers.
Kenwood 6-3/4" woofers are mounted inside the console, back to back and facing out, and accompanying tweeters are mounted beneath the dash at both ends. Finally, a subwoofer is hidden in the trunk to add the needed bass to fill out the sound. I use two external amplifiers to drive all of these speakers, both mounted to a carpeted panel behind attached with screws and Velcro to the rear panel in the trunk.
We'll start with the woofers mounted inside the console. My Avanti does not have air conditioning; therefore the console header is surprisingly empty as you can see when the side panels are removed. I elected to build a sealed enclosure for the twin Kenwood speakers and then mount the completed box enclosure inside the console, securely screwing it to the transmission hump.
The sealed speaker box isolates the woofers from each other. The speakers are separated from each other by a solid wooden baffle inside the case. The box is bolted to the transmission hump with two sturdy L-brackets. It fit tightly enough that I did not need additional points of connection, but I tested carefully by applying very loud music and listening for undesirable vibrations before I buttoned everything up.
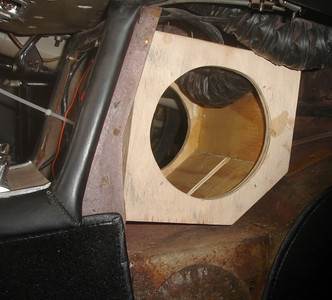
The woofer box fits neatly over the transmission hump, completely out of sight.
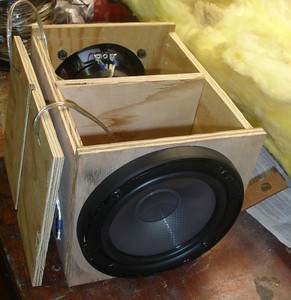
Bill's Kenwood woofers loaded in his custom box.
Tweeters are highly directional, and in this installation they are especially important because they are the only speakers mounted on the left and right sides of the car. So besides reproducing the highs they also give depth and a sense of separation to the stereo sound.
I first experimented with them above the dash, and no matter how I pointed them, they were too "hot" sounding. I found that the best solution was to mount them lower, below the dash pointed about 45 degrees towards center. Here, they added highs and depth to the sound but did not assault my hearing.
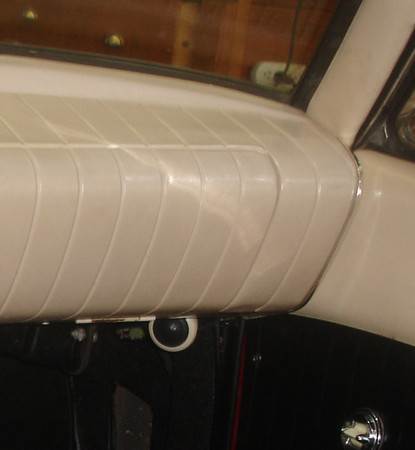
The tweeters mounted unobtrusively under the dash.
Read the full article on Bill's Studebaker Avanti sound system. He describes more of the installation process, sharing some great installation tips along the way, and tells us how it sounded in the end.
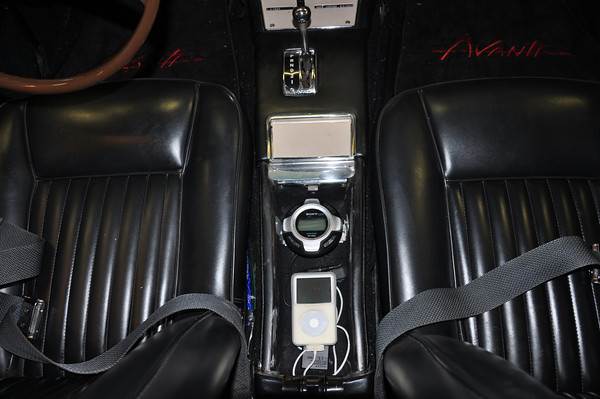
Bill's wired remote and iPod fit snugly in the center console.
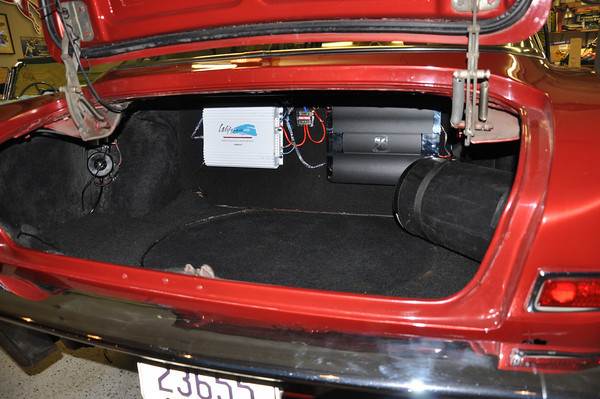
The amps are mounted neatly in the trunk, while the Bass Tube® takes up little space.
Vehicles in the Custom Car Showroom are submitted by customers and fans, and edited by Crutchfield writing staff. You can find more of these articles on the Showroom main page.


Comments (0)