His and her car stereo DIY
A couple tackles an audio installation in their vehicle


Getting advice they needed
What happened when a couple decided they wanted to upgrade the audio system in their 2010 Mitsubishi Lancer? They called their good friend Stephen, who happens to also be a car audio buyer for Crutchfield. Jen and Greg knew that Stephen knows his stuff — before becoming a buyer, he spent many years a Crutchfield Sales Advisor. Stephen listened to what they said about their factory system and what they wanted to improve and add, and then he offered up some choices and advice on how to proceed with the installation.
Things that were missing
Jen and Greg live in the outskirts of Washington, D.C., where you often want some form of entertainment to take your mind off of snarled traffic. They knew they wanted a new receiver to add some media versatility, including USB and Bluetooth capability, so they could get their Android phones involved in the action. Their factory radio didn't offer these features, nor did it offer the clarity and detailed soundstage that both Greg and Jen wanted for their music. That's where new speakers and a powered subwoofer came into play.
How to proceed
They were confident in the fact they could perform the installation with Crutchfield's help, and since there were several items being installed that needed to be connected together, Stephen gave them a step-by-step plan of attack, and provided them with the exclusive Crutchfield MasterSheet™ instructions for their Lancer.
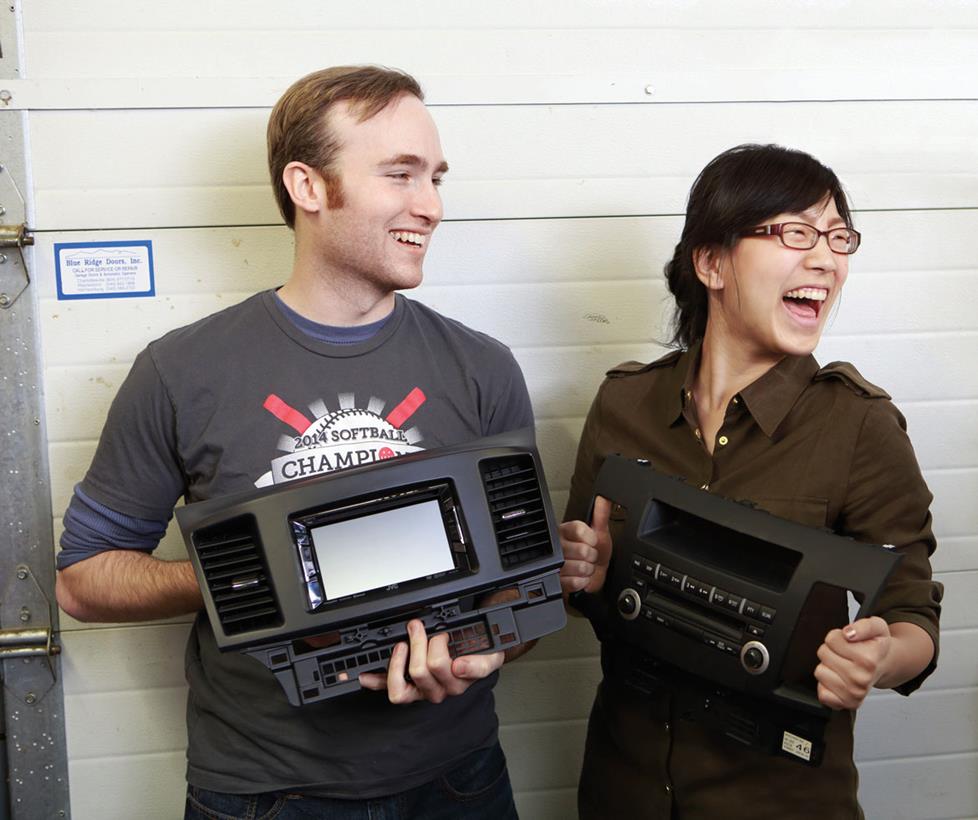
Greg and Jen compare their new JVC receiver and dash kit to the factory radio that's been removed.
Old radio out, new radio in
Since it was the hub for all connections and controlled the entire system, they began by replacing the radio. The factory radio had a 2-piece assembly that included a thin front dash panel mounted over the CD player and amp module. Once some dash trim and bolts were removed, as the MasterSheet instructed, Jen and Greg detached the wiring harness and removed the radio. They were careful to leave the airbag harness connected, as the instructions warned.

For their new media center, Jen and Greg went with the JVC KW-V21BT DVD receiver, which included the Bluetooth functionality they wanted for hands-free calls and streaming their favorite music. They could also use the USB port to plug in their phones for charging, as well as plugging in flash drives loaded with music. Touchscreen controls also gave them quick access to all their media.
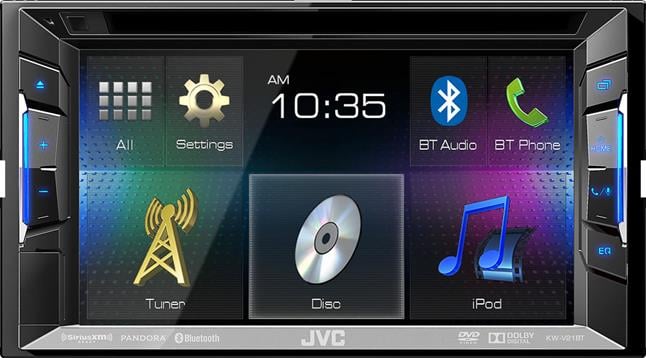
Their new JVC KW-V21BT DVD receiver
Jen worked on completing the wiring connections for the JVC to interface with the Mitsubishi wiring. She also removed the air vents from the factory dash panel and installed them into the new Scosche dash kit, which gave the new radio a seamless look once it was mounted in the dash opening. The JVC receiver also required the use of the factory brackets to secure the radio in the opening, so Jen attached them to the radio chassis.
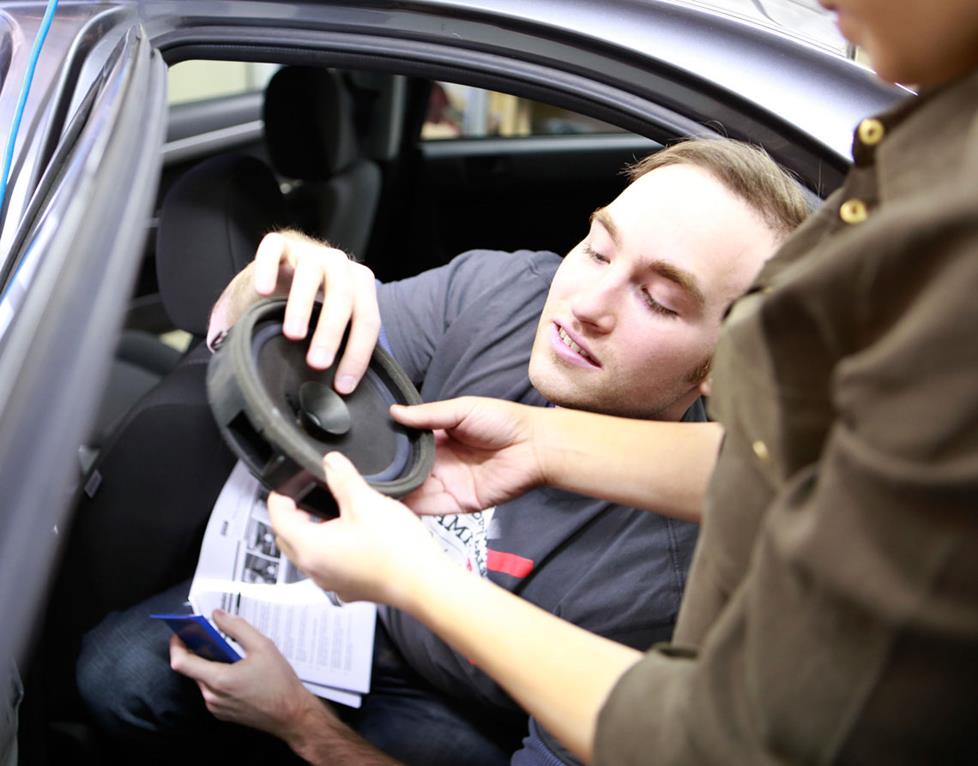
Greg and Jen examine the flimsy factory speaker that twisted out of the door locations.
Removing factory speakers
While Jen handled the radio assembly, Greg began the removal of the factory speakers from the four doors. He used Bojo panel tools and a screwdriver to pop off the door panels so he could get to the speakers. He also detached the cables that connected to the door levers and disconnect a couple of harnesses for power window controls. Mitsubishi used a unique screw-in bracket mount to house the factory speakers, so Greg simply twisted them out and disconnected the wiring harness.
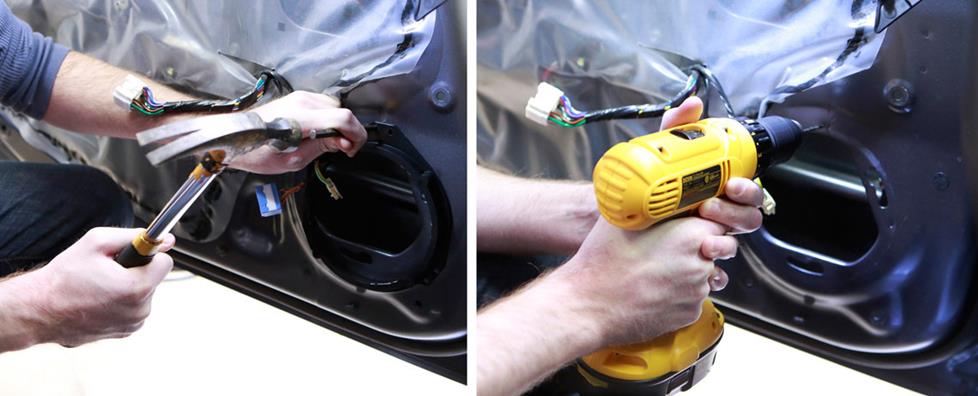
Greg hammered a pilot divot and then drilled holes for the new speakers.
Upgrading to new types of speakers
Jen transitioned over to help Greg with the installation of the new Rockford Fosgate speakers. Because the factory speakers didn't use bolts or screws, they had to drill new screw holes in the door metal to secure the new speakers. After aligning the brackets that Crutchfield supplied and marking the screw hole locations, they drilled holes for the speakers. Next they attached the speakers to the brackets and secured the entire assembly to the door locations using screws that came with the Rockford Fosgate speakers, while making sure that the screws didn't bump into the windows when they were down.

Greg shows off the difference between the factory speakers (left) and the new Rockford Fosgate speakers.
Stephen recommended a pair of Rockford Fosgate Prime R165X3 6-3/4" 3-way speakers for the rear doors and a pair of Rockford Fosgate Prime R1675-S 6-3/4" component speakers up front. Component speakers provide better imaging and an improved soundstage over full-range speakers located lower in the doors. Both sets are super-efficient to work well with the power from the JVC radio, but they can still handle more power if they decide to add an amp later.
Jen and Greg had to mount the tweeters of the component speakers remotely, so Stephen introduced a little innovation here. The front door "sail panels" in the Lancer actually had mounting holes for the factory tweeters that Mitsubishi offered as an upgrade. So, Jen and Greg used universal backstraps to secure the tweeters in these locations. These backstraps were bent and cut to fit the tight locations, and the tweeters fit nicely behind the panels.
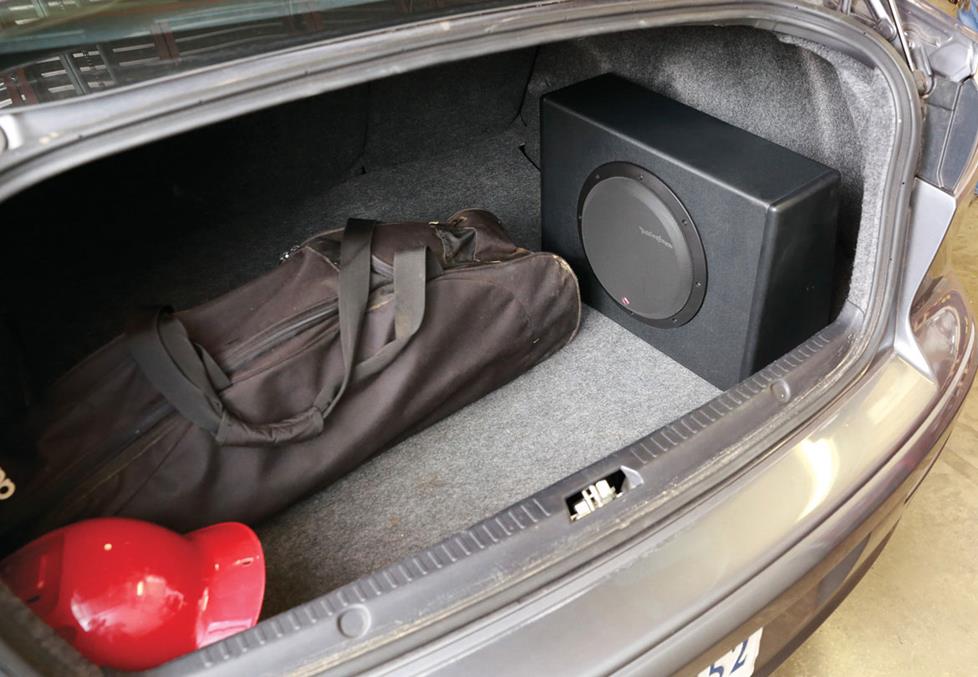
Putting some bass in their music
After a quick sound check with the connected radio loosely bolted in place, they gained some confidence once they heard the speakers working like they should. Now, it was time for the subwoofer. The Rockford Fosgate Punch P300-10 10" powered subwoofer offers a nice bass punch without taking up too much space. Jen and Greg were able to retain much of their trunk's cargo space for their softball gear and Greg's saxophone. And when they needed more space, the sub features a disconnect terminal that lets them quickly remove the sub without pulling all the wire out.
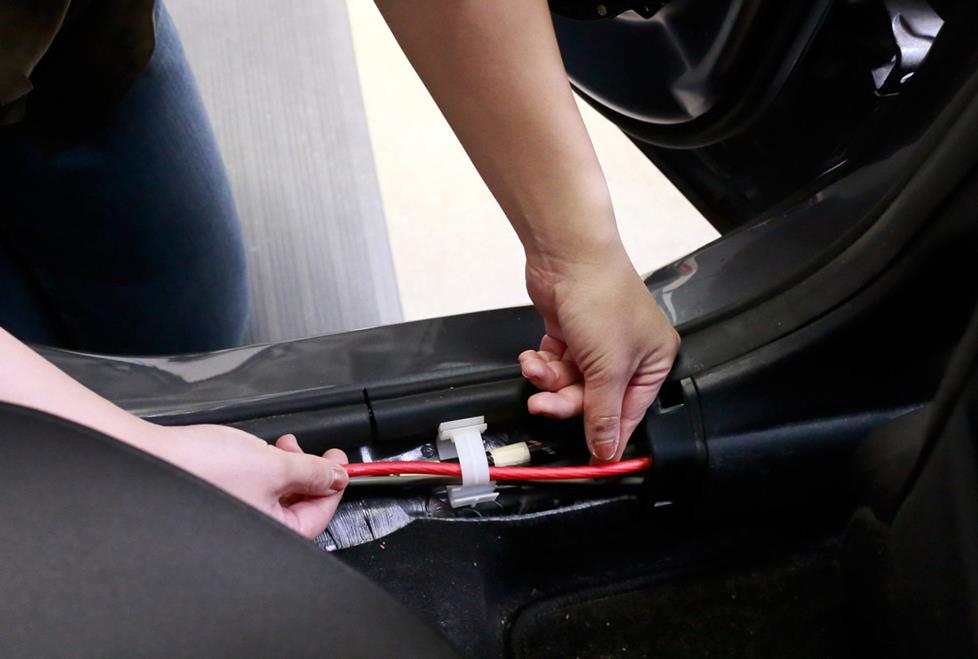
Jen ran the power cable for the subwoofer under the door trim panels on the way to the engine compartment.
The sub's built-in amp required running a power cable to the Mitsubishi's battery, so Jen and Greg ran that cable under the front and rear door trim on the driver's side. They fed the cable through a grommet in the front fender that allowed them to transition the cable safely to the engine compartment where they connected it to the positive battery terminal.
Finished with that, they ran their RCA signal cables and the remote turn-on lead the same way on the opposite side of the vehicle and fed them to the radio location. Having the power cable and signal cables separated provides less potential for any noise issues in the system.
Cranking up the tunes
Jen and Greg left all of the panels off but connected all the wiring. It was time for a second sound check, and once they heard their new gear in action, they immediately realized that their efforts were totally worth it. They heard more detail from Steely Dan than they'd ever heard from the factory setup. They tightened the radio's bolts and replaced all of the panels and trim pieces. And even after several hours of work together, they had smiles on their faces and were still speaking to each other.
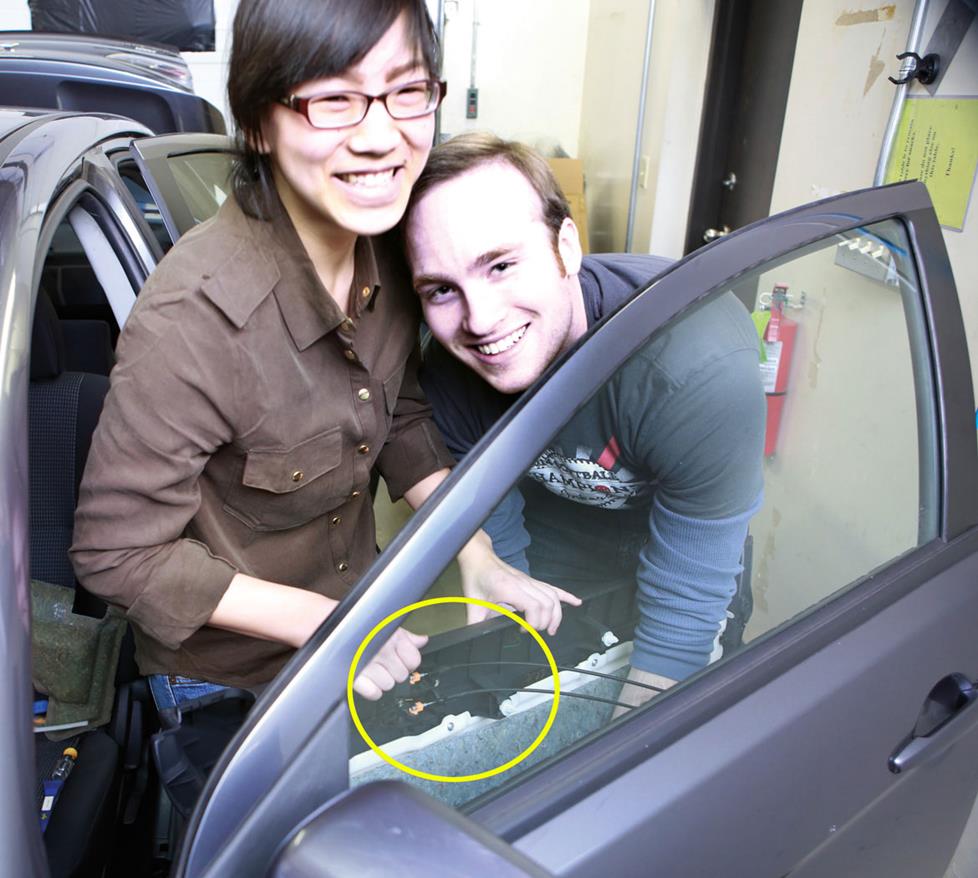
After Greg couldn't open the driver door, Jen and he realized they had to properly reattach the door lever cables (circled).
Not so fast...
Well, they thought they had properly put everything back together. After the installation, they stopped for gas and Greg realized he couldn't open the driver’s door. Laughing, Jen ran around from her side and used the outside latch to let him out of the car. After a quick door panel removal, now that they knew how to do it, they found that the latch cables hadn't been re-attached correctly when they reassembled the door panel. They quickly fixed that issue like seasoned pros and cranked up their system on the way home.
Who's next?
Thanks to help from Crutchfield, Jen and Greg were able to install their new stereo system and transform their daily grind into a fun-filled commute. If that's sounds like something you'd like to do, just contact us via phone, chat, or email using the links at the top of our website. Our advisors will help you pick out the gear that's right for you and make sure you get everything you need to do it yourself.

Because of their willingness to be featured in this article, Greg and Jen received their new gear compliments of Crutchfield.


Jermaine Hicks from Atlanta
Posted on 8/11/2023
Awesome instructional testimony. Looking forward to upgrading my 2011 mitsubishi lancer es sport tunes
Oscar from San Antonio
Posted on 4/5/2023
Just bought a pioneer stereo and speakers! I am looking forward to installing them. Definitely going to double check on those latch cables so that I don't end up locked in like Greg haha. I'm excited, and if everything goes well I'll definitely consider buying a subwoofer.
Eric from WILMINGTON
Posted on 5/19/2016
I have an 08 Lancer with 6 speaker stereo. Same factory head unit but mine has the optional tweeters in the upper front door sail panels. I have been patiently pricing a complete system replacement just like this...touch screen head unit(pioneer avh4100nex), component front speakers(sane Fosgate ones as this), rear door 6 3/4"( I have already new Infinity Reference speakers) and a powered trunk sub. I'm thinking bigger trunk sub or under seat powered sub to hear clean bass better. This is nearly my planned setup just different brands of parts.
Robert Mundell from Phoenix
Posted on 9/29/2015
The new sound system looks rad!! Thinking of upgrading my car's sound system next month.