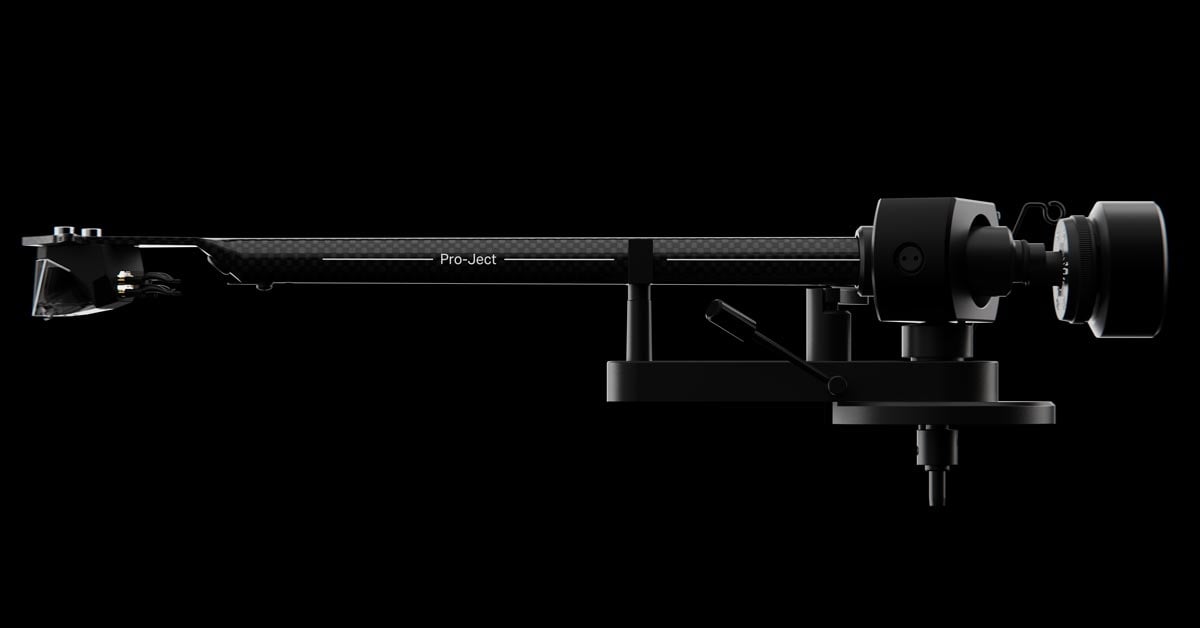
How to balance a tonearm on a record player
A step-by-step guide to setting up your new turntable

Balancing your tonearm might sound tricky, but it’s essential for getting great sound from your vinyl. Here’s a straightforward guide to getting it right. Let’s start with the basics.
How does a record player work?
When you play a record, the stylus (or needle) follows the V-shaped groove on the record’s surface, moving up, down, and side to side as the record spins. This makes the stylus vibrate, and these vibrations travel through the tonearm to a small magnet or coil in the cartridge, creating an electrical signal that can then be amplified into the music you hear. Since the stylus’s movement and position in the groove are key to the quality of the audio, it’s crucial that it be adjusted correctly.
Most vinyl records are designed for stereo sound, with the groove's left and right sides carrying separate audio channels. This is where the stereo magic happens. The needle’s movements along the groove read the variations on each side of the V. The wiggling in one direction picks up the sound for your left ear, while the wiggling in the other direction picks up the sound for your right ear.
This separation is key to creating a dynamic listening experience. It’s what makes the opening cash register in Pink Floyd's Money so intriguing — the sound shifts between channels, adding depth and immersion.

A look inside a moving magnet phono cartridge. As the stylus glides through the record groove, it makes the magnets shift between the coils' pole pieces, creating a voltage.
The needle is attached to a tiny cantilever inside the cartridge. As the needle vibrates, it causes the cantilever to move as well. This cantilever is connected to a set of small coils or a magnet that convert the vibrations into audio information. The cartridge then separates these signals into two audio channels — left and right — which are sent through your preamp and amplifier to your speakers. This separation creates the rich, full stereo sound you hear.
Balancing the tonearm
Since the needle captures both the left and right audio channels simultaneously, a properly balanced tonearm is very important — it ensures the needle sits perfectly in the groove, delivering that breathable, spacious, audio experience that vinyl is known for.
Now, let's get your 'table balanced. Start by making sure your turntable is off and placed on a level surface. To get the turntable perfectly balanced, you can pop a small bubble level on the 'table and if you can, adjust the feet until the bubble is centered. It’s a good idea to check from different angles to ensure everything is level.
Here’s a quick tip: place the level near the spindle, and if your platter spins freely, double-check from various positions to make sure it’s just right. If you can’t make any adjustment to the table or surface, try a small shim like a piece of cardboard or felt. Ensuring that your 'table is level is super important for the next steps.
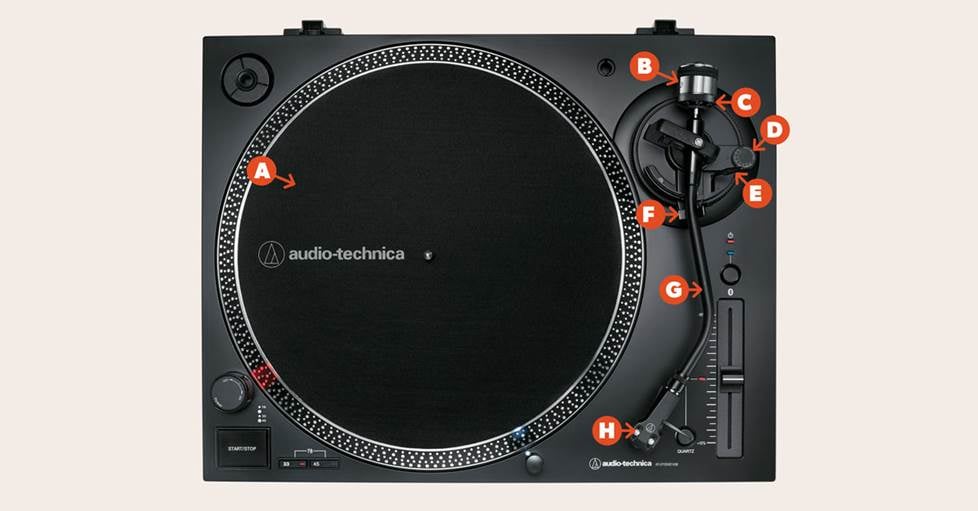
Turntable parts list: A) Platter, B) Counterweight, C) Counterweight dial, D) Anti-skate weight, E) Tonearm lift lever, F) Tonearm rest, G) Tonearm, H) Headshell
Now, if your cartridge has a stylus guard or protective cover on it, you’ll need to remove it.
Locate the anti-skate weight adjustment dial (E), if the 'table has one, and set it to zero.
Next, using the lift lever (F), gently raise the tonearm (G) from its rest (D) and move it over the platter (A) — you'll notice it will either drop towards the record or lift away. Your goal is to get the arm to "float" perfectly parallel to the platter.
Turn the counterweight (B) — a small, cylindrical piece at the back of the tonearm, which is typically metal with a sleek, matte finish and features a ridged, numbered dial (which we will discuss later). Turn the entire counterweight to make the tonearm either heavier or lighter.
Turning the counterweight clockwise decreases the weight, making the arm drop, and counterclockwise does the opposite. And since small adjustments can make a big difference, go slowly. This is the most crucial step, so as Axl Rose once said, "All you need is just a little patience."
Remember, the stylus is very delicate, so care should be taken to not let it drop fully to the platter during this process. A good practice is to have one hand ready to prevent drops while the other hand makes the adjustments.
Once the tonearm is balanced and floating level with the platter, set it back on its rest and lock it down.
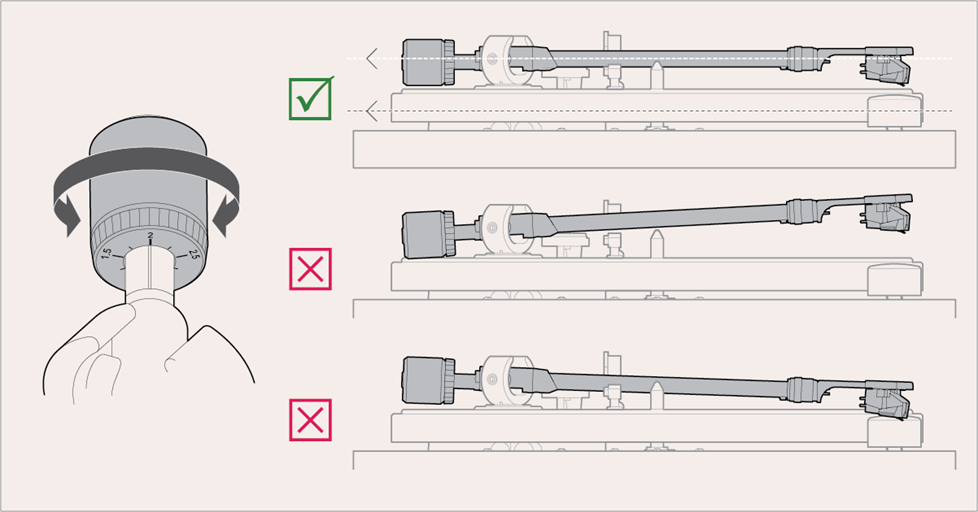
A properly balanced tonearm will sit perfectly level to the platter. Too little weight will cause the arm to lift, and too much weight will make it drop.
Next, you need to set the proper tracking force, which ensures the arm traces the groove correctly without skipping or causing audio issues.
What is Tracking Force?
Tracking force is the weight with which your turntable’s needle presses down on the record. As mentioned above, getting it right is crucial to proper playback and great sound. It’s also important for keeping your vinyl in good shape.
If the tracking force is too heavy, the stylus pushes too hard, leading to distortion, bad channel separation, and possible damage to the record. If it’s too light, the stylus could skip, bounce out of the groove, scratch the record, and potentially damage itself.
Zeroing out the counterweight
Start by setting the dial (C) on the counterweight to zero. Hold the back of the counterweight steady and turn only the numbered part until zero lines up with the 12 o’clock position. It’s crucial to keep the back of the counterweight in place while you do this.
The balancing act we just completed relies on the back of the counterweight staying where it is, so make sure to only move the dial, not the weight. The dial should spin freely and independently from the weight. This step zeroes out the tonearm, ensuring that the downforce is applied accurately when you make your final adjustments.
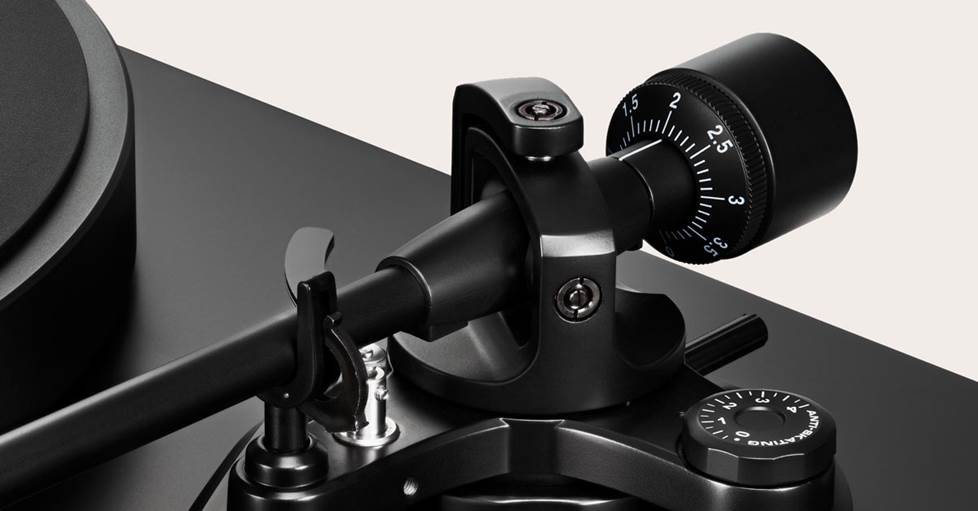
Here’s a photo of a counterweight set to 2 grams. The back of the tonearm has a marking to help you find the right position.
Applying the tracking force
Now that the dial is zeroed out, you can adjust the entire counterweight (both the dial and the weight) to set the tracking force according to your cartridge’s recommended weight. This could be in grams (g) or millinewtons (mN), depending on your turntable's specifications.
So, let’s say the recommended downforce is 15 mN (or 1.5 g). To apply this, start with the counterweight set to zero, just as we left it. Now, turn the entire counterweight counterclockwise until the dial reads 15 (or 1.5) at the 12 o’clock position. There is usually a centerline marking on the back of the tonearm, nearest the weight, to indicate the correct, 12 o'clock position as well.
One final step
If your turntable has an adjustable anti-skate weight, the one we set to zero at the beginning of the process, set it to match the tracking force (e.g., 1.5). If your 'table doesn't have a dial, but instead offers a hanging weight, refer to the owner's manual for the correct position based on the cartridge being used. This adjustment helps keep the tonearm from drifting towards the center of the record.

A close-up of an anti-skate adjustment set to zero. In the example above, you’d need to adjust the dial to 1.5, right between the 1 and 2.
Your turntable may offer additional features, like vertical tracking force or azimuth adjustment, but unless you've replaced the cartridge or other turntable parts, it's best to stick with the factory settings — they’re already optimized and don’t need tweaking.
And there you have it — your tonearm is now balanced and ready to deliver some seriously sweet sound from your records!
A little help
Need a little help with the process? A force gauge could be your new best friend. It’s a simple yet precise tool that takes the guesswork out of balancing your turntable. Just place the gauge on the platter, lower the needle onto it, and voilà — it shows you exactly how much pressure the stylus is applying to the record. This way, you can skip the tricky balancing act and adjust the counterweight until you find the sweet spot. Easy peasy!
Some turntables come with the arm balance pre-set, or feature a counterweight with no markings. In those cases, a force gauge would be needed to help re-balance after swapping out or setting up a cartridge, so having one is always helpful.
Expert advice for your system
Feeling a little unsure about picking a turntable or need help setting yours up? No worries — we’ve got your back! Just get in touch with one of our friendly Advisors for some quick guidance. And remember, you get free lifetime tech support with your Crutchfield purchase.








Paul Weber
Posted on 7/27/2026
I have never understood what all those dials were at the back of the tonearm. I was always overwhelmed. Thank you for clear, concise instructions.
Graham from Lakeland
Posted on 4/19/2026
I have a Technics SLQL1 tangential arm deck. I've never had an issue with sound quality. I always make sure it's level. Just out of interest, is there any adjustability on the arm?
Charles Fontaine from Crutchfield
on 5/7/2026
Lynette from Batavia
Posted on 10/26/2025
A wealth of information and knowledge, thank you!
Bernard Warner from Pittsburgh, Pa.
Posted on 4/6/2025
Great info. Thanks for sharing.